Indulge in Homemade Bliss: The Ultimate Guide to Crafting Perfect Chocolate Covered Marshmallows
There’s a special magic in homemade treats, a secret language spoken between a baker and their loved ones. For me, that language often translates into sweet, chocolate-covered delights. I vividly remember when my daughter, Fuzz, was just a pre-teen. I discovered that a simple chocolate covered marshmallow tucked into her lunchbox was the ultimate peace offering, guaranteeing a lovely disposition for the rest of the day! It was a small gesture, but the joy it brought was immense. Naturally, this delightful discovery sparked a deep dive into the world of chocolate covered marshmallow recipes, transforming me into a passionate explorer of all things fluffy and chocolate-dipped.
This journey led me to experiment with various techniques, from traditional scratch-made marshmallows to quicker, fuss-free options. In this comprehensive guide, I’ll share my experiences with different recipes, offer valuable tips for achieving marshmallow perfection, and even link to an even simpler marshmallow delight for those moments when time is of the essence. Just this week, I rediscovered the power of these delightful confections – they still work wonders in getting on my now 13-year-old daughter’s good side!
Mastering Homemade Marshmallows from Scratch
Making marshmallows from scratch might sound intimidating, but it’s an incredibly rewarding process that yields a product far superior to anything store-bought. The texture is softer, more delicate, and the flavor possibilities are endless. While I’ve often used homemade marshmallow mixtures to pipe out cookies, like my beloved Whippet Cookies, yesterday marked my first successful attempt at pouring the mixture into a pan, allowing it to set, and then meticulously cutting it into perfect squares. The process itself was surprisingly straightforward, yet the initial challenge lay in selecting the ideal recipe.
Navigating the sea of marshmallow recipes available online can be daunting. Many culinary enthusiasts recommended David Lebovitz’s marshmallow recipe, renowned for its use of egg whites, which often results in a lighter, airier texture. On the other hand, chefs like Ina Garten and Alton Brown offered more simplified versions, sans eggs, appealing to those seeking a less complex approach. I initially leaned towards Alton Brown’s recipe, but found the sugar measurement notation a bit unclear, prompting me to reconsider. Ultimately, I settled on Molly Wizenberg’s homemade marshmallows recipe from Epicurious, and it proved to be an absolute winner. It worked perfectly, delivering consistently excellent results. The original recipe specifies potato starch, but like many home bakers, I found that a simple mixture of cornstarch and confectioners’ sugar worked just as effectively for dusting and preventing stickiness, making the process even more accessible.
Tips for Scratch Marshmallow Success:
- **Quality Gelatin:** Ensure your gelatin is fresh and unflavored for the best results. Blooming it properly is crucial for a smooth texture.
- **Accurate Temperatures:** A candy thermometer is your best friend when making marshmallows. Reaching the precise sugar syrup temperature (240°F / 115°C) is key to achieving the correct consistency.
- **Stand Mixer Power:** A stand mixer with a whisk attachment is almost essential. The mixture needs to be beaten for a considerable amount of time (around 15 minutes) to become incredibly thick and stiff, a task that would be challenging with a hand mixer.
- **Preparation is Key:** Line your pan with foil or parchment paper and spray it generously with cooking spray. This will make removing the set marshmallow much easier.
- **The Right Coating:** The combination of confectioners’ sugar and cornstarch is perfect for dusting your workspace and the marshmallows, preventing them from sticking to everything (and each other!).
From Bland to Brilliant: The Magic of Marshmallow Taste and Texture with Chocolate
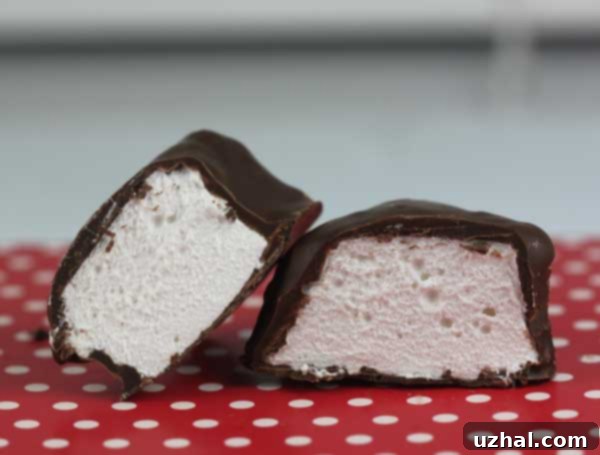
Upon initial cutting, the freshly made marshmallows tasted good, certainly better than anything from a bag, but they didn’t quite deliver that “wow” factor I was chasing. It wasn’t until I allowed them to sit overnight, firming up and developing their full potential, and then finally dipped them into luscious melted chocolate, that the true magic unfolded. The combination of the airy, vanilla-scented marshmallow and the crisp, rich chocolate coating was simply divine. While the process of making these beauties from scratch is undeniably time-consuming, every minute spent is absolutely worth it once they emerge, glistening and irresistible, from their chocolate bath.
Beyond the classic individual dipping method, I also experimented with a more expedient approach, resulting in something akin to Rocky Road Candy. Dipping each individual marshmallow can become a bit tedious, especially if you’re making a large batch. So, I took a shortcut: I lined a loaf pan with nonstick foil, artfully arranged the homemade marshmallows within it, and then poured a generous layer of melted chocolate over the entire lot. For an added layer of texture and flavor, I scattered some walnuts over the chocolate before letting it set. Once firm, I simply cut the whole block into convenient squares. This method is fantastic for creating impressive treats with less fuss, offering a delightful blend of textures and flavors in every bite.
Regarding pan choice, if you desire fatter, taller marshmallows, a 9-inch square pan is ideal. However, I found myself quite content with the slightly less statuesque, yet perfectly dippable, marshmallows produced in a 9×13 inch pan. Their slightly thinner profile made them just right for individual dipping, providing an excellent marshmallow-to-chocolate ratio.
Choosing Your Chocolate and Dipping Techniques:
- **Quality Chocolate Matters:** For the best flavor and melting consistency, choose high-quality dark, milk, or even white chocolate. Chocolate chips work, but a good bar chocolate will melt smoother and taste richer.
- **Melting Method:** A double boiler is excellent for gentle, even melting, preventing scorching. Microwaving on 50% power, stirring frequently (every 30-50 seconds), also works well.
- **Coconut Oil Trick:** Adding a small amount of coconut oil (as suggested in the recipe) helps thin the chocolate slightly, making it easier to dip and ensuring a smoother, glossier finish.
- **Draining Excess:** After dipping, tap the marshmallow gently against the side of the bowl or use a fork to allow excess chocolate to drip off, preventing puddles.
- **Setting:** Arrange dipped marshmallows on nonstick foil or parchment paper and chill until the chocolate is fully set.
- Chocolate Covered Banana Cookies
- Chocolate Covered Cherry Pie
- Chocolate Covered Cherry Cake
- Chocolate Covered Cherry Cookies
- Chocolate Covered Marshmallow Cookies
Chocolate Covered Marshmallows Recipe

Chocolate Covered Marshmallows
Cookie Madness
Pin Recipe
Ingredients
- 1 cup cold water divided
- 3 ¼-ounce envelopes unflavored gelatin
- 2 cups sugar (14 oz/390 grams)
- ⅔ cup light corn syrup
- ¼ teaspoon salt
- 2 ½ teaspoon pure vanilla extract
- ¼ cup confectioner/s sugar
- ¼ cup cornstarch
- ½ pound of your favorite dark chocolate for melting
- ½ pound of your favorite milk chocolate
- Some coconut oil optional
Instructions
-
Line 13x9x2-inch metal baking pan with foil or parchment and spray with cooking spray.
-
Pour ½ cup of the cold water into bowl of a stand mixer fitted with whisk attachment and sprinkle gelatin over water. Let gelatin sit and “bloom” for 15 minutes.
-
Combine 2 cups (14 oz/400 grams) sugar, corn syrup, salt, and remaining ½ cup cold water in heavy medium saucepan. Stir over medium low heat until sugar dissolves, brushing down sides of pan with wet pastry brush. As soon as it begins to boil, cover with a lid and let boil for 2 minutes. Remove lid , insert thermometer and boil until it reaches 240 degree F.
-
With mixer running at low speed, slowly pour hot syrup into gelatin mixture in thin stream down side of bowl. Gradually increase speed to high and beat until mixture is very thick and stiff, about 15 minutes. Add vanilla and beat to blend, about 30 seconds longer.
-
Pour marshmallow mixture into prepared pan. Smooth top with wet spatula. Let stand uncovered at room temperature until firm – at least four hours.
-
Stir confectioners’ sugar and cornstarch together in a small bowl, then sift a generous amount of mixture over a clean work surface covering 9×13 inches of space. Invert the marshmallow onto the sugar mixture and peel away the foil. Sift more sugar mixture over marshmallow. Using a sharp knife coated with nonstick spray, cut mixture into cubes. Toss marshmallows squares in remaining sugar mixture.
-
Chop half the chocolate and put it in the top of a double boiler or a microwave-safe bowl. Add about 2 teaspoons of coconut oil and stir. Melt over simmering water in the double boiler, or melt at 50% power in the microwave, stirring every 30 to 50 seconds (I stir ever 30 seconds for milk and every 50 for dark).
-
Dip marshmallow squares in chocolate and allow excess to drip back into bowl. Arrange pieces on a small tray lined with nonstick foil. Chill until chocolate is set.
Storage and Serving Suggestions
Once your homemade chocolate covered marshmallows have set, store them in an airtight container at room temperature for up to a week, or in the refrigerator for longer freshness. If refrigerated, let them come to room temperature for a few minutes before serving to ensure the marshmallow is at its softest. These delightful treats are perfect for gifting, holiday platters, or simply enjoying as a luxurious everyday indulgence. They also make fantastic additions to a hot chocolate bar, allowing guests to drop a chocolatey, fluffy square into their steaming mugs.
Endless Possibilities: Customizing Your Marshmallows
One of the greatest joys of making marshmallows from scratch is the ability to customize them. While vanilla is a classic choice, consider adding different extracts to your marshmallow base: peppermint for a festive touch, almond for a nutty flavor, or even a hint of espresso for coffee lovers. You can also experiment with spices like cinnamon or nutmeg. For the chocolate coating, don’t stop at just dark and milk! White chocolate can be dyed with food coloring for vibrant, fun treats. After dipping, sprinkle them with various toppings: sea salt for a sweet and salty kick, crushed nuts for added crunch, shredded coconut, or even festive sprinkles. The possibilities are truly limitless, allowing you to tailor these treats to any occasion or preference.
A Sweet Conclusion: The Joy of Making and Sharing
From a simple lunchbox surprise to a sophisticated homemade dessert, chocolate covered marshmallows hold a special place in my heart. They represent not just a sweet treat, but an act of love and care, a way to connect and bring a little extra joy into everyday moments. The process of creating them from scratch, while requiring a bit of patience and precision, is immensely satisfying. And the reward? Pillowy, vanilla-scented marshmallows enrobed in a rich, crisp chocolate shell – a truly irresistible combination that is guaranteed to bring smiles to faces, young and old. So, gather your ingredients, set aside some time, and embark on this delicious adventure. You’ll soon discover the magic of homemade chocolate covered marshmallows for yourself. Happy baking!
