Decadent Mini Chocolate Ice Cream Layer Cake: Easy No-Egg Recipe & Drip Cake Perfection
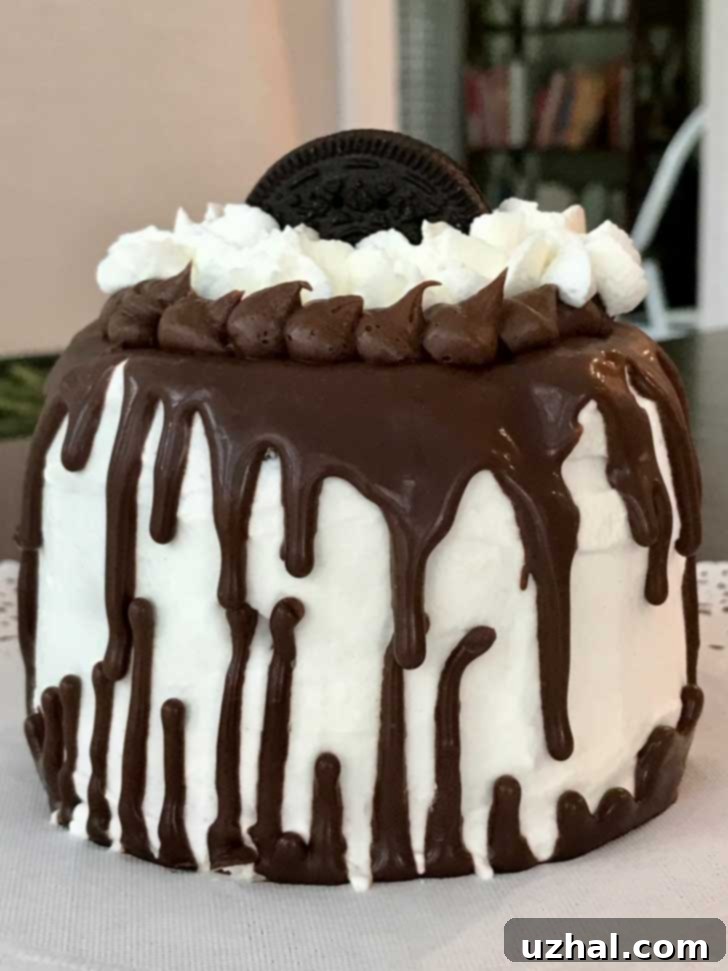
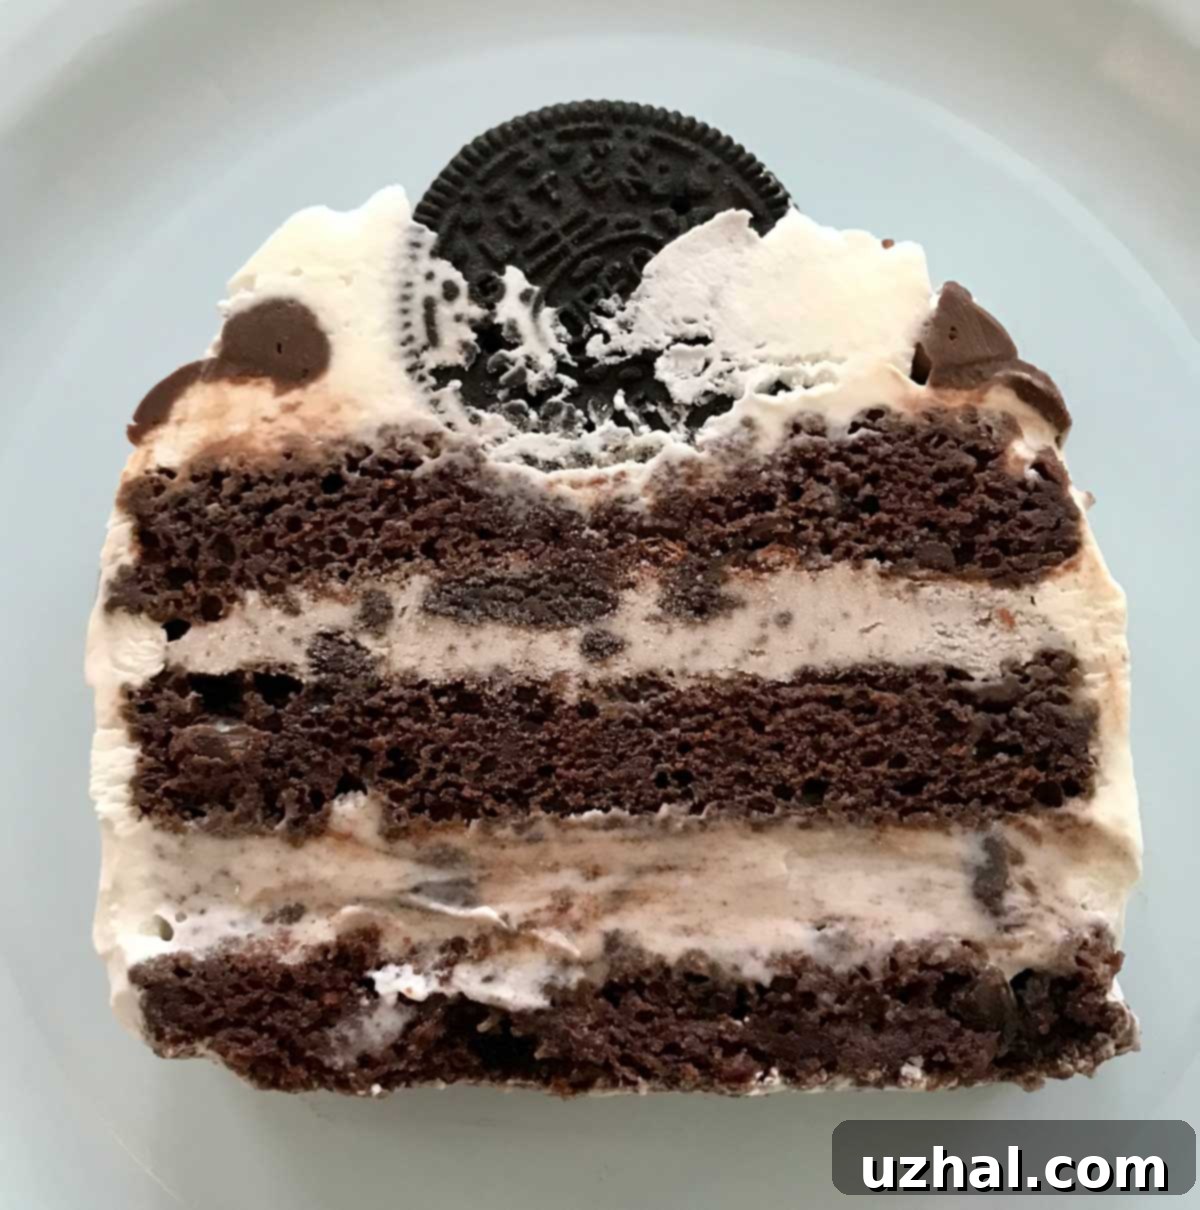
There’s a special joy in baking, and recently, my passion has led me to the delightful world of **mini chocolate layer cakes**. Instead of committing to a large, elaborate dessert, I’ve found a clever and highly rewarding method: baking a single 9-inch cake layer, then using a sturdy 28-oz can to cut out perfect, small rounds. These rounds are then stacked and frosted, effortlessly transforming into an adorable three-layer mini cake. This technique is absolutely fantastic for honing your cake decorating skills without the pressure of a grand occasion, and it yields just enough cake for 3-4 servings, making it an ideal treat for small households or intimate gatherings. Today, I’m thrilled to share my latest creation: a rich and incredibly moist **no-egg chocolate cake** transformed into a stunning mini ice cream cake, complete with a beautiful chocolate drip. And yes, I’m still perfecting that elegant drip – it’s all part of the fun of baking!
Jump to Recipe

The Ultimate No-Egg Chocolate Cake Recipe for Mini Creations
While you can certainly adapt any cake recipe for these miniature marvels, I particularly favor this **no-egg chocolate cake recipe** for its consistent results and amazing texture. Its simplicity is a dream – an easy “stir-and-bake” method that skips the eggs entirely, making it perfect for those with egg sensitivities, last-minute baking when your egg carton is unexpectedly empty, or simply a preference for a lighter, yet equally delicious, alternative. The secret to its incredibly moist and tender texture lies in the dynamic duo of buttermilk and oil. Buttermilk not only adds a lovely, subtle tang that complements chocolate beautifully but also reacts with the baking soda to create a wonderfully tender and airy crumb. Meanwhile, the oil ensures a consistently moist cake that stays fresh for longer, a highly desirable quality in any rich chocolate dessert.
The chocolate intensity comes from a balanced combination of 2 tablespoons of natural cocoa powder and a scattering of mini chocolate chips. This ensures a deep, satisfying chocolate flavor without being overwhelmingly rich, which is just right for a smaller cake. If you’re familiar with classic “Wacky Cake” or “Depression Cake” recipes, you might recognize some similarities in the ingredient list and method, given their egg-free nature. However, this recipe features slightly different ratios and a touch more complexity in flavor, resulting in a cake that is arguably even more decadent and moist, perfectly suited for layering and pairing with creamy ice cream. The inclusion of brewed coffee, a time-honored trick in many chocolate cake recipes, doesn’t make the cake taste like coffee; instead, it magically enhances and deepens the natural chocolate flavor, elevating it to new, luxurious heights. This makes it an ideal foundation for any mini chocolate dessert, especially when paired with a cold, refreshing filling.
Crafting the Perfect Mini Ice Cream Cake: Filling and Frosting
This versatile **mini cake recipe** offers the flexibility to create either a classic layered cake (perhaps with a delicious buttercream) or an indulgent ice cream cake, which is what we’re focusing on today. For the ice cream cake variation, a creamy, freshly whipped sweetened cream serves as the ideal frosting. It provides a light and airy contrast to the rich chocolate cake layers and the cold, dense ice cream filling. This delicate frosting doesn’t overpower the other flavors and freezes beautifully.
When it comes to the decorative elements, particularly that ever-challenging but rewarding chocolate drip, you have several options for your garnishing frosting. While I’ve become utterly spoiled by the superior taste and smooth texture of homemade chocolate frosting, sometimes convenience is key, especially when your primary focus is on perfecting the drip or intricate piping. Canned frosting can be a surprisingly handy tool for piping and garnishing. You can use it straight from the can for quick application, or, for a smoother, more pipeable consistency that’s easier to work with for fine details, try mixing in a little heavy cream (a tablespoon or two) until it reaches your desired texture. This little trick makes it much simpler to create intricate designs or a flawless drip. Of course, if you have a bit more time and are seeking that truly artisanal touch, this is an excellent opportunity to try my latest no-egg chocolate buttercream frosting recipe. It’s designed to complement this cake perfectly and will elevate your mini cake to gourmet status. For the ice cream filling, choosing a complementary flavor like “Cookies and Cream” or even a classic vanilla adds another layer of texture and taste that perfectly balances the chocolate cake.
The Great Mini Cake Debate: 4-Inch Pans vs. Single-Layer Cut-Out Method
When venturing into the delightful world of **miniature cakes**, bakers often ponder the best approach for creating those perfectly round layers: investing in dedicated 4-inch cake pans or utilizing the clever single-layer cut-out method. Each has its unique advantages and charm, depending on your baking goals and kitchen setup. If you prefer to avoid cake scraps altogether and aim for a perfectly uniform, professional look, opting for dedicated 4-inch cake pans is a straightforward choice. The mini cake pans I’ve been using, typically 4×2 inches, consistently produce perfectly symmetrical layers with minimal fuss. This method ensures every bit of your carefully prepared batter goes into a beautifully formed cake, ideal for a pristine presentation that requires no further trimming.
However, the single-layer cut-out method, which involves baking one larger 9-inch cake and then punching out smaller rounds, holds a special appeal for many bakers, particularly those who love to experiment or enjoy a little “baker’s treat.” By baking one 9-inch layer and then cutting out rounds with a sturdy, cleaned 28-oz can, you achieve the same lovely mini cake layers, but with the delightful bonus of cake scraps. These scraps are far from waste – they’re perfect for tasting your cake before frosting (a crucial quality control step!), a secret indulgence while you decorate, or even transforming into other treats like cake pops, parfaits, or a quick trifle. The “disadvantage” of having scraps can quickly become a delightful advantage for the resourceful baker! This method also offers flexibility; you can make larger layers if you decide to experiment with different sizes or simply don’t want to buy specialized equipment right away. Ultimately, both methods lead to charming mini cakes, so choose the one that best suits your baking style, kitchen philosophy, and desire for those delicious leftover bits!
Explore More Mini Dessert Inspirations
If you’ve enjoyed making this mini chocolate ice cream cake and found joy in crafting a small yet impressive dessert, you’ll love exploring other small-scale baking projects. The world of individual-sized treats is vast and rewarding, offering perfect portions and endless creative possibilities. Here are a few more recipes to inspire your next baking adventure, ideal for individual servings, charming party treats, or simply a delightful indulgence without the commitment of a full-sized cake:
- Peanut Butter Layer Cake – Another delicious layered option.
- Oreo Stack Brownie — Better! – For those who love a cookie and brownie combo.
- Mini Chocolate Chip Cream Cake – If you prefer a lighter, cream-filled option.
- Raspberry Icebox Cake – A refreshing, no-bake alternative.
- Oreo Stack Brownies – Simple, satisfying, and always a crowd-pleaser.
Recipe

Mini Ice Cream Cake
Anna
Pin Recipe
Equipment
-
1 3 to 3 ½ quart plastic bowl with lid (handy for storing your assembled ice cream cake in the freezer, keeping it fresh and protected from freezer burn)
-
1 cleaned 28 oz tomato can with one side removed (our ingenious DIY cake cutter for perfectly round mini cake layers from a single large one)
-
Squeeze bottle or pastry bag with small round tip for dripping While a spoon can work in a pinch, a squeeze bottle or pastry bag offers much greater control for achieving those picture-perfect chocolate drips.
-
9×2 inch round cake pan (for baking the single chocolate cake layer evenly)
-
Electric mixer or stand mixer (essential for whipping the heavy cream to fluffy perfection for the frosting)
-
Small saucepan or microwave-safe bowl (for heating cream for the chocolate ganache drip)
Ingredients
- ½ cup all-purpose flour (65 grams, provides the essential structure for our tender cake)
- ¾ teaspoon baking soda (reacts with the buttermilk to give the cake its lift and characteristic softness)
- ¼ teaspoon salt (a small amount that makes all the chocolate flavors pop)
- 2 tablespoons cocoa powder, natural (12 grams, for a rich and deep chocolate base in the cake)
- 7 tablespoons sugar (90 grams, for sweetness and contributes to the cake’s moistness)
- ¼ cup full fat whole buttermilk (60ml, using whole milk buttermilk ensures the best flavor and texture, if possible)
- 1 tablespoon whole milk yogurt or applesauce (14 grams; this is the crucial binder and moisture provider in our egg-free cake)
- 2 ½ tablespoons light olive oil or vegetable oil (30-32 grams, vital for the cake’s ultimate moist and tender crumb, keeping it fresh longer)
- ¼ teaspoon vanilla extract (pure vanilla extract adds a lovely aromatic depth)
- ¼ cup brewed coffee or use ¼ cup water and ¼ teaspoon espresso powder (doesn’t make the cake taste like coffee, but magically enhances and deepens the chocolate flavor)
- 2 tablespoons mini chocolate chips (for delightful little pockets of melty chocolate goodness throughout the cake)
Filling
- 1 pint Cookies and Cream Ice Cream (you won’t use all of it for one mini cake, but it’s a fantastic flavor combination with chocolate!)
Whipped Cream Frosting
- 1 cup heavy cream (ensure it’s very cold for the best whipping results and stability)
- ¼ cup powdered sugar (sifted for smoothness; adjust to your preferred level of sweetness)
- ½ teaspoon vanilla extract (pure vanilla is highly recommended for the best flavor)
Chocolate Drip
- ½ cup dark chocolate chips (84 grams, or finely chopped good quality dark chocolate for a superior ganache)
- 3 ounces heavy cream (¼ cup plus 2 tablespoons) (84 grams, hot cream helps to create a perfectly smooth, emulsified ganache)
Chocolate Frosting for Garnishing
- Canned Frosting (or your favorite homemade chocolate buttercream; convenient for piping intricate details)
Instructions
-
1. Prepare Your Pan: Preheat your oven to 350 degrees F (175 C). Thoroughly grease a 9×2 inch round cake pan. Line the bottom with a circle of parchment paper or wax paper, then grease the paper again and dust the entire pan with a little more flour, tapping out any excess. This meticulous preparation ensures your thin cake layer will release perfectly without sticking.
-
2. Combine Dry Ingredients: In a large mixing bowl, whisk together the all-purpose flour, baking soda, salt, cocoa powder, and sugar. Ensure these dry ingredients are thoroughly and evenly blended before proceeding; this is crucial to prevent lumps and guarantee consistent leavening throughout your cake. Once mixed, create a small well (a depression) in the center of the dry mixture.
-
3. Add Wet Ingredients & Mix Batter: Pour the yogurt (or applesauce), oil, buttermilk, and vanilla extract directly into the well you created. Begin stirring gently with a whisk or spatula until these wet ingredients are almost fully incorporated into the dry mixture. Next, stir in the brewed coffee; it can be warm or cool, but crucially, not hot if you plan on adding chocolate chips directly into the batter to avoid melting them. Continue to beat the batter by hand with about 40 vigorous strokes or until it appears smooth and lump-free. Finally, stir in the mini chocolate chips until just combined, ensuring they are evenly distributed.
-
4. Bake the Cake Layer: Carefully pour the chocolate batter into your prepared 9-inch pan. Don’t be alarmed by how thin the layer appears; this is intentional for this recipe, designed to create delicate, easy-to-cut layers that form the base of our mini cakes.
-
5. Bake to Perfection: Bake in the preheated oven for approximately 18 to 20 minutes. The cake is done when it looks set, the edges begin to pull away slightly from the sides of the pan, and a toothpick inserted into the center comes out with moist crumbs, not wet batter. Be careful not to overbake, as this can dry out your cake; a moist cake is key for this recipe.
-
6. Cool & Cut: Allow the cake to cool in the pan for 10 minutes. Then, very carefully loosen the edges with the tip of a thin knife. At this stage, you have two options for cutting your mini rounds: either immediately use the 28 oz can as a cutter, or, for cleaner cuts and less crumbling (my preferred method, especially for ice cream cakes), let the cake cool completely in the pan and then transfer it to the freezer. Once firm and cold (after at least 30-60 minutes in the freezer), use your can-turned-cutter to punch out three perfect 4-inch cake rounds. Freeze the cut cake rounds on a plate or small baking sheet until ready to assemble, ensuring they are thoroughly chilled.
-
7. Prepare Whipped Cream: To assemble your ice cream cake, first prepare the luscious whipped cream frosting. In a very cold bowl (chilled for at least 15 minutes in the freezer) with cold beaters, beat the heavy cream on medium-high speed until soft peaks form. Gradually add the powdered sugar and vanilla extract, continuing to beat until stiff peaks are achieved. Be careful not to overbeat, or it will become grainy.
-
8. Assemble Ice Cream Layers: Take one of your thoroughly frozen cake rounds and place it on your desired serving plate or directly into your plastic storage bowl. Spoon a layer of slightly softened (but not melted!) Cookies and Cream ice cream onto the cake, spreading it evenly to the edges. Top with a second frozen cake round, pressing down gently to ensure a good seal. Repeat with another layer of softened ice cream, then finish with the third and final cake round.
-
9. Crumb Coat & Freeze: Spread a very thin layer of the prepared whipped cream over the entire assembled cake. This is your essential “crumb coat,” which neatly traps any loose crumbs and creates a perfectly smooth base for your final frosting layer. Freeze the cake for at least 30 minutes, or until this crumb coat is firm to the touch. Once firm, generously frost the entire cake with the remaining whipped cream, ensuring even coverage. Place the cake back into the freezer to firm up completely before attempting the delicate chocolate drip. While the cake is freezing, prepare your garnishing chocolate frosting. Fill a decorating bag fitted with your desired tip (a small round tip like Wilton #2 or #3 works wonderfully for piping borders or details) with canned or homemade frosting. You’ll likely need about a cup at most.
-
10. Create the Chocolate Drip: For the gorgeous chocolate drip, heat the heavy cream in a small saucepan over medium heat or in the microwave until it just begins to bubble gently around the edges. Remove from heat immediately and add the dark chocolate chips (or finely chopped chocolate). Let the mixture stand undisturbed for about 1 minute to allow the chocolate to melt thoroughly, then stir gently with a whisk until it forms a completely smooth, shiny ganache. Transfer the ganache to a squeeze bottle or a decorating bag fitted with a very small round tip. Working quickly and carefully, pipe small dots of ganache around the top edge of your thoroughly frozen cake, allowing them to gently drip down the sides. Adjust the amount of ganache per dot to control the length and thickness of each drip. For a clean, uniform look, apply the drip consistently around the cake.
-
11. Garnish & Store: Once the chocolate drip is set (which happens quickly on a frozen cake), you can add any additional garnishes using your prepared chocolate frosting from step 9, such as decorative swirls, stars, or borders on top of the cake. Finally, to ensure its freshness and pristine condition, place the finished mini ice cream cake into a plastic tub with a tight-fitting lid, ensuring it’s airtight. Store it in the freezer until ready to serve. This will keep it perfectly preserved and ready to enjoy whenever a delicious craving strikes!
Notes
