The Ultimate Homemade Six-Inch Yellow Cake with Decadent Chocolate Frosting
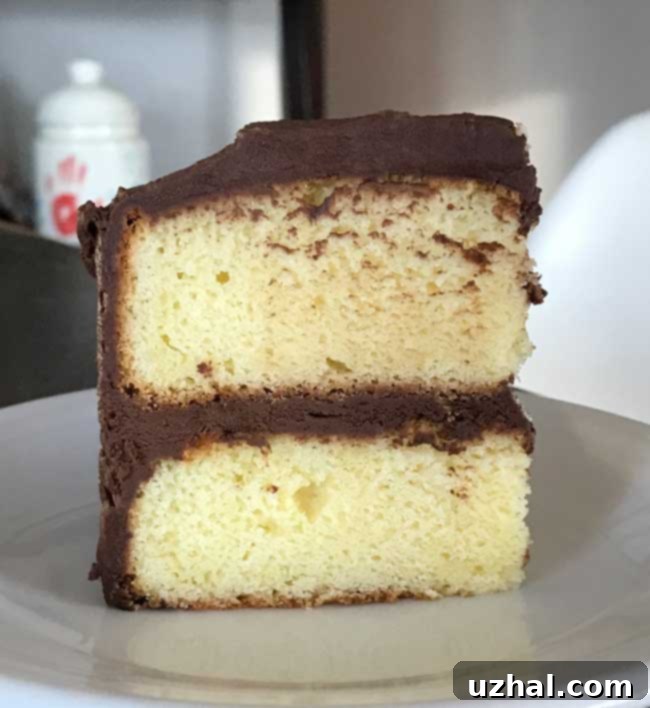
There’s nothing quite like the comforting aroma and taste of a classic homemade cake, and a yellow cake with rich chocolate frosting is a timeless favorite. Lately, I’ve found myself in a delightful cake baking mood, eager to share the simple pleasures of baking from scratch. This particular recipe features a perfectly sized six-inch yellow cake, beautifully complemented by a decadent, velvety chocolate frosting. It’s ideal for smaller gatherings, a special treat for a few, or simply when you crave a delicious slice of cake without the commitment of a full-sized dessert. While some of the accompanying photos might be older, the recipe itself remains constant, delivering consistently delicious results. This is a foundational, moist yellow cake, characterized by a tender crumb rather than a dry texture, ensuring every bite is a pure delight.
Jump to Recipe

This delightful recipe is essentially a scaled-down version (halved, specifically) of a traditional nine-inch round sour cream yellow cake. The magic of this smaller format is that it allows for less waste and feels more manageable for the home baker, yet still delivers that impressive layer cake aesthetic. The cake layers are then generously frosted with my tried-and-true, always-a-favorite chocolate frosting. The combination is simply irresistible – a moist, flavorful yellow cake providing the perfect base for a rich, creamy chocolate topping. It’s a harmonious pairing that truly stands the test of time and satisfies any sweet craving.
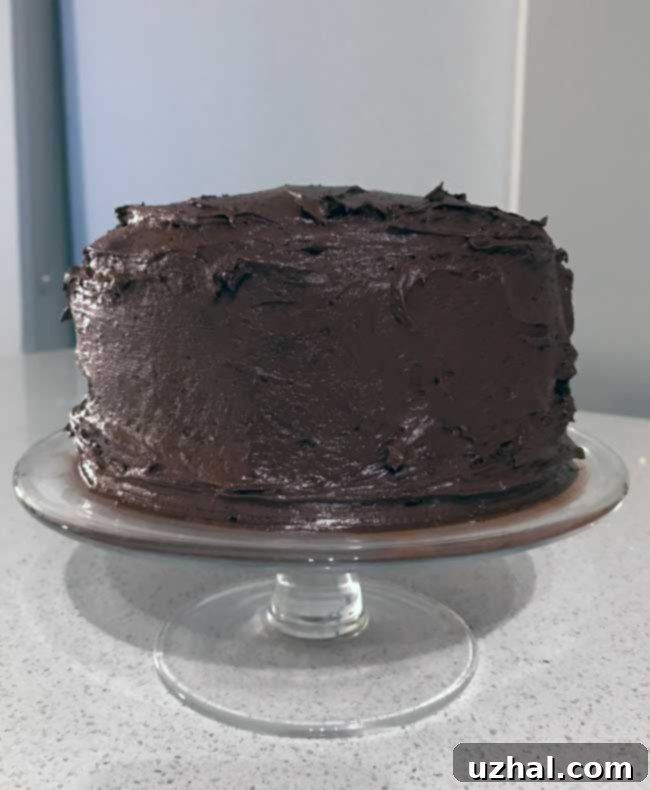
While the overall recipe might appear straightforward, it does call for specific techniques that elevate it beyond a simple “dump and bake” creation. Achieving that wonderfully tender and slightly crumbly (but never dry!) texture requires a few key steps. You’ll need cake flour, which contributes to a finer crumb, and a commitment to meticulous sifting. Furthermore, beating the egg whites separately and folding them into the batter is crucial for the cake’s light and airy structure. These steps might require a bit more time and attention, but the effort is truly rewarding. This is a cake best made when you have a bit of spare time, allowing you to engage in some mindful baking. The process itself can be a meditative experience, and the delicious outcome is a testament to that dedication. The initial picture showcases an earlier attempt at frosting – perhaps not my most “mindful” moment, as I jokingly admit! Nevertheless, it tasted absolutely wonderful, proving that even a less-than-perfect appearance doesn’t diminish the homemade goodness.

Crafting Your Classic Yellow Cake: Step-by-Step Visuals and Tips
To help guide you through the baking process, I’ve included a few visual cues from various stages of making this cake. While I haven’t captured every single step photographically, these images can provide helpful insight, particularly regarding the size of the six-inch cake pans and the proper consistency of beaten egg whites. Understanding these visual benchmarks can make a significant difference in your baking success. You’ll notice that the final cake batter itself is quite thick, which is perfectly normal for this type of rich yellow cake, contributing to its dense yet tender crumb.

- Step 1: Preparing Your Pans for Perfect Release. The first crucial step for any successful layer cake is proper pan preparation. Begin by thoroughly greasing two six-inch round cake pans. Don’t be shy with the butter or baking spray; ensure every crevice is covered. After greasing, dust the pans with a light coating of flour, tapping out any excess. This creates a non-stick barrier, guaranteeing your beautiful cake layers release easily after baking. This seemingly simple step is vital to prevent frustrating sticking.

- Step 2: The Importance of Sifting for a Tender Crumb. Sifting isn’t just for removing lumps; it’s a critical step for aerating your dry ingredients, which translates directly to a lighter, more tender cake. Begin by measuring your cake flour, then sift it together with the baking powder. Once sifted, whisk in the salt until all dry ingredients are thoroughly combined. This ensures even distribution of leavening agents and seasoning, making every bite consistently delicious.

- Step 3: Whipping Egg Whites to Perfection. Separately beating your egg whites is a hallmark of classic yellow cake recipes. This step introduces significant air into the batter, contributing to the cake’s overall lift and delicate structure. Beat the egg whites until they form stiff, glossy peaks. When you lift the whisk, the peaks should hold their shape firmly. Set these aside carefully, as they will be gently folded into the batter later to preserve their volume.

- Step 4: Combining Wet and Dry Ingredients. This is where the main body of your cake comes together. In a separate bowl, cream the softened butter with the sugar until light and fluffy. This step incorporates more air, creating a tender texture. Beat in the egg yolks one at a time, followed by the vanilla extract. Then, gradually add the sifted dry ingredients alternately with the sour cream. This method helps prevent overmixing and ensures a smooth, emulsified batter. Finally, very gently fold in the beaten egg whites. The goal here is to maintain as much air as possible, so use a light hand.

Baking this six-inch yellow cake with chocolate frosting isn’t just about following steps; it’s about enjoying the process, appreciating the transformation of simple ingredients into a beautiful dessert. The effort involved in mindful baking, from carefully sifting flour to gently folding in egg whites, truly pays off in the final product’s superior taste and texture. This cake offers a perfect balance of tenderness, richness, and classic flavor, making it a delightful treat for any occasion, big or small.
Beyond this delicious yellow cake, explore more delightful recipes to satisfy your sweet tooth:
- The Easiest Cake Mix Brownies – For a quick and effortless chocolate fix.
- Large Yellow Cupcakes – A versatile individual serving option using a similar flavor profile.
- Birthday Cake Ice Cream – A fun and festive dessert, perfect for celebrations.
- Yellow Cake with Chocolate Sour Cream Frosting – Another take on the classic combination with a slight variation in frosting texture.
- Last of the Yellow Cakes – Rich Yellow Cake – For those who want to explore different yellow cake variations.
Recipe: Classic Six-Inch Yellow Cake with Rich Chocolate Frosting

Six Inch Yellow Cake with Chocolate Frosting
Anna
Pin Recipe
Ingredients
For the Yellow Cake
- 1 cup plus 2 T. sifted cake flour (sifted before measuring for accuracy and lightness, 114 grams)
- 1 teaspoon baking powder
- ¼ teaspoon salt
- 2 large egg whites (separated from yolks)
- 1 stick unsalted butter (**very important: room temperature, 114 grams)
- 1 cup granulated sugar (200 grams)
- 2 large egg yolks
- 1 teaspoon pure vanilla extract
- ½ cup sour cream (full-fat, room temperature for best results, 114 grams)
For the Decadent Chocolate Frosting
- 8 tablespoons unsalted butter (softened to true room temperature, 114 grams)
- 1 ½ tablespoon sour cream (room temperature, about 25 grams, contributes to tang and richness)
- 3 cups confectioners’ sugar (sift or aerate thoroughly before using for a smooth frosting, 300 grams)
- ¾ cup natural style cocoa powder (highly recommend sifting to prevent lumps, 60 grams)
- 1 pinch salt (enhances chocolate flavor)
- 1 teaspoon vanilla extract
- 4 to 6 tablespoons whole milk or cream or half & half (ensure it’s at room temperature for a smooth emulsion)
Instructions
For the Six-Inch Yellow Cake
-
Preheat your oven to 350 degrees F (175 C). Properly prepare two 6-inch round metal cake pans by thoroughly greasing them with butter or baking spray, then dusting them with flour, tapping out any excess. This meticulous step ensures your cakes release cleanly.
-
Begin by sifting your cake flour into a bowl. For precision and the best texture, weigh it after sifting to ensure you have exactly 114 grams. Then, in a separate bowl, sift together the measured cake flour and baking powder. Add the salt to this mixture and whisk thoroughly until all dry ingredients are uniformly blended. Sifting twice helps achieve the desired light crumb.
-
Using a clean, dry mixing bowl and whisk attachment (free of any grease), beat the two large egg whites until they form stiff, glossy peaks. This means when you lift the whisk, the peaks should hold their shape firmly without drooping. Set these carefully aside, as their volume is essential for the cake’s light texture.
-
In a large mixing bowl, preferably with an electric mixer, beat the room temperature unsalted butter until it is visibly lightened and creamy, approximately 1-2 minutes. Gradually add the granulated sugar and continue to beat for another 3 minutes until the mixture is pale and fluffy. Remember to scrape down the sides of the bowl frequently to ensure all ingredients are evenly incorporated. Next, add the egg yolks one at a time, beating well after each addition until fully blended. Finally, beat in the vanilla extract until just combined.
-
To the creamed butter mixture, alternately fold in the sifted flour mixture and the room temperature sour cream, beginning and ending with the flour. This means you’ll add about a third of the flour mixture, gently fold, then half the sour cream, fold, another third of the flour, fold, the remaining sour cream, fold, and finally the last third of the flour. Scrape the bowl often to ensure everything is thoroughly blended without overmixing. Once everything is just combined, beat the mixture with the electric mixer for only 30-40 seconds on medium speed, performing one final scrape of the bowl. This short beating develops the cake’s structure.
-
With a heavy-duty rubber scraper or spatula, very gently fold in the beaten egg whites. Do this in two or three additions, using a light hand and a folding motion from the bottom to the top of the bowl. The goal is to incorporate the egg whites without deflating the air you’ve built up, which is crucial for a light and tender cake. Stop folding as soon as no streaks of white remain.
-
Carefully divide the delicate batter evenly between the two prepared six-inch pans. Each pan should contain approximately 10 ounces (about 280 grams) of batter. Gently smooth the tops with your spatula to ensure even baking and level cake layers.
-
Bake the cakes in the preheated oven at 350 degrees F for approximately 25-30 minutes, or until the tops are golden and spring back gently when lightly touched in the center. A wooden skewer or toothpick inserted into the center should come out clean. Let the cakes cool in their pans on a wire rack for exactly 10 minutes. Then, carefully invert them onto the wire rack to cool completely. Cooling thoroughly before frosting is paramount to prevent the frosting from melting. While the cakes cool, you can begin preparing your delicious chocolate frosting.
For the Chocolate Frosting
-
A note on ingredients for perfect frosting: Accuracy is key, so be sure to measure your confectioners’ sugar precisely. I highly recommend taking the extra time to sift both the confectioners’ sugar and the cocoa powder. This step is crucial for achieving an ultra-smooth, lump-free frosting texture that spreads beautifully.
-
Ensure all your frosting ingredients – butter, sour cream, and milk/cream – are at true room temperature. The butter should be soft enough to indent with your finger without melting, and the dairy liquids should not be cold. This uniform temperature allows all ingredients to emulsify properly, resulting in a smooth, creamy, and stable frosting.
-
In a large mixing bowl or the bowl of a stand mixer fitted with the paddle attachment, combine the softened butter, room temperature sour cream, sifted confectioners’ sugar, sifted cocoa powder, salt, and initial 2 tablespoons of room temperature milk (or cream/half & half). Mix on low speed until the ingredients just start to come together, forming a thick, somewhat lumpy “sludge.” This initial mixing prevents a cloud of powdered sugar and cocoa from erupting!
-
Once the ingredients are sticking together and form a cohesive (though still thick) mixture, add the vanilla extract. Increase the mixer speed to medium-high and beat the frosting for 3-5 minutes until it becomes incredibly smooth, light, and fluffy. During this process, be sure to stop and scrape down the sides and bottom of the bowl frequently. If the frosting is too thick, gradually add more milk, cream, or half & half, one tablespoon at a time, beating after each addition, until you achieve your desired spreadable consistency. Remember, you want it firm enough to hold its shape but soft enough to spread easily. Once the cakes are completely cool, generously spread this decadent chocolate frosting over them.
Notes
This classic six-inch yellow cake with decadent chocolate frosting is more than just a recipe; it’s an invitation to experience the pure joy of homemade baking. With its moist, tender crumb and rich, velvety frosting, it promises to be a delightful centerpiece for any small celebration or a comforting treat on a quiet afternoon. Embrace the mindful process, and savor the exceptional results of this beloved classic. Happy baking!
