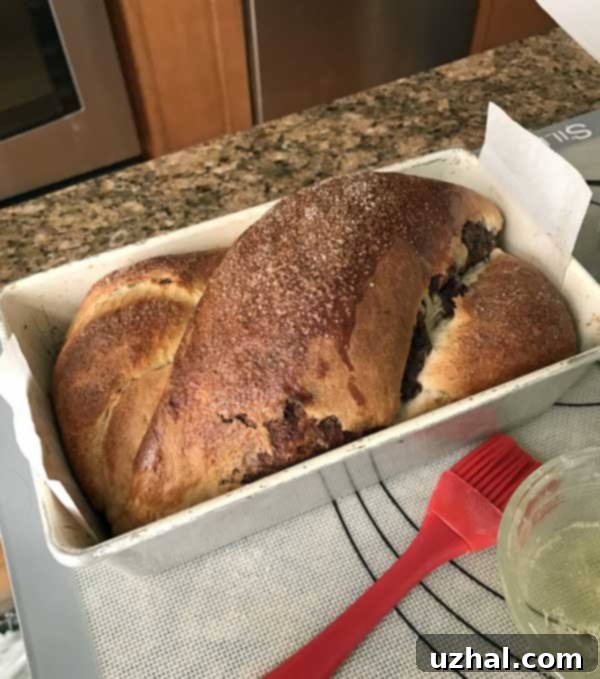
Indulge in Homemade Perfection: The Ultimate Chocolate Swirl Bread Recipe (Easier Than Babka!)
There’s an undeniable allure to a freshly baked loaf of bread, especially when it’s generously swirled with rich, melted chocolate. While often compared to its more intricate cousin, Babka, this Chocolate Swirl Bread offers a simpler, yet equally satisfying, baking experience. We’ve opted for the name “Chocolate Swirl Bread” to highlight its unique charm and distinguish it from our other beloved babka recipes, making it approachable for bakers of all skill levels. What makes this recipe truly special is its relative ease and incredibly delicious outcome, even with a slightly reduced butter content. It’s a perfect introduction to enriched dough baking, promising a soft, tender crumb interwoven with luscious chocolate ribbons that will delight your taste buds. Get ready to bake a show-stopping bread that’s as fun to make as it is to eat!
Crafting the Perfect Chocolate Swirl Bread Dough
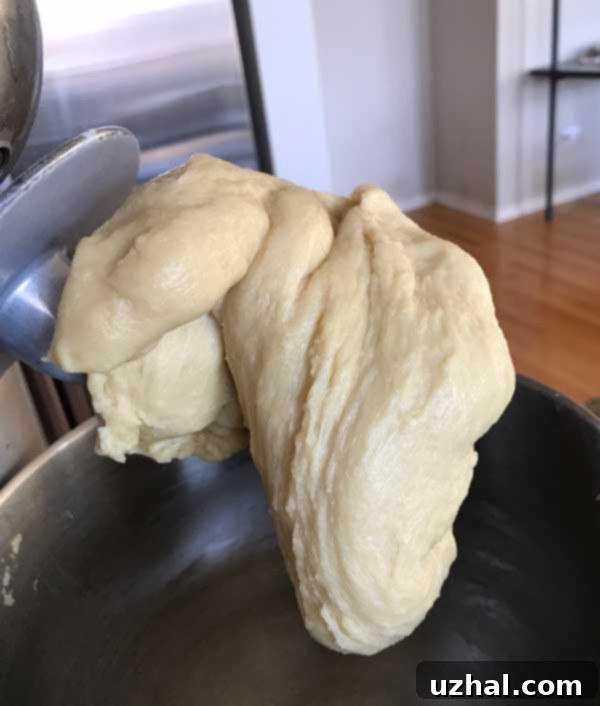
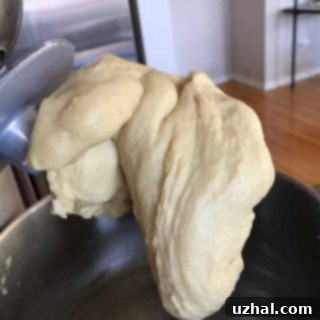
The foundation of any exceptional bread lies in its dough, and our Chocolate Swirl Bread is no exception. We love working with this dough because of its incredibly pliable and cooperative nature. When you first combine the ingredients, the mixture might seem surprisingly soft and sticky, leading you to believe it requires more flour. Resist that urge! This initial softness is key to achieving a tender, moist crumb in the final product. As the kneading process begins, you’ll witness a remarkable transformation. The dough gradually becomes smooth, supple, and beautifully elastic, pulling away from the sides of the bowl to form a cohesive ball.
For best results, we highly recommend using a stand mixer equipped with a dough hook. This recipe involves an enriched dough, meaning it contains butter, eggs, and milk, which contribute to its richness but also make it quite sticky to handle initially. A stand mixer provides the consistent, vigorous kneading required to develop the gluten properly without overworking the dough, ensuring that light and airy texture. While it’s technically possible to knead this dough by hand, it would be a considerably more challenging and time-consuming endeavor, potentially leading to a denser loaf. The machine does all the hard work, leaving you to enjoy the magic of baking and the anticipation of a delicious treat.
Pay close attention to the dough’s texture as it kneads. It should achieve a smooth, almost satiny finish, indicating sufficient gluten development. A good test is the “windowpane test”: stretch a small piece of dough thinly until you can see light through it without it tearing. If it passes, your dough is ready for its first rise, promising a delightful base for the chocolate swirls to come. Remember, the quality of your dough directly impacts the success of your finished bread, so taking a moment to ensure it’s perfectly kneaded is well worth the effort.
The heart of our Chocolate Swirl Bread lies in its luxurious chocolate filling. Crafting the perfect filling is simple, yet offers room for customization to suit your palate. Traditionally, we often turn to 6 ounces of Ghirardelli Bittersweet Chips, melted harmoniously with 3 tablespoons of unsalted butter and 2 tablespoons of granulated sugar. This combination yields a rich, deep chocolate flavor with a balanced sweetness that perfectly complements the tender bread, creating a classic babka-like experience.
However, for this particular iteration, we opted for a slightly different approach, using 6 ounces of Dove dark chocolate melted with just 1 tablespoon of butter. This variation, while still incredibly decadent, allows the pure flavor of the chocolate to shine through, with less added sugar. The beauty of this method is its versatility: it opens up a world of possibilities for experimenting with various types of chopped chocolate. Imagine the delightful burst of flavor from a Lindt Dark Orange bar, a touch of spicy chili chocolate, or even a sophisticated coffee-infused dark chocolate. Simply chop your chosen chocolate bar, melt it gently with the butter, and you have a custom-made filling that’s uniquely yours.
Regardless of your choice, the key is to melt the chocolate and butter together slowly, either in a microwave in 30-second intervals, stirring well after each, or over a double boiler. Ensure the mixture is smooth and free of lumps. It should be warm enough to spread easily but not so hot that it might “cook” the dough. Allow it to cool slightly to a spreadable consistency before applying it to your rolled-out dough. This careful attention to temperature will ensure a clean, vibrant swirl throughout your loaf, preventing the chocolate from soaking into the dough and maintaining those beautiful, distinct ribbons.
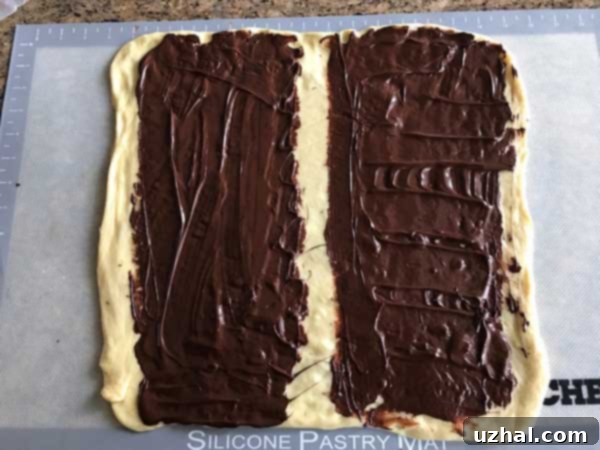
Shaping this Chocolate Swirl Bread is a delightful part of the baking process, and it’s surprisingly straightforward, even for those new to intricate bread designs. Once your dough has completed its first rise and your chocolate filling is ready, the magic begins. Start by gently pressing and rolling your risen dough into a large rectangle, approximately 16×14 inches. The dough should be smooth and pliable from proper kneading, which means you typically won’t need much, if any, extra flour for this step. If you have a large silicone rolling mat, it will make this task incredibly easy, preventing sticking and allowing for precise measurements. For those without a mat, a generously floured clean countertop or a large melamine cutting board will also work effectively.
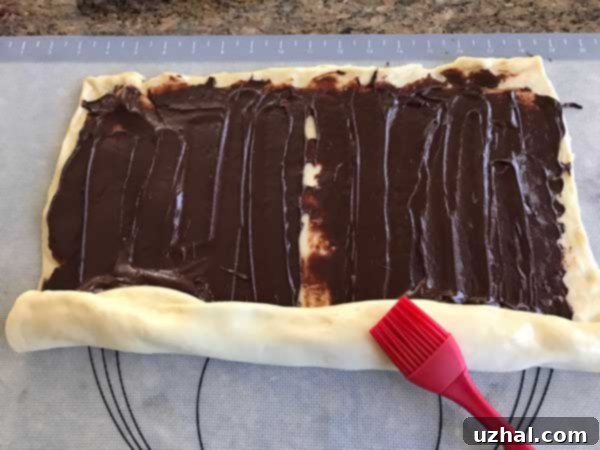
Next, evenly spread your cooled chocolate filling across the entire dough rectangle. Be sure to leave a small border, about ¼ inch, along the right edge and a slightly wider line, about half an inch, down the very middle where you plan to make your cut. This strategic placement ensures the chocolate doesn’t spill out too much when rolling and cutting, maintaining the integrity of your swirls.
Now comes the fun part: creating the roll. Starting from one of the long (16-inch) sides, carefully and tightly roll the dough upwards, just like you would a jelly roll. The tighter you roll, the more distinct and beautiful your chocolate swirls will be. Once you have a compact log, use a sharp knife or a bench scraper to cut it precisely in half along its length. You’ll now have two beautiful, chocolate-filled halves.
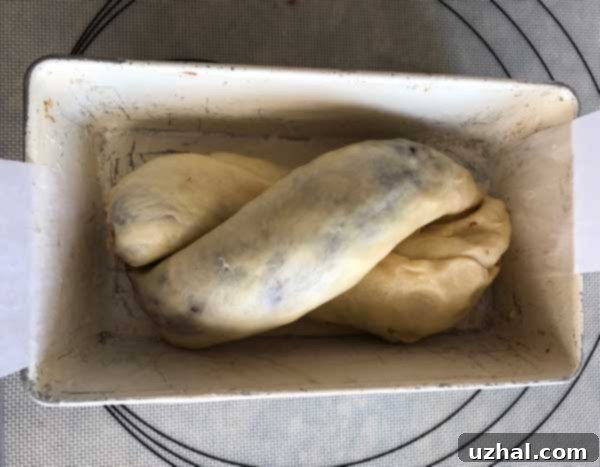
To create the iconic swirl, place these two halves side-by-side, forming an “x” shape. Gently twist the two pieces together, intertwining them from top to bottom. Don’t worry if a little chocolate peeks out – this often adds to the rustic charm of homemade bread. Once twisted, carefully transfer this stunning creation into your prepared 9×5 inch loaf pan. The dough will continue to rise around any exposed chocolate, forgiving any small imperfections. This simple twisting technique is what gives the bread its distinctive, visually appealing marbled appearance, making it as much a feast for the eyes as it is for the palate.
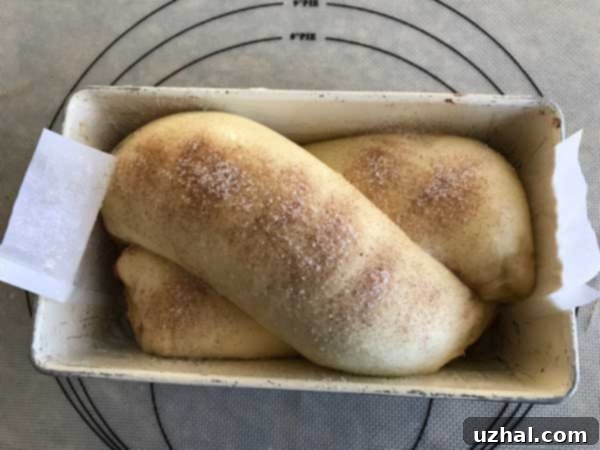
A final touch before baking significantly enhances the appearance of your Chocolate Swirl Bread: the egg wash. While there are several options, we find brushing the risen dough with a lightly beaten egg white yields a beautiful, glossy, and slightly crispy crust. This method is particularly convenient as this recipe uses a whole egg and an egg yolk in the dough, leaving a spare egg white readily available. Using egg white alone provides a lovely sheen without adding too much color, allowing the golden-brown crust to develop naturally and truly highlight the bread’s shape.
Other popular options for an egg wash include melted butter, which imparts a rich flavor and a softer crust; a whole beaten egg, offering a deeper golden hue and more pronounced shine; or even a simple sugar water solution for a less intense gloss. Each option contributes a slightly different finish, but the egg white is a fantastic choice for its accessibility and elegant result. This step isn’t just for aesthetics; it also helps to create a slightly firmer crust that protects the tender interior and allows the cinnamon sugar, if you choose to add it, to adhere perfectly, ensuring every bite is as delightful as the last.
To further elevate the flavor and visual appeal, a sprinkle of cinnamon sugar over the egg-washed loaf is highly recommended. The subtle warmth of cinnamon perfectly complements the rich chocolate, adding another layer of complexity to each bite. Preparing cinnamon sugar is effortless: simply combine about 1 tablespoon of granulated sugar with ½ teaspoon of ground cinnamon. Generously sprinkle this mixture over the top of your loaf just before it goes into the oven. As it bakes, the sugar caramelizes, forming a slightly crunchy, fragrant crust that adds an irresistible texture contrast to the soft bread within. This small addition makes a big difference, transforming a delicious bread into an unforgettable treat that will quickly become a family favorite.
Addressing the “Air Bubble” in Your Chocolate Swirl Bread
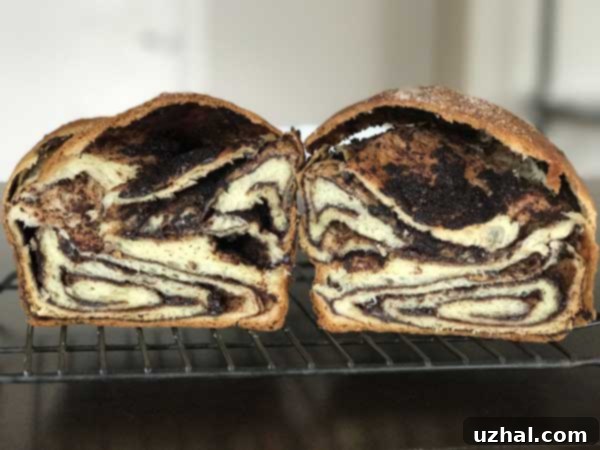
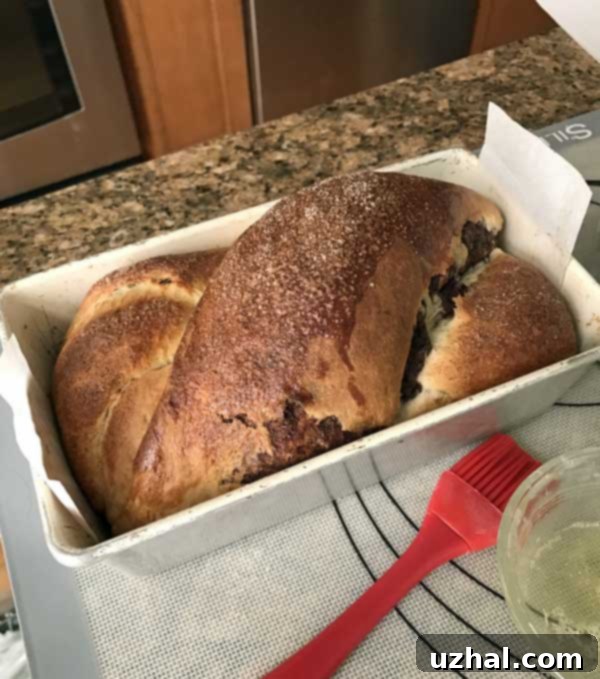
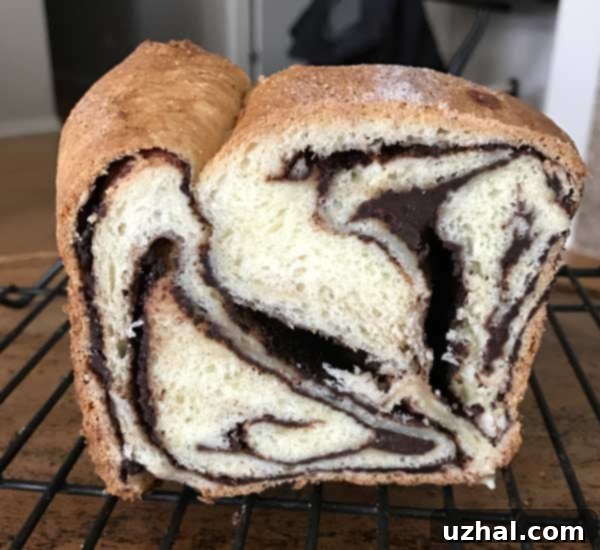
One common characteristic that sometimes emerges with this particular shaping method is the formation of a noticeable air pocket or “bubble” just above the chocolate swirl. While some, like our family, find this a charming and even enjoyable feature, contributing to a lighter texture in that area, it’s a point of interest for many bakers. This air bubble typically forms as the dough expands during its final rise and baking, sometimes separating slightly from the denser chocolate layer. Rest assured, it doesn’t detract from the deliciousness of the bread, but if you’re aiming for a completely uniform crumb, there are strategies to explore.
For those keen on minimizing this air bubble, we’ve experimented with a few techniques. The traditional babka method, for instance, involves splitting the rolled log completely in half and then twisting the exposed chocolate layers. This not only creates a beautiful, striped pattern but also helps to release trapped air and encourages a more even rise, often resulting in fewer large air pockets. While our current method is simpler, adopting a babka-style twist can be a great alternative for a different aesthetic and potentially a denser, more consistent interior.
Experimenting with Rise Times: Lessons from Montreal
Through our baking journey, we discovered an intriguing technique to address the air bubble dilemma. A significant update to our approach involves skipping the conventional first rise of the shaped loaf and instead, allowing it to rise directly in the oven (known as “oven spring”). This method is reportedly common in Montreal baking traditions for similar enriched breads. By eliminating the initial proofing outside the oven, the dough develops less gas before baking, which can lead to a slightly denser crumb and reduce the likelihood of large air pockets forming. The loaf still achieves a good rise, but the expansion is more controlled within the oven’s heat, often resulting in smaller, more evenly distributed bubbles.
Another experimental approach involves adjusting the dimensions of your dough rectangle. If you find the air bubble to be a consistent issue, consider making the rectangle slightly shorter – perhaps 12 inches high instead of the recommended 14 inches. A shorter, and consequently thicker, rectangle means a heavier dough log after rolling. This increased density can make the dough less prone to separating and forming a large air bubble during its rise. The trade-off, however, might be a slightly reduced number of visible chocolate swirls, as the thicker dough will have fewer turns within the loaf. It’s a balance between aesthetics and texture, and your preference will guide your choice.
The Single Rise vs. Double Rise Debate
Further experimentation revealed that a single rise can also impact the air bubble. Allowing the dough to rise just once – either by shaping it immediately after kneading and letting it proof solely in the pan, or letting it rise in the bowl first, then shaping and baking immediately – tends to produce smaller air bubbles throughout the loaf. This single-rise approach results in a loaf that is often slightly heavier and has a more compact texture. While some bakers might prefer this denser crumb, we personally find ourselves returning to the texture of the double-risen loaf, despite the “big air bubble and all!” The double rise contributes to a wonderfully light and airy bread, which we believe enhances the overall experience of this delectable Chocolate Swirl Bread. Ultimately, the choice is yours, and each method offers a unique, delicious outcome, ensuring your homemade bread is always a delight.
- Convection Oven Granola
- Hazelnut Babka with Nutella
- Chocolate Peanut Butter Babka
- Babka Mini Loaves or Regular
- Peanut Butter Swirl Brownies
Recipe
Chocolate Swirl Bread
Anna
Pin Recipe
Ingredients
- 5 tablespoons unsalted butter cut into small chunks**
- ½ cup whole milk
- ½ teaspoon vanilla extract
- 2 cups all-purpose flour, plus more if needed (280 grams)
- 1 ⅛ teaspoons fast rising yeast
- ¼ cup granulated sugar
- ⅜ teaspoon kosher salt
- 1 large egg
- 1 large egg yolk
- 2 teaspoons of olive oil or vegetable oil
Filling
- 6 oz Dove or Lindt dark chocolate
- 1 tablespoon unsalted or salted butter
- Egg Wash: Reserved Egg White
- Cinnamon Sugar as needed (1 tablespoon sugar plus ½ teaspoon cinnamon)
Instructions
-
In a 2 cup glass microwave-safe measure, melt the butter. Add the milk and heat again until the mixture is very hot. Let cool to between 125 and 130 degrees. While it is cooling, stir in the vanilla.
-
Meanwhile, mix the flour, yeast, sugar and salt together in the bowl of a stand mixer. Add the warm milk mixture and stir well by hand or with the paddle, then add the egg and yolk and stir until well mixed. The batter should feel pretty sticky at this point.
-
Put the bowl on the mixer stand and attach the dough hook. Let the machine knead for about 1 ½ minutes, then scrape down side of bowl. Continue kneading and scraping every 1 ½ minutes until the dough becomes smooth and elastic and clears the side of the bowl (it will still stick to the bottom). Total time should be 6 to 8 minutes.
-
Transfer the dough to a large bowl in which you have placed the 2 teaspoons of oil. Roll the dough around in the oil. Cover with plastic wrap and let rise in a warm place for about 45 minutes.
-
Grease a 9×5 inch loaf pan, line vertically with a strip of parchment paper, then grease again and dust sides with flour.
-
Filling: Melt chocolate and butter together in the microwave on high, stirring every 30 seconds. Set aside.
-
Press and roll dough into a 16×14 inch rectangle. I do this on a big silicone mat, but a large melamine cutting board or very clean surface should work.
-
Dough should be slick and easy to press, therefore you shouldn’t need flour at this point.
-
Spread the chocolate mixture across the rectangle, leaving about ¼ inch on the right and a half inch wide line down the middle where you will be cutting.
-
Starting at the long (16 inch) side, roll upwards, as tightly as you can, into a jelly roll.
-
Cut the roll in half so that you have two rolls. Set them side-by-side, then form an “x”. Twist the tops an bottoms and do your best to pinch the edges, but don’t worry too much about chocolate leakage, as the dough will rise around it. Carefully scoop up the loaf and fit it into your loaf pan.
-
Allow unbaked loaf to rise for about 45 minutes.
-
At some point while it is rising, preheat oven to 350 degrees F.
-
Brush egg white lightly over the risen loaf. Sprinkle with cinnamon sugar.
-
Bake the for about 45 minutes. Transfer pan to a wire rack and let cool in pan 15 minutes, then loosen sides with a knife. Allow it to cool for several hours (I keep it in the pan) before cutting.
-
If you want, freeze the loaf overnight and slice while frozen.
Notes
For an alternative decadent chocolate filling, we highly recommend using 1 cup (6 oz) of Ghirardelli bittersweet chips, melted with 3 tablespoons of butter. For extra sweetness and depth, stir in 2 tablespoons of superfine sugar to this mixture. Experiment to find your perfect balance!
