Chocolate Sugar Cookie Pink and Whites: A Delicious Twist on a Classic Recipe
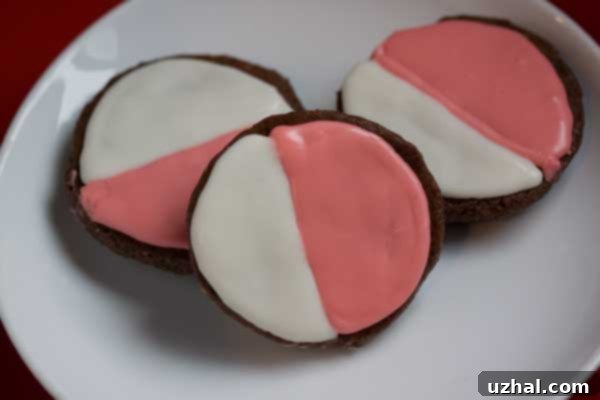
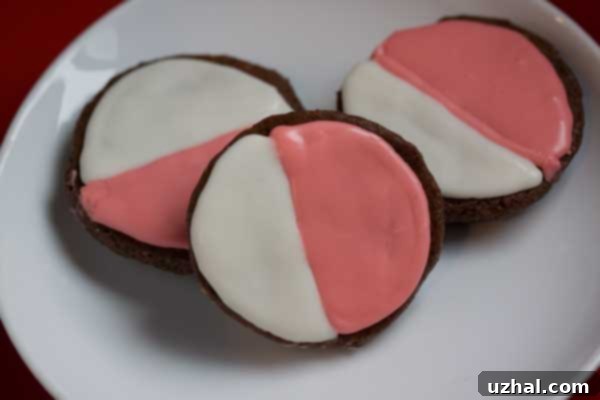
There are days when unexpected delays turn into delightful opportunities, and this morning was one of them. With school starting two hours late, my wonderful helper, Fuzz, and I seized the chance to dive into some baking. Our mission? To create a special batch of “Chocolate Sugar Cookie Pink and Whites.” This recipe is a vibrant and utterly delicious variation of the beloved New York Black & White cookie, but with a richer, more indulgent twist: a decadent chocolate sugar cookie base, perfectly complemented by a beautiful swirl of pink and white icing.
Imagine the soft, cake-like texture of a classic Black & White, but infused with deep chocolate flavor, then adorned with cheerful pastel icing. That’s exactly what these cookies deliver. They are visually stunning, a true showstopper for any occasion, and incredibly fun to make. Whether you’re a seasoned baker or just starting out, this recipe promises a rewarding experience and a tray full of smiles.
The Irresistible Chocolate Sugar Cookie Base: A Hershey’s Legacy
The foundation of these incredible cookies is an old, reliable chocolate sugar cookie recipe from Hershey’s. And let me tell you, Hershey’s knows chocolate! This base isn’t just a vehicle for icing; it’s a star in its own right. It bakes up into a tender, rich, and incredibly flavorful cookie that has just the right amount of sweetness to balance the vibrant icing. Unlike many sugar cookies that are designed to be crisp, this recipe yields a soft, slightly cakey texture, which is quintessential for a Black & White style cookie.
Creating the perfect cookie base starts with the right ingredients and technique. Make sure your butter is truly softened – this allows it to cream beautifully with the sugar, incorporating air and creating a light texture. The room temperature egg is also crucial for emulsification, ensuring a smooth, cohesive dough. For the dry ingredients, specifically the all-purpose flour, remember the note to “stir and spoon” into your measuring cup. This technique prevents over-packing the flour, which can lead to dense, dry cookies. A kitchen scale is an even more accurate way to measure flour by weight (6.8 oz for 1 ½ cups), guaranteeing consistent results every time.
The natural unsweetened cocoa powder is key to achieving that deep chocolate flavor without adding extra sweetness. And the buttermilk? It’s the secret ingredient for tender, moist cookies. Buttermilk reacts with the baking soda, creating air pockets that contribute to the cookie’s soft crumb. If you don’t have buttermilk on hand, you can easily make a substitute by adding a tablespoon of white vinegar or lemon juice to regular milk and letting it sit for 5-10 minutes until it slightly curdles. This simple trick ensures you never miss out on that essential tenderness.
Crafting the Iconic Pink and White Icing
The icing is what truly transforms these chocolate sugar cookies into “Pink and Whites.” It’s the same reliable icing recipe I use for all my traditional Black & White cookies, but with a fun, colorful twist. For the white icing, we keep it pristine and classic. For the pink, we simply omit the cocoa powder and add a few drops of red paste food coloring to the white icing base. Using paste food coloring is highly recommended over liquid, as it provides intense color without altering the consistency of your icing.
The key to perfect icing for these cookies is achieving the right consistency. It needs to be thin enough to spread smoothly but thick enough to stay put and not run off the sides. This is where the “add your milk a teaspoon or so at a time” advice becomes critical. It’s much easier to add more liquid than to fix an overly runny icing. Start with the specified amount, mix thoroughly, and then gradually add tiny increments of milk until you reach a pourable yet slightly thick consistency – think honey or a thick syrup. It should coat the back of a spoon and drip slowly.
Piping the icing is part of the fun! Setting a decorating bag in a glass and folding down the sides creates a stable “cuff” that makes filling the bag mess-free. Once filled, you’ll snip the tip of the bag, allowing for controlled application. The goal is to cover half of each cooled cookie with white icing and the other half with pink. The contrast is what gives these cookies their signature look and makes them so appealing.
After applying the icing, patience is a virtue. Allow the cookies to sit at room temperature until the icing sets completely. This process can take a couple of hours, depending on humidity. Once set, the icing forms a slightly firm shell, making the cookies easy to handle and stack without smudging their beautiful design.
Recipe

Chocolate Sugar Cookie Pink and Whites
Cookie Madness
Pin Recipe
Ingredients
- 1 ½ cups all-purpose flour 6.8 oz, weight or stir and spoon into cup
- ½ teaspoon baking soda
- Scant ½ teaspoon salt
- ½ cup natural unsweetened cocoa powder
- 10 ½ tablespoons unsalted butter softened
- 1 cup granulated sugar
- A large egg at room temperature
- ¾ teaspoon vanilla extract
- ⅓ cup buttermilk
White Icing
- 1 ¾ cups plus 2 tablespoons 8 oz powdered sugar
- 1 ½ tablespoons cream
- 1 ½ tablespoons milk plus more as needed
- 1 teaspoon corn syrup
- 1 teaspoon of vanilla extract
Pink Icing
- 1 ¾ cups plus 2 tablespoons 8 oz powdered sugar
- 2 tablespoons cream
- 1 ½ tablespoons of milk plus more as needed
- 1 teaspoon of corn syrup
- A few drops of red food coloring paste
Instructions
-
Preheat oven to 350 degrees F. Have ready two large baking sheets lined with parchment paper.
-
Mix together the flour, baking soda, salt and cocoa powder and set aside.
-
In a large mixing bowl using an electric mixer, beat the butter and sugar until creamy. Add the egg and beat until mixed, then beat in the vanilla. Add the buttermilk and flour mixture alternately until you have a smooth, thick, batter.
-
Using a generously heaping tablespoon, drop the dough onto the baking sheets spacing 2 inches apart. Bake for 12-14 minutes or until cookies appear set and spring back when touched. Remove from baking sheets and let cool.
-
Set a decorating bag in a glass and pull sides down to make a little cuff . Do not snip the bottom or add a decorating tip at this point.
-
To make the white frosting, combine the powdered sugar, cream, milk and corn syrup in a bowl and stir until thick. Add corn syrup and vanilla. Add more milk, 1 teaspoon at a time, until batter is thin but not runny. Transfer to the decorating bag.
-
Repeat the same steps with the pink frosting recipe, only add the red food coloring Transfer to another decorating bag.
-
When cookies are completely cool, turn them over so that the flat side is up. Snip the tip off the white decorating bag and pipe filling over half of each cookie. Repeat with the pink icing.
-
Let cookies sit at room temperature until the icing sets.
Tips for Success and Creative Variations
Baking is a delightful blend of science and art, and a few key tips can elevate your Chocolate Sugar Cookie Pink and Whites from good to unforgettable:
- Quality Ingredients Matter: Use good quality cocoa powder for the richest chocolate flavor. Fresh, unsalted butter and good vanilla extract also make a noticeable difference in the final taste.
- Don’t Overbake: These cookies are meant to be soft. Watch them carefully and remove them from the oven when they appear set and spring back slightly when gently touched. Overbaking will result in a dry, crumbly cookie.
- Cool Completely: This cannot be stressed enough! Icing warm cookies will cause the icing to melt and run, ruining the distinct pink and white halves. Ensure your cookies are entirely cool before you begin decorating.
- Icing Consistency is Key: As mentioned, slowly add milk to your icing until it reaches the desired consistency. It should be thick enough to pipe and hold its shape, but thin enough to spread smoothly without tearing the cookie surface.
- Smooth Icing Technique: After piping half the cookie with one color, use a small offset spatula or the back of a spoon to gently smooth the icing to the edge, creating a clean line. Repeat with the second color.
Want to get creative? These Pink and Whites are incredibly versatile! Consider these variations:
- Seasonal Colors: Swap pink for light blue for a baby shower, green for St. Patrick’s Day, or orange for Halloween. The possibilities are endless!
- Flavor Boosts: Add a tiny amount of almond extract to the vanilla icing for a different flavor profile, or a touch of peppermint extract for a festive holiday treat.
- Sprinkle Fun: While the classic Black & White doesn’t traditionally have sprinkles, a light dusting of coordinating sprinkles on top of the wet icing before it sets can add an extra layer of festivity and texture.
- Mini Cookies: Use a smaller scoop for mini versions, perfect for bite-sized party favors or for those who just want a little taste. Adjust baking time accordingly.
A Sweet Treat for Any Occasion
These Chocolate Sugar Cookie Pink and Whites are more than just a dessert; they’re a celebration in cookie form. Their striking appearance makes them perfect for birthday parties, bridal showers, baby announcements, or even just a thoughtful gift for a loved one. They evoke a sense of nostalgia while offering a fresh, exciting flavor experience.
Sharing these cookies with family and friends, especially after a fun morning baking session like the one Fuzz and I had, adds an extra layer of warmth and joy. There’s something truly special about a homemade treat that looks as good as it tastes, bringing smiles to everyone who tries them.
So, next time you’re looking for a delightful baking project that’s both engaging and delicious, turn to this Chocolate Sugar Cookie Pink and Whites recipe. It’s a wonderful way to brighten anyone’s day and create sweet memories.
Don’t forget to come back and let us know how your batch turned out! Happy baking!
