Homemade KFC Little Bucket Chocolate Pudding Parfaits: A Nostalgic Copycat Recipe
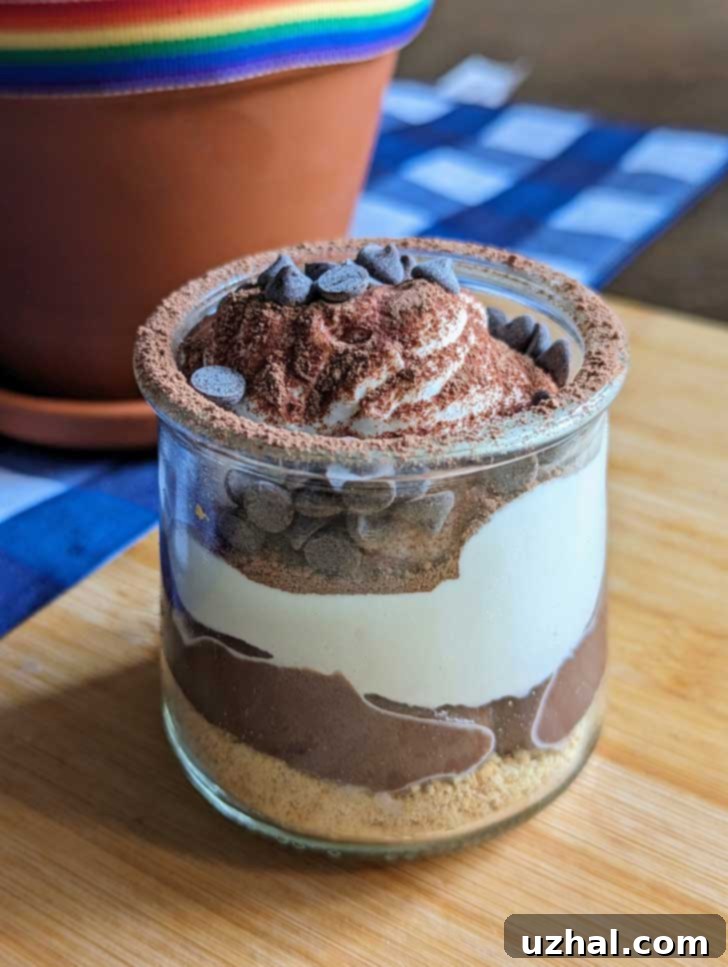
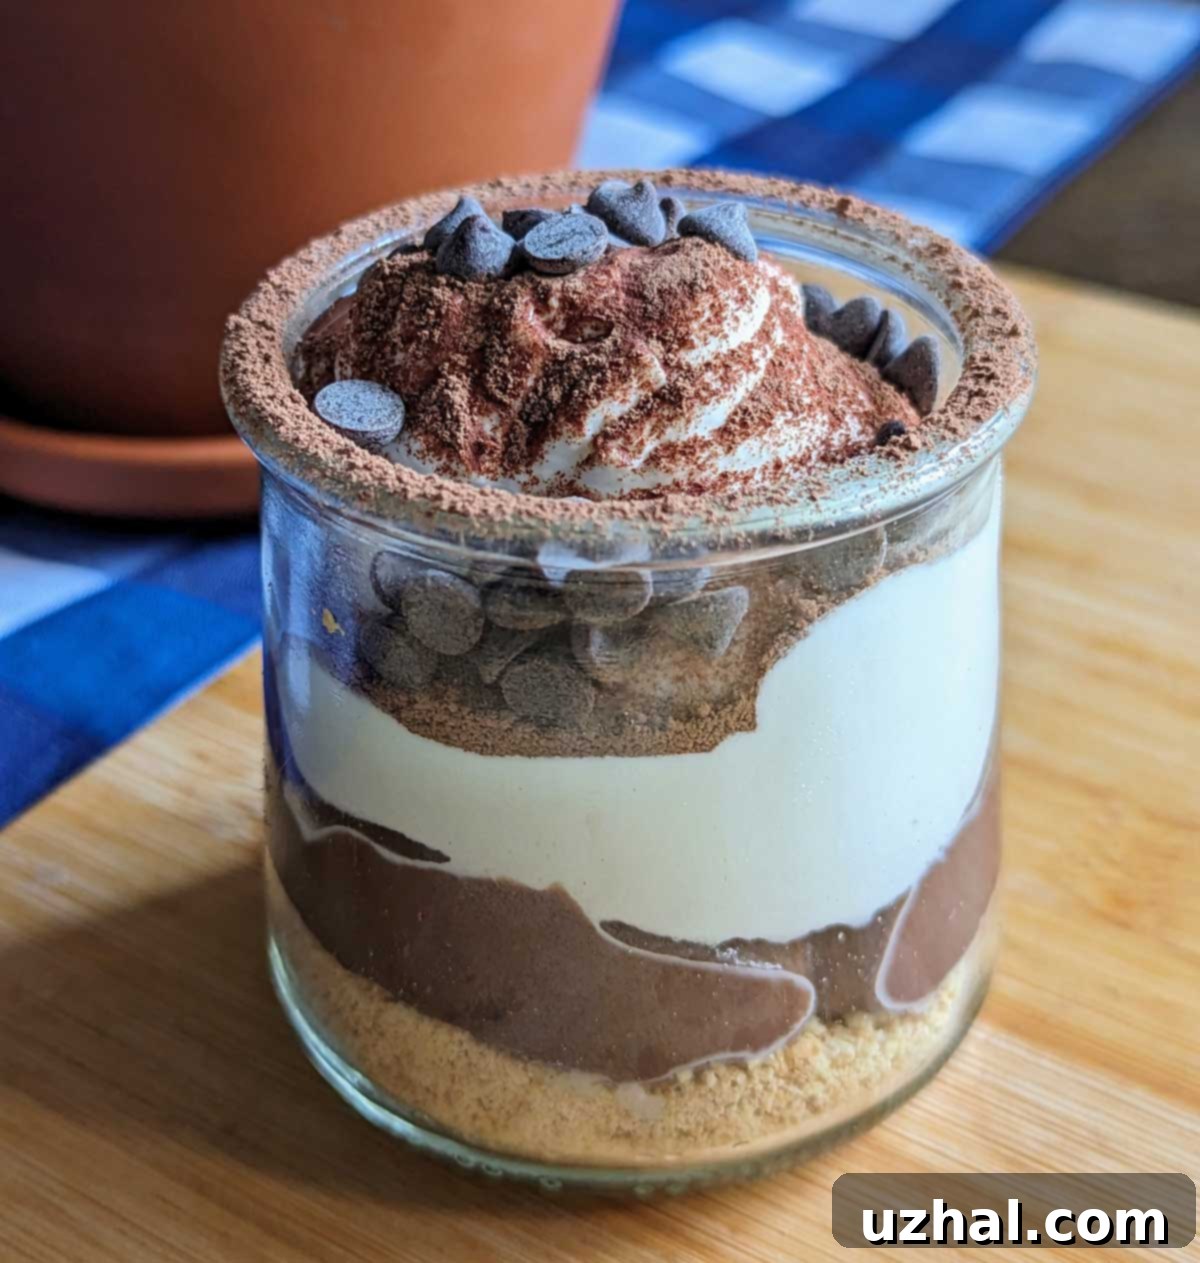
Remember those delightful Little Bucket Pudding Parfaits from Kentucky Fried Chicken? For many, they evoke a powerful sense of nostalgia, a sweet memory from childhood visits to KFC where dessert was often a rare and special treat. Sadly, these iconic parfaits were discontinued years ago, leaving a void in the hearts (and stomachs!) of many dessert enthusiasts. That longing for the simple yet satisfying combination of crunchy crumbs, creamy pudding, and fluffy whipped cream recently inspired me to embark on a culinary quest: to recreate the magic of those Little Buckets right in my own kitchen. What started as a simple banana pudding experiment quickly evolved into a mission to craft the perfect copycat chocolate pudding parfait, designed to bring back those cherished flavors for my family and, of course, for anyone else who misses this classic.

Creating individual servings of these parfaits offers a distinct advantage over a large casserole-style dessert. While a “pudding lasagna” is undeniably delicious (and I’ve got a fantastic Chocolate Lasagna recipe if you’re looking for one!), there’s something uniquely satisfying about having your very own mini-dessert, perfectly portioned and ready to enjoy. It brings back the “little bucket” charm, making each bite feel special. Plus, it’s a wonderful way to control portion sizes and simplify serving, especially when you have a collection of small glass containers just waiting to be repurposed for a delightful treat.
Repurposing Glass Jars for Eco-Friendly Parfaits
In the spirit of the original “little buckets,” I sought out charming individual containers for my parfaits. My secret weapon? Repurposed glass yogurt containers, specifically the Yoplait Oui type. These delightful little jars are not only aesthetically pleasing but also incredibly practical for individual desserts. I genuinely hope they continue to be sold in glass, as the opportunity to give them a second life is something I truly appreciate. It reminds me of a trip to France where we bought mustard in a beautiful glass jar, adorned with Star Wars characters, that cleverly lacked a lip, making it perfect for repurposing into a drinking glass. This kind of thoughtful packaging, which encourages reuse rather than immediate disposal, is a concept I wholeheartedly embrace. Using these glass jars adds a touch of rustic elegance to the parfaits and aligns perfectly with a more sustainable kitchen practice.
If you don’t have Oui yogurt jars on hand, don’t worry! There are plenty of other fantastic options for individual dessert vessels. Small mason jars (4-ounce or 8-ounce sizes work wonderfully), miniature ramekins, shot glasses (for truly tiny treats), or even decorative tea cups can all serve as charming alternatives. The key is to choose containers that allow for clear layering, showcasing the distinct elements of your parfait – the crunchy base, the creamy pudding, and the luscious whipped topping. Reusing containers not only helps the environment but also adds a unique, personal touch to your homemade desserts, making them even more special and a joy to present.
Crafting the Perfect Crumb Layer: Graham Crackers and Creative Alternatives
The foundation of any great parfait is its crumb layer, and for these nostalgic “little buckets,” the graham cracker mixture is paramount. I deliberated quite a bit on whether to use plain ground graham crackers or a more substantial, baked graham cracker crust. To get a definitive answer, my family conducted an informal taste test. My son, Fuzz, found that the baked graham crust mixture offered a more satisfying “reward” at the bottom of the glass – a richer, slightly more robust texture and flavor that felt like a special discovery. However, he was perfectly content with the straight, unbaked graham crumbs as well. I personally enjoyed both versions equally, and if memory serves me correctly, the original KFC parfaits had crumbs that were somewhat sandy, much like plain ground grahams, making the unbaked option a truly authentic choice.
Ultimately, the choice between the two methods comes down to personal preference and the time you have available. For a quick and easy approach, simply grinding graham crackers into fine crumbs is ideal. You’ll want about 9 full graham cracker squares to yield the ⅔ cup of crumbs needed for this recipe. Just pulse them in a food processor or crush them thoroughly in a sturdy zipper-lock bag with a rolling pin until uniformly fine. This method delivers a classic, slightly sandy texture that melts delightfully with the pudding, offering a delicate crunch without being overly firm.
For a richer, more cohesive base that mimics a pie crust, the baked graham cracker crust is worth the extra few minutes. To make this, you’ll combine the graham cracker crumbs with a tablespoon of sugar and two tablespoons of softened butter, along with a tiny pinch of salt (omit if using salted butter, as the salt helps to balance the sweetness). Mix these ingredients thoroughly until the crumbs are moistened and resemble wet sand. Press this mixture into a thin, even slab on a parchment-lined baking sheet and bake at 350°F (175°C) for about 8 minutes, or until it becomes fragrant and slightly toasted around the edges. Once cooled completely, break it apart into crumbs. This baking process transforms the crumbs, deepening their flavor and giving them a delightful, slightly crispier texture that holds up beautifully against the creamy pudding.
And for those adventurous souls looking to experiment, consider other crumbly alternatives! Next time, I plan to use Barnum’s Animal Crackers for a different flavor profile and a touch of whimsy, adding a hint of vanilla and sweetness. Nilla Wafers, crushed shortbread cookies, or even gingersnaps could also provide exciting twists to this classic parfait, offering varying levels of sweetness, spice, and unique textures. Don’t be afraid to get creative with your base; the possibilities are endless for customizing your perfect parfait.
The Heart of the Parfait: A Rich and Creamy Chocolate Pudding from Scratch
While convenience often dictates using instant pudding mixes, there’s truly no substitute for the unparalleled flavor and luxurious texture of homemade chocolate pudding. This recipe yields a small, intensely rich serving of pudding that tastes incredibly decadent, despite using just two tablespoons of cocoa and a tiny bit of butter. Making pudding from scratch allows you to control the quality of ingredients and achieve a silky-smooth consistency that elevates the entire parfait experience to a gourmet level, far surpassing any store-bought alternative.
The beauty of this quick pudding recipe lies in its simplicity and speed. You’ll start by whisking together the dry ingredients – sugar, unsweetened cocoa powder (Dutch or natural, depending on your preference for intensity and color), and cornstarch – in a saucepan off the heat. This crucial step prevents lumps and ensures a smooth start, making your cooking process much easier. Gradually whisk in the whole milk, then follow with a large egg yolk. The egg yolk is a powerhouse ingredient here; it adds incredible richness, helps with emulsification, and contributes to that wonderfully creamy, custard-like mouthfeel that defines truly exceptional pudding. Whisk until the mixture is perfectly blended and smooth, with no visible streaks or clumps, indicating all ingredients are well incorporated.
Once your mixture is ready, place the saucepan over medium heat, or medium-low if your stovetop runs hot (it’s always better to start lower and increase if needed to prevent scorching). The key here is constant whisking. This prevents the pudding from sticking to the bottom, scorching, or forming unwanted lumps, ensuring a uniform texture. Within about 5 minutes, you’ll notice the mixture begin to bubble and thicken significantly. After it starts to boil and thicken, continue to boil and stir for an additional minute; this ensures the cornstarch is fully cooked, preventing any starchy taste and maximizing its thickening power. Remove the saucepan from the heat and allow it to cool slightly, letting the residual heat continue its magic.
Finally, stir in the vanilla extract for a beautiful aroma and the optional teaspoon of butter for added silkiness and richness, which truly takes the texture to the next level. A tiny pinch of salt can also be added to taste, as this helps to enhance the deep chocolate flavor and balance the sweetness, preventing the pudding from tasting flat. Scrape the pudding into a clean bowl. If you need it to cool faster, a technique I often employ is scraping it thinly onto a cold dinner plate. This maximizes the surface area, allowing it to cool down rapidly in about 20 minutes. Once scraped into a bowl or onto a plate, cover the pudding directly with a piece of buttered wax paper or plastic wrap, pressing it down onto the surface to prevent a “skin” from forming as it chills. Transfer it to the refrigerator to cool completely, which typically takes a few hours, but can be accelerated with the plate method.
If you’re looking for a different flavor profile, or need a dairy-free option, this recipe is quite versatile. My family adores this Almond Milk Chocolate Pudding, which can be easily adapted for these parfaits. Simply combine it with a dairy-free whipped topping (like homemade whipped coconut milk or a store-bought alternative) for a delicious, diet-friendly “Little Bucket” copycat that everyone can enjoy.
The Cloud-Like Crown: Elevating Your Parfaits with Fresh Whipped Cream
No parfait is truly complete without a generous dollop of fresh, sweetened whipped cream, and for a small, homemade dessert like this, taking the extra few minutes to whip your own cream makes an enormous difference. The light, airy texture and delicate, natural sweetness of homemade whipped cream are far superior to anything store-bought, adding a luxurious, cloud-like finish that makes these parfaits truly special and wonderfully reminiscent of their original KFC counterparts. It’s the perfect light contrast to the rich pudding and crunchy base.
To achieve perfectly whipped cream, start with very cold heavy cream. For best results, I highly recommend chilling your mixing bowl and whisk attachment in the refrigerator or freezer for 10-15 minutes beforehand. The colder your equipment and ingredients, the faster and more voluminous your whipped cream will be. With an electric mixer (either a handheld mixer or a stand mixer fitted with the whisk attachment), beat the cold heavy cream on medium-high speed until soft peaks just begin to form. This is the stage where the cream holds its shape somewhat when the whisk is lifted but still looks soft and pliable, like a gentle wave. At this point, gradually beat in the powdered sugar and vanilla extract (or vanilla bean paste for a more intense vanilla flavor). Powdered sugar is preferred over granulated sugar for whipped cream because its fine texture dissolves easily, preventing any gritty mouthfeel, and it often contains a small amount of cornstarch, which helps stabilize the cream, making it hold its shape longer.
Continue beating until stiff peaks form. Stiff peaks mean that when you lift the whisk, the cream stands up straight and holds its shape firmly without collapsing. Be careful not to overbeat, as this can quickly turn your beautiful, airy whipped cream into a grainy, separated mess, or even butter! The fresh vanilla and natural sweetness of the cream truly shine through, providing a perfect counterpoint to the rich chocolate pudding and crunchy graham cracker base. For a beautifully neat presentation, once whipped, transfer your cream to a piping bag with a star tip, or a sturdy zipper-lock bag with the corner snipped off, for easy piping onto your parfaits.
For those opting for a dairy-free version of these parfaits, you’re in luck! The market now offers an impressive array of high-quality dairy-free whipped toppings. Whipped coconut milk is a fantastic homemade option; simply chill a can of full-fat coconut milk overnight, then scoop out the thick cream from the top and whip it with a sweetener and vanilla extract until fluffy. Alternatively, many excellent store-bought dairy-free whipped toppings are available, often made from almond, oat, or soy milk, making it easy to enjoy this delicious dessert regardless of dietary preferences, ensuring everyone can indulge in this nostalgic treat.
Making these “Little Bucket” parfaits has been a thoroughly enjoyable and rewarding experience, much more so than simply buying a dessert. They are simple to prepare, yet incredibly satisfying, bringing back sweet memories with every spoonful. The combination of textures – crispy crumbs, smooth, rich pudding, and airy, delicate cream – is simply irresistible and a testament to the power of homemade treats. This recipe is not just about recreating a dessert; it’s about recapturing a piece of culinary nostalgia and sharing it with loved ones, creating new memories around old favorites. And with the resounding success of this chocolate version, I’m already looking forward to my next project: a delightful banana version to continue the parfait adventure!
- Chocolate Cream Pie Parfait
- Lofthouse Cookie Madness
- Greek Yogurt Brownies with Self-Rising Flour
- Glass Dish Brownies
- Favorite Brownie Recipes of All Time
Recipe

Little Buckets Parfait
Pin Recipe
Equipment
-
Electric Mixer
Ingredients
- ⅔ cup graham cracker crumbs (from 9 squares)
- 1 tablespoon sugar
- 2 tablespoon butter, softened
- tiny pinch salt, can omit if using salted butter
Quick Pudding
- ¼ cup sugar
- 2 tablespoons unsweetened cocoa powder, Dutch or Natural
- 1 ½ tablespoons cornstarch
- 1 cup whole milk
- 1 large egg yolk
- ½ teaspoon vanilla extract
- 1 teaspoon unsalted or salted butter (optional)
- 1 tiny pinch of salt
Whipped Cream Topping
- ¾ cup heavy cream
- 2 tablespoons powdered sugar
- ½ teaspoon vanilla extract or vanilla bean paste
Instructions
-
Make the crumb mixture first. Mix all ingredients, empty onto a parchment lined baking sheet and press into a slab. Bake at 350F for about 8 minutes or until it smells toasty, then remove and let cool. Break apart into crumbs.
-
Alternatively, you can just grind the graham crackers into crumbs and use them straight. This is a quicker option if you’re short on time and prefer a softer, sandier base.
-
In a saucepan, off heat, whisk together the sugar, cocoa powder and cornstarch. Whisk in the milk gradually, then whisk in the egg yolk. Whisk until everything is evenly blended and smooth.
-
Put the mixture on the stove over medium (you may need to use medium-low depending on your stovetop) heat and cook, whisking constantly, until the mixture begins to bubble and thicken significantly. This should take approximately 5 minutes. After it starts to boil and thicken, continue boiling and stirring for 1 minute to ensure the cornstarch is fully cooked. Remove from heat and let cool slightly.
-
Stir in the butter and vanilla extract. Add a dash of salt to taste, as this helps to enhance the chocolate flavor. Scrape the pudding into a clean bowl. If you need it to cool faster, spread it thinly onto a cold dinner plate (a trick I always use!). Cover the pudding directly with a piece of buttered wax paper or plastic wrap, pressing it down onto the surface to prevent a “skin” from forming. Let cool slightly at room temperature before transferring to the refrigerator to cool completely, ideally for at least 4-6 hours, or overnight, for the best texture and flavor.
-
Prepare the whipped cream. Using an electric mixer (with a chilled bowl and whisk for best results), beat the cold heavy cream until soft peaks just start to form. Beat in the powdered sugar and vanilla extract and continue beating until stiff peaks are achieved. Be careful not to overbeat, as it can quickly turn into butter.
-
To assemble the parfaits, take your 4 little glass cups (recycled glass yogurt containers or similar). Divide the crumb mixture evenly among them, pressing it gently into the bottom of each container to form an even base.
-
Spoon a generous layer of the thoroughly chilled chocolate pudding mixture over the crumbs. Next, spoon on a layer of whipped cream. For a neater, more professional look, you can transfer the whipped cream to a piping bag (or a sturdy zipper-lock bag with the corner snipped off) and pipe it onto the pudding. Optional: Garnish with a sprinkle of cocoa powder, mini chocolate chips, or chocolate shavings for an extra touch of elegance and flavor. Serve immediately or chill until ready to enjoy.
