The Ultimate Red Velvet Sheet Cake Recipe: Easy 9×13 Pan Perfection with Cream Cheese Frosting
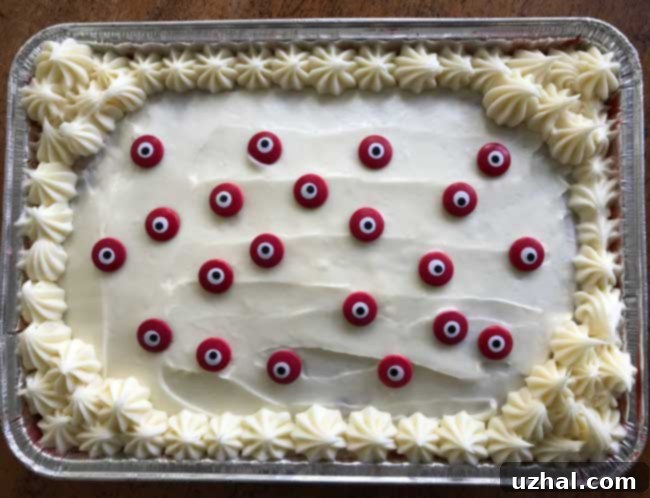
There’s something undeniably captivating about a Red Velvet Cake. Its striking ruby hue, combined with a subtle cocoa flavor and the tangy sweetness of cream cheese frosting, makes it a timeless classic. While often associated with grand tiered celebrations, we’re here to celebrate the humble yet magnificent **Red Velvet Sheet Cake**. Baked in a convenient 9×13 inch pan, this recipe offers all the beloved flavor of a traditional red velvet cake with the effortless charm and simplicity of a sheet cake. Originally envisioned as a spooky Halloween treat, adorned with playful “eyeballs” made from frosting, this versatile cake effortlessly adapts to any occasion.

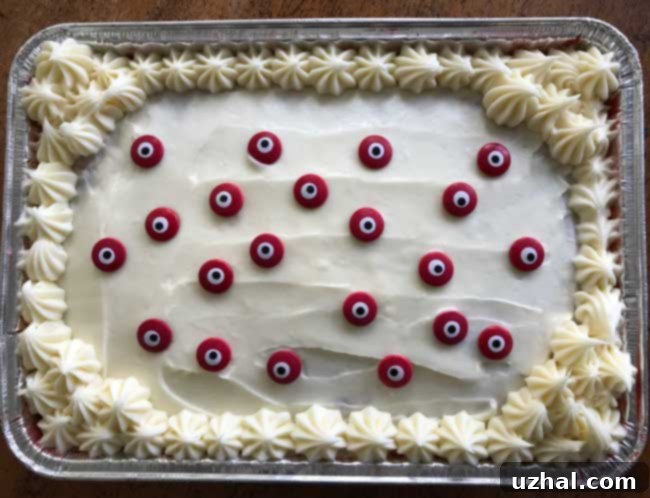
While our featured image showcases a fun, spooky Halloween rendition (perfect with its blood-red color!), the beauty of this Red Velvet Sheet Cake lies in its adaptability. Imagine transforming it into a festive Christmas dessert by replacing the “eyeballs” with delicate frosted Christmas trees or adorable snowmen. Or, for a romantic touch, decorate it with charming hearts, making it an ideal treat for Valentine’s Day. This recipe isn’t just for holidays; it’s a reliable, crowd-pleasing dessert that’s easy to make and even easier to share, perfect for potlucks, family gatherings, or simply a delightful weekend indulgence. This guide will walk you through creating a moist, flavorful Red Velvet Sheet Cake, topped with our signature luscious cream cheese frosting, ensuring a perfect bake every time.
The Enchanting History of Red Velvet Cake
Before diving into the recipe, let’s appreciate the rich history of this iconic dessert. The origins of Red Velvet Cake are shrouded in a bit of mystery, with various stories attributing its creation to different times and places. Some believe it originated during the Victorian era, when “velvet cakes” were made with cocoa to soften flour and give the cake a finer, “velvety” crumb. The reddish-brown hue was initially a natural chemical reaction between the acidic buttermilk and vinegar and the anthocyanin-rich cocoa powder available at the time. When non-Dutched cocoa was common, its natural acidity reacted with the baking soda and red food coloring to enhance the red color, giving it a distinctive reddish tint.
During World War II, food rationing led bakers to use beet juice or boiled beets to enhance the red color and retain moisture in cakes. However, the vibrant red color we know today largely became popular with the widespread availability of red food coloring. The cake gained significant traction in the mid-20th century, particularly in the Southern United States, where it became a staple and a symbol of hospitality. Its unique combination of mild chocolate flavor, tender crumb, and tangy cream cheese frosting solidified its place as a beloved dessert. Understanding its roots helps appreciate the balance of flavors and textures that make this Red Velvet Sheet Cake so special.
Why a Sheet Cake? The Benefits of Baking in a 9×13 Pan
While layer cakes are visually stunning, a sheet cake offers practical advantages, especially when serving a crowd. Baking in a 9×13 inch pan means a single, even layer of cake that’s incredibly easy to bake, cool, frost, and transport. There’s no fussing with multiple cake pans, delicate stacking, or intricate leveling. This straightforward approach makes it an excellent choice for bakers of all skill levels, from beginners to seasoned pros looking for a less labor-intensive option. The uniform thickness ensures an even bake, resulting in a consistently moist and tender crumb throughout the entire cake.
Furthermore, a sheet cake is inherently portion-friendly. You can easily cut neat squares or rectangles, making serving a breeze at parties, picnics, or family dinners. Its flat surface provides a generous canvas for decoration, whether you opt for simple swirls of frosting, elaborate piping, or fun, themed embellishments as we did for Halloween. The 9×13 pan size is also standard in most kitchens, meaning you likely already have the necessary equipment, simplifying the baking process even further. This recipe leverages these advantages, delivering a delicious Red Velvet Cake without the usual complexities.
8 Inch Square Red Velvet Cake: A Smaller Serving Option
If you don’t need a full 9×13 inch red velvet cake or are baking for a smaller gathering, you can easily halve this recipe and make the cake in an 8-inch square pan. This adjustment allows for a more manageable portion while still delivering the same incredible flavor and texture. When halving the recipe, precision is key for consistent results. Here are the adjusted measurements for an 8-inch square pan red velvet cake:
- 1 cup plus 2 tablespoons (126 grams) cake flour
- 1 tablespoon (10 grams) unsweetened natural cocoa powder
- ½ teaspoon salt
- ½ teaspoon baking soda
- 4 tablespoons (56 grams) unsalted butter, softened
- ¾ cup (150 grams) sugar
- 1 large egg, room temperature
- 2 tablespoons (1 oz/28 grams) red food coloring (use less if using Super Red for a more concentrated color)
- ½ tablespoon (7 grams) white vinegar
- ½ teaspoon vanilla extract
- ½ cup (114 grams) buttermilk, room temperature
Use the same directions as for the 9×13 inch pan, ensuring you grease and flour your 8-inch pan thoroughly. The main difference will be the baking time. Start checking for doneness at approximately 22 minutes, as smaller cakes bake faster. Insert a toothpick into the center; if it comes out clean or with a few moist crumbs, the cake is ready. Adjust baking time as needed, usually between 22-28 minutes.
Recipe

Classic Red Velvet Sheet Cake with Tangy Cream Cheese Frosting
Anna
Pin Recipe
Ingredients
For the Red Velvet Cake
- 2 ¼ cups cake flour (252 grams, sifted for best results)
- 2 tablespoons unsweetened cocoa powder, natural (20 grams, not Dutch-processed, as acidity is key)
- 1 teaspoon baking soda
- 1 teaspoon salt
- ½ cup unsalted butter, softened (114 grams, at room temperature for smooth creaming)
- 1 ½ cups granulated sugar (300 grams)
- 2 large eggs (ensure they are at room temperature for better emulsification)
- 2 ounces red food coloring (liquid or gel; adjust for desired intensity. Gel coloring provides a more vibrant color with less liquid.)
- 1 tablespoon white vinegar (essential for activating baking soda and enhancing color)
- 1 teaspoon vanilla extract (pure vanilla for best flavor)
- 1 cup buttermilk (at room temperature, or make your own by adding 1 tbsp white vinegar or lemon juice to regular milk and letting it sit for 5 minutes)
For the Classic Cream Cheese Frosting
- 12 oz full-fat cream cheese, softened (brick-style, not whipped; ensure it’s at room temperature for a smooth, lump-free frosting – see note below for quantity adjustments)
- 6 oz unsalted butter, softened (you can use salted butter if preferred, omit the pinch of salt if so)
- 4 ½ to 5 cups powdered sugar (sifted after measuring, around 1 ¼ pound or 560g; sift to prevent lumps)
- ¾ teaspoon vanilla extract
- Pinch of salt (only if using unsalted butter to balance sweetness)
Instructions
-
Prepare for Baking: Preheat your oven to 350°F (175°C). Take out a 9×13 inch baking pan. Thoroughly grease the bottom and sides of the pan with butter or baking spray, then lightly flour it to prevent sticking. Tap out any excess flour.
-
Combine Dry Ingredients: In a medium bowl, whisk together the cake flour, unsweetened cocoa powder, baking soda, and salt. For a truly smooth batter, sift these dry ingredients, especially if your cake flour or cocoa powder tends to be lumpy. Set this mixture aside.
-
Cream Butter and Sugar: In a large mixing bowl, using an electric mixer (stand mixer with paddle attachment or hand mixer), beat the softened butter and granulated sugar together on medium-high speed. Cream until the mixture is light, fluffy, and pale in color, typically 3-5 minutes. This step incorporates air, making your cake tender.
-
Add Wet Ingredients: Add the large eggs one at a time, beating well after each addition until fully incorporated. Scrape down the sides of the bowl as needed. Next, beat in the red food coloring, white vinegar, and vanilla extract until the mixture is uniformly red and smooth. The vinegar is crucial for reacting with the baking soda and enhancing the red color.
-
Alternate Dry and Wet: With your mixer on low speed, gradually add the flour mixture into the creamed mixture alternately with the buttermilk, beginning and ending with the flour mixture. Start by adding about one-third of the flour mixture, then half the buttermilk, then another third of flour, the remaining buttermilk, and finally the last third of the flour. Mix until just combined. Do not overmix! Once the flour is blended in, beat on medium speed for about 1 minute or until the batter is smooth and lump-free.
-
Bake the Cake: Transfer the vibrant red batter to your prepared 9×13 inch pan and spread it evenly with a spatula.
-
Bake in the preheated oven for 25 to 30 minutes. The cake is done when a wooden skewer or toothpick inserted into the center comes out clean or with a few moist crumbs attached. The cake should also spring back gently when lightly touched. Be careful not to overbake, as this can dry out the cake.
-
Cool and Frost: Allow the cake to cool completely in the pan on a wire rack before attempting to frost it. This is a critical step; frosting a warm cake will result in melted, messy frosting. Once completely cool, proceed to make and spread the cream cheese icing.
-
Prepare the Cream Cheese Frosting: In a large mixing bowl, beat together the softened full-fat cream cheese and softened unsalted butter with an electric mixer until smooth and creamy, about 2-3 minutes. Begin by adding about 1 cup of the sifted powdered sugar and beat until well combined. Gradually add the remaining powdered sugar, beating and scraping the sides of the bowl frequently until the frosting is smooth, fluffy, and light. Finally, beat in the vanilla extract and a pinch of salt (if using unsalted butter) until just combined. Spread this luscious frosting evenly over the cooled cake. For an extra touch, you can pipe a decorative border around the edges with a star tip, if desired.
Notes
For those who don’t favor overly sweet cream cheese frosting, a great tip is to taste test the icing after incorporating the first 2-3 cups of confectioners’ sugar. You can then stop adding sugar if you find the sweetness level to your liking, or continue adding in small increments until it suits your preference. Always remember that using full-fat, brick-style cream cheese and ensuring both butter and cream cheese are truly at room temperature are crucial for achieving a perfectly smooth, lump-free frosting.
Pro Tips for a Perfect Red Velvet Sheet Cake Every Time
Achieving a bakery-quality Red Velvet Sheet Cake is well within reach with a few expert tips:
- Room Temperature Ingredients: This cannot be stressed enough! Softened butter, cream cheese, and eggs emulsify better with other ingredients, creating a smoother batter and a finer crumb for the cake, and a silky-smooth frosting.
- Measure Flour Accurately: Too much flour is the most common cause of dry cakes. Use the spoon-and-level method (spoon flour into a measuring cup, then level off with a straight edge) or, even better, use a kitchen scale for precise measurement (grams are provided in the recipe).
- Don’t Overmix: Once you add the dry ingredients to the wet, mix only until just combined. Overmixing develops gluten, leading to a tough, dense cake.
- Quality Food Coloring: For the most vibrant red color, use a high-quality gel food coloring (like Americolor Super Red or Wilton No-Taste Red). Liquid food coloring might require a larger quantity, potentially altering the batter consistency slightly.
- Natural Cocoa Powder: Red velvet cake traditionally uses natural unsweetened cocoa powder, which is acidic. This acidity reacts with the baking soda and buttermilk to help the cake rise and enhance the red hue, contrasting with Dutched cocoa, which is processed to be less acidic.
- Cool Completely: Resist the urge to frost a warm cake. A warm cake will melt the frosting, creating a gooey mess. Patience is key for a beautiful finish.
- Sift Powdered Sugar: For the cream cheese frosting, sifting the powdered sugar is essential to prevent lumps and ensure a perfectly smooth, creamy texture.
Creative Decoration Ideas Beyond Halloween
As mentioned, this Red Velvet Sheet Cake is a blank canvas for your creative decorating ideas:
- Christmas Cake: Frost with classic cream cheese frosting, then decorate with green and red sprinkles, edible glitter, candy canes, or small gingerbread cookie cutouts. You could even pipe tiny evergreen trees or snowflakes.
- Valentine’s Day Treat: Use pink or red sprinkles, conversation hearts, or pipe small frosting hearts onto the cake. A dusting of cocoa powder through a heart-shaped stencil would also be lovely.
- Birthday Celebration: Adorn with colorful sprinkles, candles, or chocolate shavings. You can customize with the birthday person’s favorite colors or theme.
- Everyday Elegance: Keep it simple with a rustic spread of the cream cheese frosting and perhaps a sprinkle of red velvet crumbs from the cake trimmings, or a delicate dusting of cocoa powder. Fresh berries (raspberries, strawberries) also provide a beautiful contrast to the red and white.
- Patriotic Cake: For holidays like the 4th of July or Memorial Day, decorate with blueberries and white chocolate shavings on top of the cream cheese frosting for a red, white, and blue theme.
Serving and Storage Suggestions
This Red Velvet Sheet Cake is best served at room temperature, allowing the cake’s flavors and the frosting’s creaminess to truly shine. It pairs wonderfully with a cup of coffee, a glass of cold milk, or even a sparkling glass of champagne for a special occasion.
For storage, because of the cream cheese frosting, the cake should be kept refrigerated. Cover it loosely with plastic wrap or store it in an airtight container to prevent it from drying out or absorbing odors from the fridge. It will stay fresh and delicious for 3-4 days when properly stored in the refrigerator. If you plan to serve it, take it out of the fridge about 30-60 minutes beforehand to allow it to come to room temperature for the best texture and flavor.
Whether you’re celebrating a holiday, hosting a gathering, or simply craving a classic treat, this Red Velvet Sheet Cake recipe is a reliable choice. Its straightforward preparation, combined with the delightful flavor and versatile decorating options, makes it a true winner. We encourage you to try this recipe and discover the joy of baking a perfect, moist, and utterly delicious red velvet cake right in your own kitchen. Don’t forget to share your creations and how you decided to decorate your cake!
