Ultimate Big Batch Chocolate Chip Bars: Your Go-To Recipe for Crowds and Cravings
If you’re looking for a crowd-pleasing dessert that’s easy to make and guaranteed to disappear fast, you’ve come to the right place. Forget individual cookies; these big batch chocolate chip bars are the perfect solution for parties, potlucks, or simply satisfying a serious sweet tooth. This fantastic recipe, shared by my friend Pat, delivers a generous pan of dense, moist, and utterly delicious chocolate chip goodness without any whole wheat flour – just classic, comforting flavor.
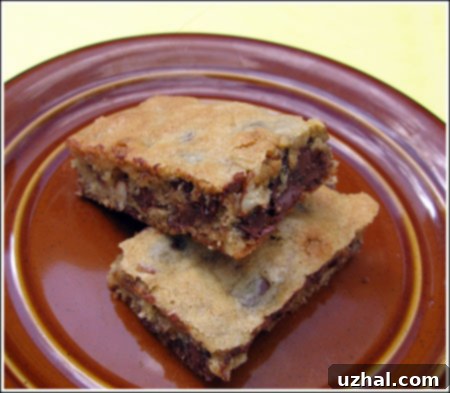
Pat bakes these bars in a large 15×10 inch pan, yielding a substantial amount perfect for sharing. However, if you’re not feeding a small army, you can easily halve the recipe and bake it in a standard 13×9 inch pan. One of the best qualities of these bars is their evolving texture: they emerge from the oven delightfully cakey, then settle into a wonderfully dense, firm-yet-moist consistency as they cool. The rich butter, sweet sugars, and abundant chocolate chips create a treat that’s universally loved.

Why Choose Big Batch Chocolate Chip Bars?
There are countless reasons to opt for a big batch recipe, especially when it comes to classic desserts like chocolate chip bars. Here are a few compelling advantages:
- Effortless Entertaining: Hosting a party or attending a potluck? A single large pan of these bars can feed a considerable number of people with minimal fuss. No need to bake multiple trays of cookies!
- Time-Saving: Instead of scooping and baking individual cookies in batches, you mix once, spread once, and bake once. This significantly cuts down on active baking time and oven usage.
- Perfect for Meal Prep (Dessert Edition): If you love having homemade treats on hand, a big batch means you’ll have delicious chocolate chip bars ready for snacks, lunchboxes, or spontaneous cravings throughout the week.
- Freezer-Friendly: These bars freeze beautifully, allowing you to save some for later or prepare them well in advance for future events.
- Sharing and Gifting: A pan of homemade chocolate chip bars makes a wonderful gift for friends, neighbors, or as a thoughtful gesture for any occasion.
Achieving the Perfect Texture: Dense, Moist, and Chewy
The magic of Pat’s recipe lies in its ability to create bars that are the ideal balance of dense, firm, and moist. Unlike some cookie bars that can be too cakey or too crumbly, these strike a harmonious balance. When they first come out of the oven, they might seem soft and slightly cake-like. However, as they cool, the sugars and fats solidify, transforming them into that coveted dense, chewy texture that holds together beautifully. The rich moisture keeps them from being dry, ensuring every bite is satisfying.
To ensure you get this perfect texture, it’s crucial not to overbake them. Keep an eye on the edges, and remove them from the oven when they appear set, even if the very center looks slightly soft. Residual heat will continue to cook them as they cool, contributing to that desirable firm-but-moist quality.
Essential Ingredients for Success
Quality ingredients make a noticeable difference in any recipe, and these chocolate chip bars are no exception. Here’s a closer look at what goes into them and why each component is important:
- Regular Salted Butter (Softened): The fat in butter is essential for flavor and texture. Using salted butter adds a hint of salt that perfectly balances the sweetness. Softened butter creams easily with sugar, creating air pockets for a lighter crumb initially, but contributes to the tender chewiness.
- Granulated Sugar & Brown Sugar (Packed): The combination of both sugars is key. Granulated sugar provides crispness, while brown sugar adds moisture, chewiness, and a deeper, caramel-like flavor due to its molasses content. Always pack brown sugar firmly when measuring.
- Large Eggs: Eggs act as a binder, provide structure, and contribute to the richness and moisture of the bars. Using large eggs ensures consistent results.
- Pure Vanilla Extract: A non-negotiable flavor enhancer. Pure vanilla extract elevates the taste of the chocolate and butter, adding warmth and depth.
- All-Purpose Flour (Spoon and Level): Flour provides the structure for the bars. The “spoon and level” method is critical for accurate measurement: gently spoon flour into your measuring cup and then level it off with a straight edge. If you have a kitchen scale, weighing the flour (15 oz for 3 ½ cups) is the most accurate approach and highly recommended for consistent baking results. Over-measuring flour can lead to dry, tough bars.
- Baking Soda: This is our leavening agent. It reacts with the acidic brown sugar and helps the bars rise slightly, creating a tender crumb.
- Salt (Optional, but Recommended): While the recipe notes salt as optional, especially if using salted butter, a small amount helps to enhance all the other flavors and cut through the sweetness, making the chocolate taste even more prominent.
- Semi-Sweet Chocolate Chips: The star of the show! Two 12 oz packages ensure a generous distribution of melty chocolate in every bite. Semi-sweet chocolate provides a classic balance, but feel free to experiment with milk or dark chocolate chips based on your preference.
- Chopped Pecans (Optional): Nuts add a delightful crunch and nutty flavor that complements the chocolate beautifully. Pecans are a classic choice, but walnuts or other chopped nuts would also work well. If you’re not a fan, simply omit them.
Tips for Baking Success
To ensure your big batch chocolate chip bars turn out perfectly every time, keep these simple tips in mind:
- Accurate Measuring: Especially for flour and sugars. Use the “spoon and level” method for flour or, even better, weigh it if you have a kitchen scale.
- Softened Butter: Make sure your butter is truly softened but not melted. This allows it to cream properly with the sugars, creating a smooth batter.
- Don’t Overmix: Once you add the dry ingredients to the wet, mix only until just combined. Overmixing can develop the gluten in the flour, leading to tough bars.
- Pan Preparation: Lightly grease your baking pan. For even easier removal and clean up, you can line the bottom with parchment paper, leaving an overhang on the sides to use as “handles.”
- Even Spreading: The batter will be thick. Use a spatula or your hands (lightly floured) to spread it evenly into the pan. This ensures uniform baking.
- Monitor Baking Time: Ovens vary! Start checking around the 15-minute mark for the 15×10 inch pan (or 20 minutes for the 13×9 inch pan). The bars are done when the edges are lightly golden and the center appears set. A toothpick inserted into the center should come out with moist crumbs, not wet batter.
- Cool Completely: Resist the urge to cut into them while they’re hot. Cooling allows the bars to set properly, develop their dense and chewy texture, and makes them much easier to cut into neat squares.
Recipe

A Big Batch Chocolate Chip Bar Recipe
By Cookie Madness
Pin Recipe
32
Ingredients
- 8 oz regular salted butter softened
- 1 ¼ cup granulated sugar
- 1 cup brown sugar packed
- 4 large eggs
- 1 tablespoon of pure vanilla extract
- 3 ½ cups all purpose flour Spoon and level — (15 oz) — weigh if you have scale
- 1 ½ teaspoon baking soda
- ¼ teaspoon salt optional, but recommended for flavor balance
- 2 12 oz packages of semi-sweet chocolate chips
- 2 cups 220 grams chopped pecans (optional)
Instructions
-
Preheat oven to 350 degrees F (175°C).
-
In a large mixing bowl, cream the softened butter with the granulated sugar and packed brown sugar until light and fluffy. Beat in the large eggs one at a time, then mix in the pure vanilla extract. In a separate bowl, whisk together the all-purpose flour, baking soda, and salt (if using). Gradually add the dry ingredients to the wet ingredients, mixing until just combined. Stir in the semi-sweet chocolate chips and chopped pecans (if using) until evenly distributed. Spread the thick dough evenly into a greased 15×10 inch baking pan. Bake for 15-20 minutes, or until the edges are lightly golden and the bars appear set. Avoid overbaking for the best texture. Cool completely in the pan on a wire rack before cutting into bars.
-
For a half batch, use a 13×9 inch pan and halve all ingredients. Baking time for a half batch typically takes around 20-25 minutes, but this will vary depending on your oven. Always check for doneness.
Delicious Variations and Customizations
While this classic big batch chocolate chip bar recipe is perfect as is, it also serves as an excellent canvas for customization. Feel free to get creative with your mix-ins!
- Chocolate Variety: Instead of just semi-sweet, try a mix of milk chocolate chips, dark chocolate chunks, or even white chocolate chips for a different flavor profile.
- Nutty Additions: Beyond pecans, consider walnuts, almonds, or even macadamia nuts for a different crunch. Lightly toast nuts before adding them to enhance their flavor.
- Candy Craze: Fold in M&Ms, chopped candy bars, or mini peanut butter cups for a fun twist, especially for kids’ parties.
- Sweet & Salty: Sprinkle a touch of flaky sea salt over the top of the bars just before baking to enhance the chocolate flavor and add a gourmet touch. Chopped pretzels can also add a delightful salty crunch.
- Coconut Delight: Add a cup of shredded coconut to the batter for a tropical hint.
- Espresso Kick: A teaspoon of instant espresso powder (dissolved in the vanilla extract) can deepen the chocolate flavor without making the bars taste like coffee.
Storage and Freezing Tips
These big batch chocolate chip bars are fantastic for making ahead or enjoying over several days. Here’s how to keep them fresh:
- At Room Temperature: Store cooled bars in an airtight container at room temperature for up to 3-4 days. Placing a piece of parchment paper between layers can prevent sticking.
- In the Refrigerator: If you prefer them chilled or live in a warm climate, refrigerate them in an airtight container for up to a week. They might become a bit firmer, but will still be delicious.
- Freezing for Later:
- Allow the bars to cool completely.
- Cut them into individual squares.
- Place the squares on a baking sheet and freeze for about an hour until firm.
- Transfer the frozen bars to a freezer-safe bag or airtight container, separated by parchment paper to prevent sticking.
- They can be stored in the freezer for up to 3 months.
To enjoy, simply thaw at room temperature or warm slightly in the microwave for a few seconds.
Conclusion: Your New Favorite Big Batch Treat
Whether you’re planning a large gathering, stocking your freezer with homemade goodness, or simply craving a generous slice of classic comfort, these big batch chocolate chip bars are a guaranteed winner. Easy to make, incredibly delicious, and versatile enough for any occasion, Pat’s recipe is sure to become a cherished favorite in your baking repertoire. So go ahead, preheat your oven, gather your ingredients, and get ready to enjoy the ultimate chocolate chip bar experience!
