Indulge in Decadence: The Ultimate Chocolate Velvet Cheesecake Recipe Guide
There are days when a simple craving for something sweet transcends into a desire for true indulgence, and for me, that day recently called for cheesecake. It had been a while since I last ventured into the delightful world of cheesecake baking, and the idea of creating something both classic and captivating was incredibly appealing. After a quick browse through my cherished recipe collection, my eyes landed on an old favorite: the Chocolate Velvet Cheesecake, a timeless recipe often associated with the renowned Philadelphia cream cheese brand. The name itself promises a luxurious experience, and the image in my cookbook, showcasing a beautifully garnished cheesecake with delicate chocolate leaves, sealed its fate as my next culinary project.
Typically, I’m one to prioritize the main event and often skip the elaborate garnishes. The thought of crafting intricate chocolate leaves usually falls into the “nice-to-have-but-not-essential” category. However, on this particular day, a strange sense of compulsion washed over me. Perhaps it was the allure of replicating the cookbook’s perfect presentation, or simply a spontaneous urge to try something new. Whatever the reason, I felt an undeniable pull to give the chocolate leaves a try. The instructions seemed straightforward enough: brush melted chocolate onto suitable leaves, chill them until firm, and then carefully peel away the natural leaf, leaving behind a delicate chocolate impression. The recipe suggested using rose or lemon leaves, known for their ideal shape and texture. Lacking those, I ventured into my backyard and found a sturdy oak tree, whose leaves provided a surprisingly robust and perfectly textured canvas for my chocolate artistry.
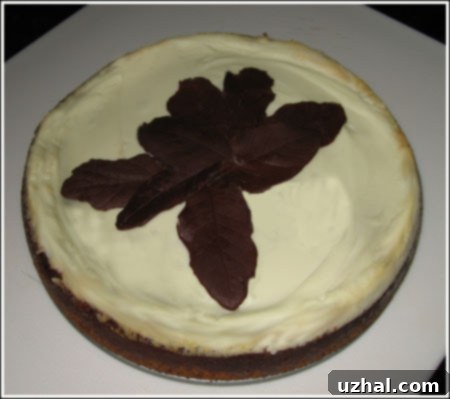
The Whole Chocolate Velvet Cheesecake Creation
And here it is, in all its glory – the complete Chocolate Velvet Cheesecake. The sight of it after hours of anticipation was incredibly rewarding. Its dark, inviting surface hinted at the rich, deep flavors within, promising a dessert that’s as pleasing to the eye as it is to the palate. The subtle sheen of the topping and the perfectly set crust spoke volumes of a well-executed bake, embodying the classic elegance that a cheesecake of this caliber demands. The overall presentation, even before slicing, was a testament to the satisfying journey from ingredients to a culinary masterpiece.

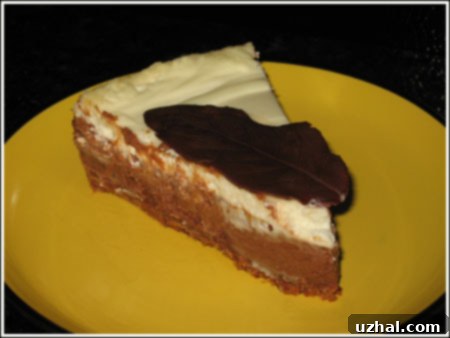
A Glimpse of Perfection: The Sliced Cheesecake and Its Texture
Peeking inside reveals the true character of this dessert. This slice, while perhaps a bit dramatically adorned with one of my oak-leaf chocolate creations, truly offers a fantastic visual representation of the cheesecake’s incredible texture. It’s hard to convey through a photograph alone, but the cross-section clearly shows the dense yet incredibly creamy and smooth interior – a testament to the “velvet” in its name. The contrast between the rich, dark chocolate filling and the lighter, tangy sour cream topping is distinct, promising a harmonious blend of flavors with every bite. What’s truly remarkable is how something so sumptuously creamy and undeniably delicious took only about twenty minutes of active preparation time. Even adding the experimental chocolate leaves only extended the hands-on time by an additional ten minutes, making this a surprisingly efficient route to gourmet indulgence.

The Ultimate Chocolate Velvet Cheesecake Recipe
Crafting this Chocolate Velvet Cheesecake is a journey of simple steps leading to spectacular results. Follow this classic recipe for a dessert that’s sure to impress.
Ingredients:
Crust:
- 28 vanilla wafers (Nilla wafers work perfectly)
- ½ cup chopped, toasted pecans
- 3 tablespoons granulated sugar
- 4 tablespoons melted unsalted butter
Filling:
- 16 ounces (two 8-ounce blocks) cream cheese, softened to room temperature
- ½ cup firmly packed light brown sugar
- 1 teaspoon pure vanilla extract
- 2 large eggs
- 3 tablespoons Amaretto liqueur (or a non-alcoholic almond extract for an alcohol-free version)
- 1 cup semisweet chocolate chips, melted and slightly cooled
Topping:
- 2 cups full-fat sour cream
- 2 tablespoons granulated sugar
Instructions for Preparation and Baking:
1. Prepare Your Oven and Pan: Preheat your oven to 325 degrees F (160 degrees C). This precise temperature is crucial for the initial baking phase, ensuring an even and stable base for your cheesecake. Grease a 9-inch springform pan lightly, or line the bottom with parchment paper to ensure easy removal.
2. Craft the Perfect Crust: Begin by crushing your vanilla wafers into fine crumbs. You can achieve this using a food processor for speed and consistency, or by placing them in a Ziploc bag and crushing them with a rolling pin for a more rustic texture. In a medium bowl, combine these wafer crumbs with the chopped, toasted pecans. Toasting the pecans beforehand significantly enhances their nutty flavor, adding another layer of complexity to the crust. Stir in the granulated sugar and then drizzle in the melted butter. Mix thoroughly until all the crumbs are moistened. Press this mixture firmly and evenly into the bottom of your prepared 9-inch springform pan. A flat-bottomed glass or the back of a spoon can help you achieve a compact, uniform crust. Bake this crust in the preheated oven for 10 minutes. This pre-baking step is vital; it helps to set the crust, preventing it from becoming soggy once the filling is added and ensuring a crisp texture.
3. Mix the Velvety Filling: While the crust is baking, begin preparing the luxurious filling. In a large mixing bowl, using the high speed of an electric mixer, beat the softened cream cheese, brown sugar, and vanilla extract until the mixture is completely smooth and creamy. The cream cheese must be at room temperature for this step to avoid lumps and ensure a perfectly smooth consistency. Brown sugar is used here for its molasses notes, which add a deeper, richer flavor profile compared to white granulated sugar. Next, reduce the mixer speed to the lowest setting, or mix by hand, and gently incorporate the eggs, one by one. It’s crucial not to overmix the eggs at this stage, as over-aerating the batter can lead to cracks in the cheesecake during baking. Once the eggs are just combined, stir in the Amaretto liqueur, which infuses the cheesecake with a wonderful almond aroma and subtle complexity. Finally, fold in the melted and slightly cooled semisweet chocolate chips. Ensure they are well integrated but again, avoid overmixing to maintain the velvet texture.
4. Bake the Cheesecake Body: Pour the prepared filling evenly over the warm, pre-baked crust in the springform pan. Return the pan to the 325 degrees F (160 degrees C) oven and bake for 35 minutes. During this phase, the cheesecake will begin to set around the edges but will likely still be slightly jiggly in the center – this is perfectly normal and desired.
5. Add the Tangy Topping: After the initial 35 minutes of baking, carefully remove the cheesecake from the oven. At this point, increase your oven temperature to 425 degrees F (220 degrees C). While the oven is heating up, prepare the topping. In a small bowl, simply stir together the sour cream and the remaining 2 tablespoons of granulated sugar until well combined. The sour cream topping is not just for flavor; it adds an additional layer of creaminess and a delightful tang that cuts through the richness of the chocolate, contributing significantly to the “velvet” texture. Gently spread this sour cream mixture evenly over the partially baked cheesecake.
6. Final Bake and Cooling: Return the cheesecake with its new topping to the now 425 degrees F (220 degrees C) oven and bake for an additional 8-10 minutes. This quick, high-heat bake helps to set the sour cream topping beautifully. Once done, remove the cake from the oven. While it’s still hot, gently slide a thin knife or an offset spatula around the perimeter of the cake, between the cheesecake and the pan sides. This small but vital step helps to prevent cracks as the cheesecake cools and contracts. Place the pan on a wire rack and allow the cheesecake to cool at room temperature for about 2 hours. This gradual cooling process is essential for preventing cracks and allowing the cheesecake to set properly. After cooling at room temperature, transfer the cheesecake to the refrigerator and chill until it is very cold, which typically takes about 3 more hours, or even better, overnight. Chilling allows the flavors to meld and the texture to firm up to its ideal velvety consistency.
Tips for a Flawless Chocolate Velvet Cheesecake
Achieving a perfect cheesecake, especially one as decadent as this Chocolate Velvet Cheesecake, often comes down to a few key techniques:
- Room Temperature Ingredients: Always ensure your cream cheese and eggs are at room temperature. This is non-negotiable for a smooth, lump-free batter that incorporates air evenly, leading to that signature velvety texture.
- Don’t Overmix: While beating the cream cheese and sugar until smooth is important, once the eggs are added, mix only until just combined. Overmixing introduces too much air, which can cause the cheesecake to puff up too much and then fall, leading to cracks.
- Gentle Cooling is Key: The transition from hot oven to cold refrigerator can be a shock to a cheesecake, often resulting in cracks. The initial cooling on a wire rack at room temperature, followed by a slow chill in the refrigerator, is vital for a smooth, unblemished surface. The knife trick around the edges is also a great preventative measure.
- Patience with Chilling: Resist the urge to cut into your cheesecake too soon. The extended chilling period in the refrigerator is where the magic truly happens, allowing the flavors to deepen and the texture to firm up to its ultimate creamy, velvety perfection.
- Garnish with Flair: While optional, garnishes like fresh berries, a dusting of cocoa powder, or those homemade chocolate leaves elevate the presentation significantly, turning a delicious dessert into a showstopper.
Concluding Thoughts on Your Culinary Creation
This Chocolate Velvet Cheesecake is more than just a dessert; it’s an experience. From the satisfying crunch of the vanilla wafer and pecan crust to the incredibly smooth, rich chocolate filling, and the bright tang of the sour cream topping, every layer contributes to a symphony of flavors and textures. The added touch of homemade chocolate leaves, made from humble oak leaves no less, turned a simple baking day into a delightful adventure, proving that sometimes, stepping out of your comfort zone in the kitchen yields the most rewarding results. This recipe, a testament to timeless culinary wisdom, consistently delivers a cheesecake that is both deeply comforting and elegantly sophisticated. Whether you’re making it for a special occasion or simply to satisfy a serious chocolate craving, this Chocolate Velvet Cheesecake is destined to become a cherished addition to your recipe repertoire. Enjoy the process, and savor every velvety bite!