Ultimate Homemade Caramel Cashew Bars: A Sweet & Salty Treat for Any Occasion
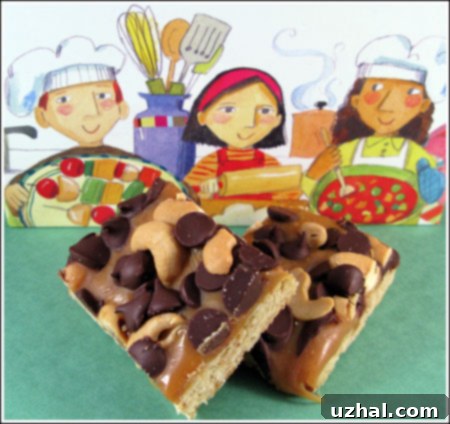
There’s a certain magic in rediscovering a beloved recipe, especially one that perfectly balances indulgence and simplicity. That’s exactly how I felt when I stumbled upon my old notes for Caramel Cashew Bars. It was a true blast from the past, a forgotten gem that once graced every cookie tray and potluck gathering. How did I ever let such a crowd-pleasing, utterly delicious, and surprisingly easy recipe slip from memory? These bars aren’t just a dessert; they’re an experience, delivering that irresistible combination of sweet and salty that everyone craves. With a foundational layer of rich, buttery brown sugar shortbread, a generous blanket of thick, gooey caramel, and a delightful topping of crunchy cashews and decadent chocolate chips, they are simply divine. They also boast the practical advantage of freezing beautifully, making them an ideal make-ahead treat, and their appealing presentation makes them a star on any dessert spread.

Why These Caramel Cashew Bars Are a Must-Bake
What makes these homemade caramel cashew bars so universally adored? It starts with the distinct layers, each contributing to a symphony of flavors and textures. The base is a tender, crumbly shortbread, elevated by the deep, molasses-like notes of brown sugar. This isn’t just a vehicle for the toppings; it’s a flavorful cookie in its own right, offering a perfect contrast to the chewiness above. Then comes the star: a luscious, homemade-tasting caramel layer that’s thick, rich, and wonderfully sweet. This golden layer melts in your mouth, providing that satisfying pull that only good caramel can deliver. Finally, a scattering of lightly salted cashew halves introduces a delightful crunch and a welcome savory note, perfectly complemented by pockets of semi-sweet chocolate chips that soften and melt into the warm caramel. The combination creates a harmonious balance that satisfies every sweet tooth while subtly hinting at that addictive sweet-and-salty dynamic. Whether you’re a novice baker or a seasoned pro, these bars are incredibly forgiving and deliver consistent, mouth-watering results every time.
The Joy of Easy Holiday Baking and Smart Tips
One of the few minor challenges with this recipe, if you can even call it that, traditionally involves unwrapping individual caramels. While a meditative task for some, it can be a bit tedious when preparing a large batch. However, there’s a fantastic shortcut: using Kraft Caramel Bits. These pre-portioned, easy-to-melt caramels eliminate the unwrapping step entirely, shaving precious minutes off your prep time and making the process even smoother. For those who prefer a more artisanal touch, making your own caramel from scratch is also an option, though the simplicity of store-bought caramels is part of this recipe’s charm.
In the past, I often scaled this recipe down, preparing a half batch in an 8-inch square pan for smaller gatherings or just a personal treat. But with the holiday season fast approaching, and the endless stream of family and friends eager to sample festive goodies, I’m wholeheartedly committing to a full batch this time around! There’s something inherently joyful about baking for the holidays, and these caramel cashew bars are perfectly suited for spreading that cheer. They’re robust enough to travel well to parties, beautiful enough to be proudly displayed on a dessert buffet, and universally loved, ensuring not a single crumb goes to waste. Plus, having a freezer-friendly dessert on hand during the busy holiday season is a true lifesaver.
Beyond their deliciousness, these bars offer great versatility. Feel free to experiment with different nuts—pecans or walnuts would be equally delightful. For an extra touch of decadence, a sprinkle of flaky sea salt over the top before chilling can amplify the sweet and salty notes, creating a gourmet twist. You could also vary the chocolate, perhaps using milk chocolate for a sweeter profile or dark chocolate for a more intense cocoa flavor. The possibilities are endless, allowing you to customize this classic to your personal taste.
Baking these bars is a wonderfully rewarding experience, filling your home with the comforting aroma of butter, brown sugar, and toasted cashews. They are perfect for holiday gift baskets, school bake sales, office potlucks, or simply as a special treat for your family after dinner. Every bite is a delightful combination of crunchy, chewy, sweet, and salty, leaving a lasting impression and undoubtedly earning you requests for the recipe. Don’t miss out on bringing this timeless classic back into your baking repertoire!
Recipe

Caramel Cashew Bars
Cookie Madness
Pin Recipe
Ingredients
- 1 ½ sticks unsalted butter (for a richer, more controlled flavor; can substitute with salted butter and adjust added salt)
- ¾ cup packed brown sugar (light or dark, dark brown sugar will give a deeper molasses flavor)
- ½ scant teaspoon salt** (adjust to taste, especially if using salted butter)
- 1 large lightly beaten egg (acts as a binder for the shortbread crust)
- 1 ½ cups all-purpose flour (for the perfect tender shortbread texture)
- 1 cup old fashioned oats (adds a lovely chewiness and rustic texture to the crust)
- 1 14 oz package caramels, unwrapped (or use caramel bits for convenience)
- 5 tablespoons half and half (to create a smooth, pourable caramel; heavy cream or milk can be substituted)
- 1 cup semi-sweet chocolate chips (or your favorite chocolate, such as milk or dark)
- 1 cup salted cashew halves (adds crunch and that irresistible salty counterpoint to the sweet caramel)
Instructions
-
Prepare your baking pan: Preheat your oven to 350°F (175°C). Line a 9×13 inch baking pan with nonstick foil for easy removal, or use regular aluminum foil and lightly spray it with cooking spray to prevent sticking. Parchment paper is also an excellent alternative to ensure your bars lift out effortlessly. Make sure the foil or parchment extends slightly over the edges to create “handles” for lifting.
-
Make the shortbread crust: In a large mixing bowl, beat together the softened unsalted butter and packed brown sugar until the mixture is creamy and well combined. This usually takes 2-3 minutes with an electric mixer. Next, beat in the salt and the lightly beaten egg until just incorporated. Gradually stir in the all-purpose flour and old-fashioned oats until a cohesive dough forms. The mixture might be a bit crumbly at first, but it will come together. Press this mixture evenly into the bottom of your prepared 9×13 inch baking pan, ensuring it forms a compact layer. Bake for 15-18 minutes, or until the edges are lightly golden brown and the center is set. Remove from oven and set aside.
-
Prepare the caramel topping: While the crust is baking, combine the unwrapped caramels (or caramel bits) and half and half cream in a large saucepan. Cook over low to medium-low heat, stirring constantly, until the caramels are completely melted and the mixture is smooth and luxurious. Be careful not to let the caramel burn; consistent stirring is key. Once melted, carefully pour the warm caramel evenly over the pre-baked shortbread crust. Immediately sprinkle the semi-sweet chocolate chips and salted cashew halves generously over the hot caramel, pressing them lightly to ensure they adhere.
-
Cool and chill: Allow the bars to cool completely to room temperature on a wire rack. This initial cooling helps the caramel begin to set. Once at room temperature, transfer the pan to the refrigerator and chill for at least 1-2 hours, or until the caramel is firm enough to cut cleanly. This chilling step is crucial for achieving neat, non-sticky bars.
-
Cut and serve: Once fully chilled, use the foil or parchment “handles” to lift the entire slab of bars from the pan onto a cutting board. Using a sharp knife, preferably one that has been run under hot water and wiped dry (for cleaner cuts), cut the slab into desired bar sizes. For best results and to prevent sticking, wipe your knife clean between cuts. Serve and enjoy! Store any leftover bars in an airtight container at room temperature or in the refrigerator.
