Bake the Best Whole Wheat Walnut Bread: A Wholesome & Flavorful Recipe Guide
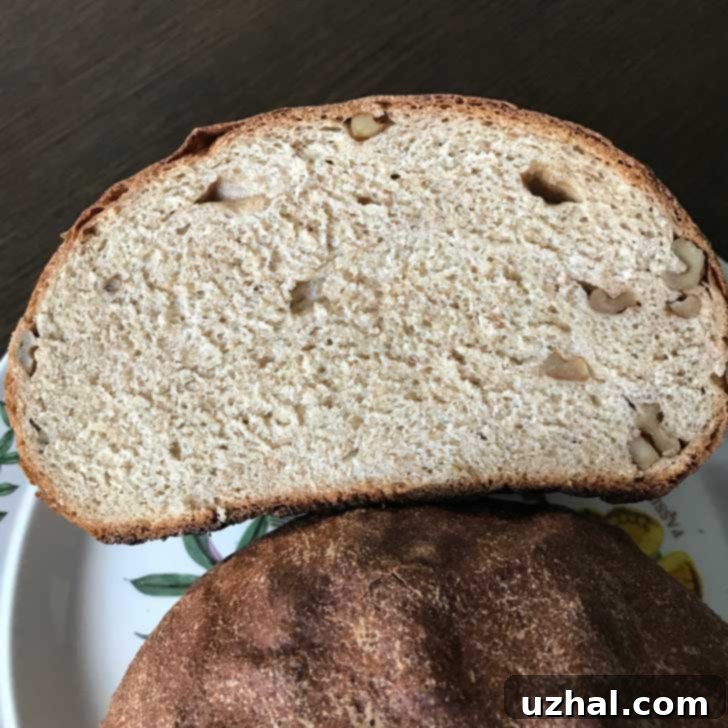
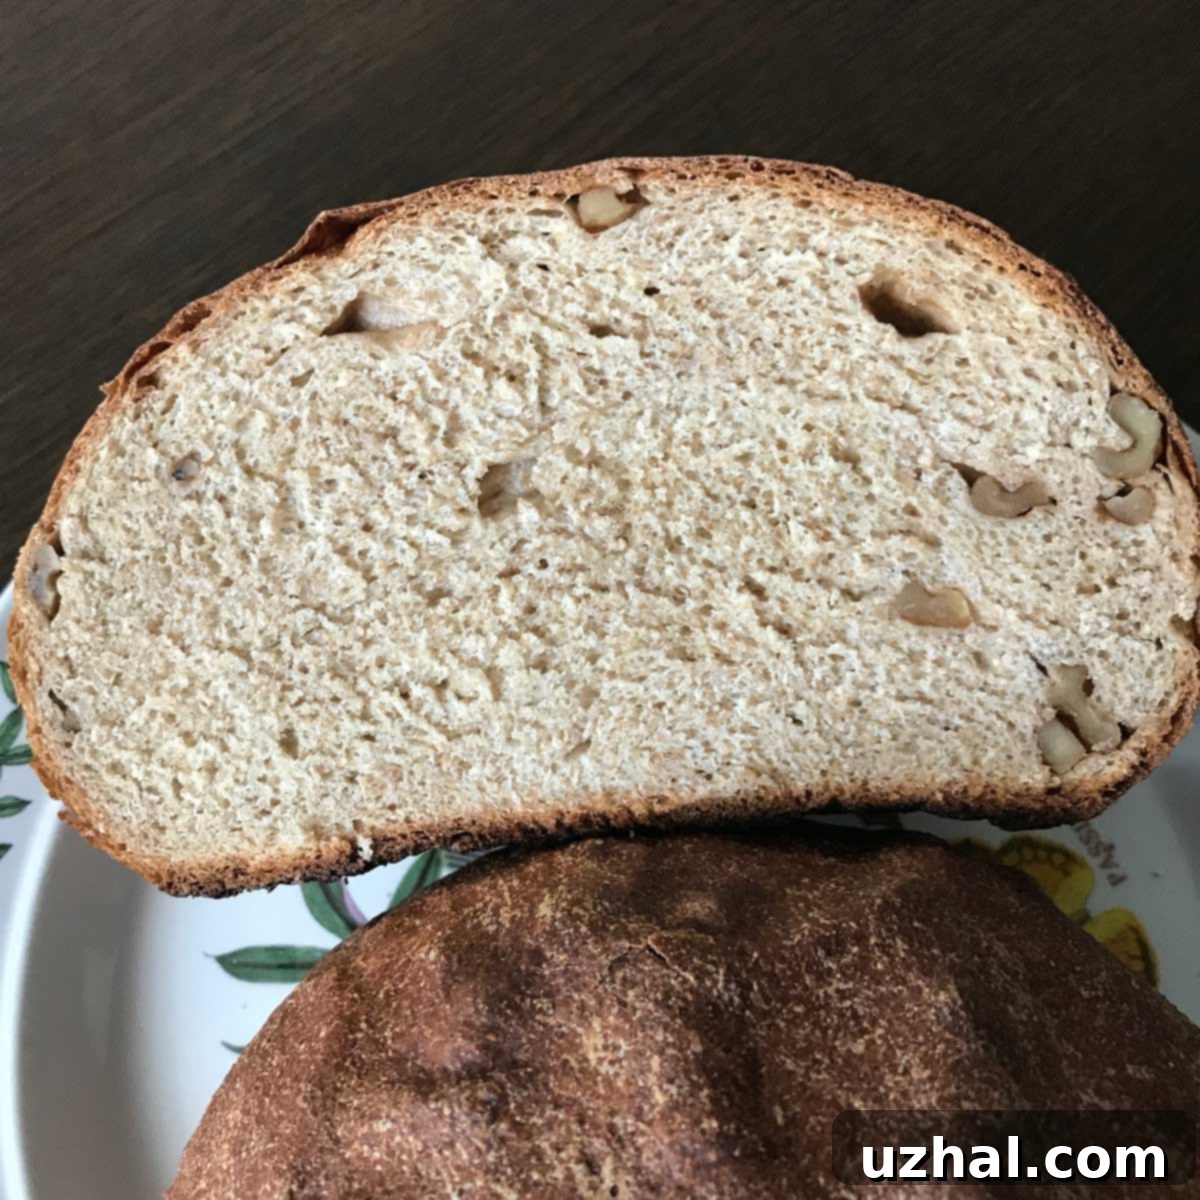
There’s nothing quite like the aroma of freshly baked bread filling your home, and this **Whole Wheat Walnut Bread** is a true testament to that simple pleasure. For years, this recipe has been a staple in my kitchen, cherished for its hearty texture and robust flavor. Unlike many other walnut bread recipes, such as the lighter, onion-infused Walnut Bread from Southern Burgundy, this particular loaf offers a denser, more substantial experience. Its tight crumb and satisfying chewiness – especially when vital wheat gluten is included, which is an optional but highly recommended addition – make it stand out. A subtle hint of natural sweetness from honey makes it an ideal companion for a spread of creamy peanut butter or a rich nut butter. Yet, its gentle sweetness doesn’t overpower, ensuring it remains incredibly versatile for savory applications too, perfect for a hearty turkey sandwich, a classic BLT, or even alongside a bowl of warm soup. This bread isn’t just a meal component; it’s an experience, bringing together the goodness of whole grains with the earthy crunch of walnuts.
My journey to perfect this **Whole Wheat Walnut Bread recipe** began with inspiration from King Arthur’s renowned Walnut Bread. Their original version, while excellent, traditionally uses all-purpose flour. However, my goal was to create a loaf that was not only delicious but also packed with the nutritional benefits and distinctive flavor of whole grains. To achieve this, I adapted their base recipe, halving the quantities and experimenting with a unique blend of flours: robust bread flour for structure, earthy rye flour for depth, and nutritious whole wheat flour as the primary grain. This specific combination isn’t accidental; each flour plays a crucial role. Bread flour provides the necessary gluten for a good rise and chewy texture. Whole wheat flour contributes a wholesome, nutty flavor and a wealth of fiber and nutrients. Dark rye flour adds an unparalleled earthy complexity and a slightly denser crumb, making the bread truly artisanal. Given the heavier nature of whole wheat and rye flours, incorporating vital wheat gluten became a brilliant addition. This optional ingredient significantly enhances the elasticity and strength of the dough, ensuring a better rise and a more satisfying, less crumbly texture. Adding a generous tablespoon of vital wheat gluten helps achieve that ideal, springy interior that can sometimes be challenging with high percentages of whole grains.

Mastering the Art of Baking Whole Wheat Walnut Bread
Baking this **Whole Wheat Walnut Bread** can be approached with a couple of methods, both yielding fantastic results, but my preferred technique truly elevates the final product. Historically, I’ve successfully baked this bread at a straightforward 375°F (190°C) for approximately 30 minutes, which consistently produces a perfectly fine loaf with a lovely golden crust. This method is reliable and accessible for any home baker.
However, to achieve a superior crust and an exceptional oven spring, my absolute favorite method involves baking in a preheated ceramic pot, often referred to as a Dutch oven or a French oven (like a Le Creuset). This technique replicates a professional bakery environment by trapping steam around the dough during the initial baking phase. The trapped steam prevents the crust from setting too quickly, allowing the dough to expand rapidly before the exterior firms up, resulting in a significantly taller, more open crumb and a gloriously crisp, artisanal crust. For this method, I preheat the Dutch oven along with the oven to a high 450°F (232°C). Once the oven and pot are thoroughly heated, the dough is carefully placed inside, the lid is secured, and it bakes for the first 15 minutes. This high-heat, covered period is critical for achieving that desirable oven spring.
After the initial 15 minutes, the lid is removed, and the oven temperature is reduced to 350°F (175°C). The bread then bakes uncovered for an additional 15 to 20 minutes, or until it reaches a deep golden brown and sounds hollow when tapped on the bottom. The uncovered baking allows the crust to brown beautifully and become wonderfully crisp. This two-stage baking process, starting hot and covered then finishing at a moderate temperature uncovered, is a game-changer for homemade rustic breads, guaranteeing a loaf with both visual appeal and textural perfection. No matter which method you choose, ensuring your oven is properly preheated and keeping a close eye on the bread as it bakes will lead to a delicious outcome.
Why Choose Whole Wheat & Rye? Nutritional Benefits and Flavor Profile
Beyond the delightful taste and texture, there are compelling reasons to opt for this **Whole Wheat Walnut Bread** over traditional white bread. Incorporating whole wheat and dark rye flours significantly boosts the nutritional value of your homemade loaf. Whole wheat flour retains the bran, germ, and endosperm of the wheat kernel, providing a rich source of dietary fiber, essential vitamins (like B vitamins), and minerals (such as iron, magnesium, and zinc). This higher fiber content aids digestion, promotes satiety, and contributes to better blood sugar management. Dark rye flour further enhances this nutritional profile, adding a distinctive tangy flavor and even more fiber, including a type of soluble fiber called arabinoxylan, which has been linked to improved gut health. The combination of these flours creates a more complex, nuanced flavor profile that is both earthy and slightly sweet, a stark contrast to the often one-dimensional taste of white bread. The walnuts themselves are powerhouses of healthy fats, particularly omega-3 fatty acids, antioxidants, and protein, adding yet another layer of health benefits and a satisfying crunch to every bite. Choosing this bread isn’t just about enjoying a delicious treat; it’s about embracing a more wholesome and flavorful approach to your daily diet.
Tips for Perfect Whole Wheat Walnut Bread Every Time
Achieving a consistently excellent loaf of **Whole Wheat Walnut Bread** involves a few key considerations. First, the quality of your ingredients truly matters. Opt for fresh active dry yeast and high-quality flours. King Arthur Flour is mentioned in the original inspiration, and their flours are indeed excellent, but any good quality brand will work. When it comes to walnuts, always toast them lightly before adding them to the dough. Toasting enhances their natural flavor and aroma, adding a deeper, nuttier dimension to the finished bread. Be mindful of water temperature for activating yeast; around 110-115°F (43-46°C) is ideal – too cold and the yeast won’t activate, too hot and it might kill it. For the kneading process, especially with the inclusion of vital wheat gluten, pay attention to the dough’s consistency. It should be sticky initially but become smooth and elastic after kneading. Don’t be afraid to adjust the final bit of bread flour quantity based on how the dough feels; humidity and flour absorption can vary.
During the rises, consistency is key. A warm, draft-free environment (like a turned-off oven with the light on, or a closed microwave) will ensure optimal fermentation. Keep an eye on the dough; it should double in bulk, not just rise a little. Over-proofing can lead to a dense crumb and a lack of oven spring. For the second rise, if you notice your dough spreading more outwards than upwards, gently reshape it by tucking the sides underneath. This technique helps create a taller, more aesthetically pleasing loaf without significantly deflating the dough, just be sure to handle it gently. Finally, allowing the bread to cool completely before slicing is crucial. While the temptation to slice into a warm loaf is strong, cooling allows the internal structure to set fully, resulting in cleaner slices and a better texture.
- Rye Flour Chocolate Chip Cookies
- Dark Chocolate Rye Flour Cookies
- Mary’s Rye Quick Bread
- German Dark Rye Round Loaves
- White Whole Wheat Peanut Butter Chocolate Chip Cookies
Serving Suggestions for Your Homemade Whole Wheat Walnut Bread
Once your glorious loaf of **Whole Wheat Walnut Bread** has cooled, the possibilities for enjoyment are endless. Its unique balance of subtle sweetness and earthy notes makes it incredibly versatile. For breakfast, thick slices toasted to perfection are divine with a generous spread of butter, your favorite jam, or a dollop of cream cheese. The mild sweetness from the honey truly shines when paired with peanut butter, almond butter, or even a homemade hazelnut spread for a wholesome and energizing start to your day. It also makes for an exceptional French toast, absorbing the custard beautifully and offering a fantastic texture.
For lunch or dinner, elevate your sandwiches. This bread’s sturdy yet tender crumb holds up wonderfully to hearty fillings. Imagine a gourmet turkey and Swiss sandwich with crisp lettuce and a touch of cranberry sauce, or a classic BLT where the bread’s flavor complements the smoky bacon and fresh tomatoes. It’s also a fantastic base for open-faced sandwiches, topped with avocado and a sprinkle of chili flakes, or a creamy chicken salad. Don’t forget its potential as an accompaniment to savory dishes; a slice alongside a hearty stew, a rich chili, or a creamy tomato soup provides a satisfying counterpoint. You can also use it to make delightful croutons for salads or even breadcrumbs for various recipes, ensuring no part of your homemade masterpiece goes to waste. The rich flavor of walnuts and whole grains makes it a sophisticated choice for a cheese board, particularly alongside aged cheddars, goat cheese, or a tangy blue cheese. A drizzle of good quality olive oil or a sprinkle of flaky sea salt on a fresh slice is also a simple yet profound way to appreciate its inherent goodness.
Recipe: Wholesome Whole Wheat Walnut Bread

Whole Wheat Walnut Bread
Cookie Madness
Pin Recipe
Ingredients
- 1 ½ teaspoons active dry yeast
- ¾ cup warm water (approx. 110-115 degrees F or 43-46 degrees C, crucial for yeast activation)
- ¾ cup bread flour (100 grams, used for initial hydration and later for dough consistency)
- 1 ½ tablespoons olive oil (or use walnut oil for enhanced flavor) plus more for coating the bowl
- 2 tablespoons honey (40 grams, provides subtle sweetness and aids yeast activity)
- 1 teaspoon salt (enhances flavor and controls yeast)
- 1 ¼ cup whole wheat flour, I like KA organic (170 grams, provides wholesome texture and nutrition)
- ¼ cup dark rye flour (35 grams, for earthy flavor and denser crumb)
- 1 tablespoon vital wheat gluten (slightly generous T) (optional but highly recommended for better rise and elasticity in whole grain breads)
- ¾ cup toasted and chopped walnuts (toasting enhances flavor and aroma)
- Egg white for brushing, optional (for a glossy, golden crust)
Instructions
-
In the bowl of your stand mixer, combine the active dry yeast with the warm water (ensure it’s around 110-115°F/43-46°C to properly activate the yeast). Stir well until the yeast starts to dissolve. Then, add ¼ cup of the bread flour to this mixture and stir gently. Let this sit undisturbed for about 10 minutes. This resting period allows the yeast to activate, and you should observe small bubbles forming on the surface, indicating the yeast is alive and ready to work. This is a crucial first step for a good rise.
-
Next, incorporate the honey and olive oil (or walnut oil) into the active yeast mixture. Follow by adding the salt, the entire quantity of whole wheat flour, and dark rye flour. If you are using vital wheat gluten, add it now as well. Stir all these ingredients thoroughly until just combined. At this stage, the dough will appear quite wet and very sticky, which is perfectly normal due to the high hydration and whole grain content. Gradually add another ¼ cup of the remaining bread flour and mix again. The dough should now be a bit firmer but will still have a noticeable stickiness. You should have approximately ¼ cup of bread flour left at this point, which will be used to adjust the dough’s consistency during kneading. If the dough is excessively sticky, you can add 1-2 more tablespoons of the remaining bread flour. The aim is for a dense dough that is still pliable and not dry.
-
Attach the dough hook to your stand mixer and begin kneading the dough on medium-low speed. Continue to knead until the dough transforms into a smooth, elastic ball. This process usually takes about 8-10 minutes. Observe the dough as it kneads: if it begins to clear the sides of the bowl and gather around the hook, it’s a good sign that sufficient gluten development is occurring, and you may not need to add the remaining flour. However, if the dough remains stubbornly sticky and doesn’t pull away from the bowl, gradually add the last 2 tablespoons of bread flour, one tablespoon at a time, until the desired smooth and elastic consistency is achieved. Avoid adding too much flour, as this can result in a dense, dry bread.
-
A helpful tip for precision: if you chose to weigh your flour measurements (which is highly recommended for baking accuracy), you will likely use all the specified bread flour, allowing for precise hydration.
-
Once kneading is complete, lightly grease a clean large mixing bowl with about ½ tablespoon of olive oil or walnut oil. Transfer the kneaded dough into this prepared bowl, turning it once or twice to ensure the entire dough ball is lightly coated with oil. This prevents it from sticking and drying out during the rise. Cover the bowl tightly with plastic wrap or a clean kitchen towel. Place the covered bowl in a warm, draft-free environment to rise. Ideal spots include a microwave (turned off) with the door closed, a slightly warmed oven (turned off), or simply a warm spot in your kitchen. Allow the dough to rise for 1 to 1 ½ hours, or until it has visibly doubled in bulk. This first rise, or bulk fermentation, is crucial for developing flavor and texture.
-
After the first rise, gently punch the dough down to release the accumulated gases. Transfer the dough to a lightly floured surface and knead in the toasted and chopped walnuts until they are evenly distributed throughout the dough. Avoid over-kneading at this stage; just enough to incorporate the walnuts. Shape the dough into a smooth, round ball. Prepare a baking sheet by lining it with parchment paper. Place the shaped dough ball onto the parchment-lined baking sheet. Cover the dough loosely with an upside-down mixing bowl or plastic wrap, ensuring there’s enough room for it to expand without sticking. Allow it to rise for a second time, known as proofing, for another 45 minutes. This second rise contributes to the final texture and lightness of the bread.
-
As the dough finishes its second rise, preheat your oven to 375°F (190°C) if using the conventional method. If opting for the Dutch oven method, place your ceramic pot (Dutch oven) with its lid into the oven and preheat both to 450°F (232°C). When the dough has adequately risen, gently make an ‘X’ incision (or a few parallel slashes) across the top of the loaf using a sharp razor blade or a very sharp knife. Do this carefully to avoid deflating the dough too much. If desired, lightly brush the top of the loaf with an egg white wash for a beautiful, glossy, golden-brown crust.
**For Conventional Baking:** Bake at 375°F (190°C) for 25 to 30 minutes, or until the crust is deep golden brown and the bottom of the loaf sounds hollow when tapped.
**For Dutch Oven Baking:** Carefully transfer the dough to the preheated Dutch oven, cover with the lid, and bake at 450°F (232°C) for 15 minutes. After 15 minutes, remove the lid, reduce the oven temperature to 350°F (175°C), and continue baking for another 15 to 20 minutes, or until the bread achieves a rich golden color and sounds hollow when tapped.
Once baked, transfer the bread to a wire rack and allow it to cool completely before slicing. While it’s tempting to cut into warm bread, cooling allows the internal structure to set properly, resulting in cleaner slices and optimal texture.
Baker’s Notes & Troubleshooting
**Achieving Optimal Crust:** For an extra crispy crust, consider adding a shallow pan of hot water to the bottom of your oven during the conventional baking method for the first 10-15 minutes. This creates steam, similar to the Dutch oven method, aiding in crust development.
**Storage:** Once completely cooled, store your Whole Wheat Walnut Bread in an airtight container or a bread bag at room temperature for up to 3-4 days. For longer storage, slice the cooled bread and freeze in a freezer-safe bag. You can then toast individual slices directly from the freezer.
