Hearty & Wholesome: The Ultimate Jumbo Wheat Germ Chocolate Chip Cookies Recipe
Baking can be one of life’s simplest pleasures, especially when the weather turns chilly and you crave something warm, comforting, and deeply satisfying. This recipe for “Wheat Germ Chocolate Chip Cookies” is more than just a sweet treat; it’s a delightful fusion of classic comfort and nourishing ingredients, perfectly adapted from the legendary Maida Heatter’s Book of Great Chocolate Desserts. These cookies offer a unique texture and a rich, complex flavor that goes beyond your average chocolate chip cookie, making them an ideal companion for a cozy afternoon or a thoughtful gift. While we won’t label them a “health food,” the inclusion of over a tablespoon of nutrient-rich wheat germ in each cookie certainly adds a wholesome touch, elevating them from a simple indulgence to a more purposeful delight for both mind and body. Get ready to transform your kitchen into a haven of enticing aromas and delicious anticipation.
Maida Heatter, a celebrated baker known for her meticulously tested recipes and delightful anecdotes, originally credited this exceptional cookie recipe to Esther Starbuck, a high school teacher from Colorado. What makes these particular cookies stand out is Heatter’s own confession: she prefers these Wheat Germ Chocolate Chip Cookies even over her famed “Absolute Best Chocolate Chip Cookies.” And it’s easy to understand why. These cookies boast a depth of flavor and texture that truly sets them apart. Their generous size and robust character make them an instant hit for bake sales or special occasions, promising a satisfying experience with every bite. The strategic addition of wheat germ, hearty oats, and fragrant coconut works harmoniously to enhance both the flavor profile and the overall textural experience, creating a cookie that is both familiar and excitingly new.
The Wholesome Power of Wheat Germ in Your Baking
Wheat germ, often overlooked in modern diets, is a nutritional powerhouse derived from the most nutrient-dense part of the wheat kernel. It’s packed with essential vitamins like E and B-vitamins, minerals such as zinc and magnesium, and a good dose of dietary fiber and protein. Incorporating wheat germ into your chocolate chip cookies not only adds a unique, nutty flavor but also boosts their nutritional value without compromising on deliciousness. This subtle addition makes your homemade cookies a more wholesome choice, offering a little extra goodness in every mouth-watering bite.
Toasted vs. Untoasted Wheat Germ: What You Need to Know
When it comes to selecting wheat germ for your baking, you’ll generally encounter two varieties: toasted and untoasted. While both offer similar nutritional benefits, their impact on the final cookie can differ slightly. Toasted wheat germ, as its name suggests, has been lightly roasted, which often intensifies its nutty flavor and can give it a slightly richer aroma. Historically, toasted wheat germ was more readily available, and a ¾ cup measure was often estimated to weigh around 90 grams. Untoasted wheat germ, on the other hand, retains a fresher, milder flavor and tends to be lighter, with ¾ cup weighing closer to 60 grams. Through extensive experimentation, I’ve found that an ideal balance is achieved with approximately 80 grams of wheat germ, and I personally prefer using the untoasted variety from Bob’s Red Mill. This specific choice allows for a delicate nutty undertone that complements the other ingredients without overpowering the classic chocolate chip cookie essence, ensuring a consistently delightful result every time you bake.
Mastering Your Wheat Germ Chocolate Chip Cookies: Expert Tips
Baking, while seemingly simple, often relies on precision and a few insider tips to achieve perfection. For these exceptional Wheat Germ Chocolate Chip Cookies, careful attention to detail will ensure they turn out beautifully every time. Here are some essential guidelines to help you master this recipe:
1. Precision in Measurement: The Key to Consistent Baking. Baking is a science, and precise measurement is paramount. While some home cooks prefer volume measurements, using a kitchen scale for dry ingredients like flour, sugar, and wheat germ can dramatically improve consistency. Small variations in ingredient quantities can significantly alter the texture and spread of your cookies. Invest in a good digital scale if you don’t have one; it’s a game-changer for serious bakers.
2. The Perfect Egg: Size Matters. Maida Heatter’s original instructions specify using a large or extra-large egg. For ultimate accuracy, I recommend aiming for an egg that weighs approximately 50 grams. The egg acts as a binder, adds moisture, and contributes to the cookie’s structure and richness. Too much or too little can throw off the balance, affecting everything from the dough’s consistency to the final chewiness of the cookie.
3. Coconut or Nuts? Enhancing Flavor and Texture. The recipe calls for shredded coconut, and both sweetened and unsweetened varieties work well, depending on your preference for sweetness. The coconut contributes a wonderful chewiness and a subtle tropical aroma that truly complements the wheat germ and oats. However, if coconut isn’t to your liking, it can be omitted. In such cases, I highly recommend replacing it with 2 ounces (approximately ½ cup) of finely chopped nuts, such as pecans or walnuts. Nuts will provide a similar textural complexity and a delightful crunch, ensuring the cookies retain their multi-dimensional character.
4. Flour Measurement: The Scoop vs. The Scale. Flour measurement can be surprisingly tricky due to varying densities. A ¾ cup of all-purpose flour can range from 90 to 105 grams depending on how it’s measured. Flour that has been aerated or sifted will be lighter, while flour scooped directly from the bag will be denser. Through my own baking, I’ve found that using 105 grams of flour (which correlates to flour that has been scooped straight out of the bag or bin without aeration) consistently yields cookies with a nicer, more structured appearance and superior edges. If you don’t have a kitchen scale, simply scoop your flour directly from the container without sifting or shaking it down, then level it off.

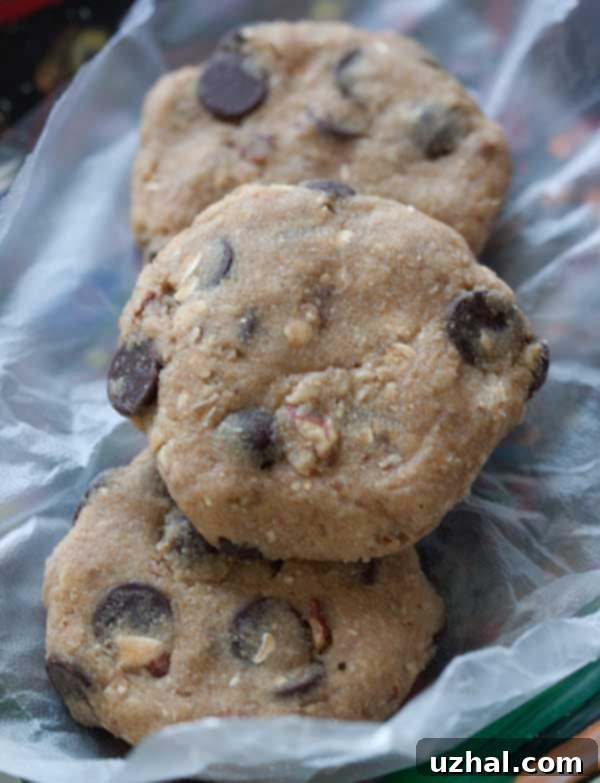
5. The Magic of Chilling: For Crisper Edges and Better Shape. One final, invaluable tip for achieving the best possible results with these jumbo cookies: chilling the pressed dough rounds before baking. After you’ve portioned and flattened your cookie dough, transfer the baking sheet to the refrigerator for a few hours. This step allows the fats in the butter to firm up, preventing the cookies from spreading too quickly in the oven. The result is consistently nicer, crisper edges and a more uniform, appealing shape. As you can see in the photo above, the raw dough has a somewhat grainy and ruddy appearance, characteristic of the wheat germ and oats. But don’t let that fool you; these unassuming rounds bake into truly handsome and incredibly delicious cookies.
By following these detailed tips, you’re well on your way to baking a batch of Wheat Germ Chocolate Chip Cookies that are not just tasty but also visually appealing and perfectly textured. Enjoy the process and the delicious rewards!
Explore More Wholesome Cookie Recipes
If you love the unique addition of wheat germ in these cookies, you might be interested in exploring other recipes that incorporate this nutritious ingredient or offer similar wholesome twists on classic treats. Here are some related recipes to inspire your next baking adventure, expanding your repertoire of hearty and flavorful homemade cookies:
- Butterscotch, Pecan & Toasted Wheat Germ Cookies: A delightful combination of sweet butterscotch, crunchy pecans, and the nutty goodness of toasted wheat germ.
- Oatmeal Wheat Germ Chocolate Chip Cookies: For those who appreciate the added chewiness and fiber of oats alongside the chocolate and wheat germ.
- Toasted Wheat Germ Monsters: A fun, textural cookie packed with various add-ins and the distinct flavor of toasted wheat germ.
- Chewy Coconut Chocolate Chip Granola Bars: While not featuring wheat germ, these bars offer a similar wholesome, chewy texture with coconut and chocolate, perfect for a hearty snack.
- Chunky Peanut Butter Cookies With Wheat Germ: A robust peanut butter cookie enhanced with the earthy flavor and texture of wheat germ.
Jumbo Wheat Germ Chocolate Chip Cookies Recipe

Jumbo Wheat Germ Chocolate Chip Cookies
By Anna
Pin Recipe
Ingredients
- ¾ cup unsifted all-purpose flour (105 grams)
- 1 teaspoon baking powder
- ½ teaspoon salt
- 8 tablespoons unsalted butter, room temperature (114 grams)
- 1 teaspoon vanilla extract
- ½ cup granulated sugar (100 grams)
- ⅓ cup firmly packed dark brown sugar (75 grams)
- 1 large or extra-large egg (50 grams)
- ¼ cup quick cooking oats (20 grams)
- ¾ cup untoasted wheat germ (60-80 grams, preferably 80g for better texture)
- ⅔ cup shredded unsweetened coconut (50 grams, or 2 ounces of finely chopped nuts as a substitute)
- 1 cup semisweet chocolate chips
- ½ cup finely chopped and toasted pecans optional, but highly recommended for added flavor and crunch
Instructions
-
Begin by preheating your oven to 350 degrees F (175 degrees C). Prepare one or two rimmed baking sheets by lining them with parchment paper. This will prevent sticking and ensure even baking.
-
In a medium bowl, thoroughly whisk or sift together the all-purpose flour, baking powder, and salt. Set this dry ingredient mixture aside for later use.
-
Using a stand mixer fitted with the paddle attachment (or a hand mixer), beat the softened unsalted butter on medium speed until it’s light and creamy. Add the vanilla extract, granulated sugar, and dark brown sugar to the butter. Continue to beat until the mixture is well combined and fluffy, making sure to scrape down the sides of the bowl occasionally to ensure all ingredients are incorporated. Next, add the large or extra-large egg (50g) and beat just until it’s fully incorporated into the mixture. Reduce the mixer speed to low. Gradually add the reserved flour mixture, then add the quick cooking oats, wheat germ, and shredded coconut. Mix until just combined. Finally, fold in the semisweet chocolate chips and the optional finely chopped and toasted pecans (if you are using them), mixing until evenly distributed.
-
The cookie dough should be quite thick and relatively easy to handle. Scrape the entire batch of dough onto a large sheet of wax paper or parchment paper. Divide the dough into 9 equal sections, each weighing approximately 3 ounces. You can achieve this by using a ¼ cup measuring cup, a large spoon, or for ultimate precision, a kitchen scale and slightly dampened fingers to shape the portions.
-
If you are using two baking sheets, arrange 5 cookie dough portions on one sheet and 4 on the other, leaving ample space between them for spreading. Using a fork or the palm of your hand, gently press each dough portion into a ½ inch thick round. This flattening step is crucial for the final cookie shape and texture.
-
Bake one sheet of cookies at a time in the top center of your preheated oven for 18 minutes, or until the edges are golden brown and the centers appear set and spring back lightly when touched. Baking one sheet at a time helps ensure even heat distribution and consistent results. Once baked, allow the cookies to remain on the hot baking sheet for a few minutes until they are firm enough to be carefully transferred. Then, use a spatula to move them to a wire cooling rack to cool completely. Ensure they are on a rack with plenty of air circulating both above and below to prevent sogginess.
-
Upon cooling, these cookies will develop satisfyingly crunchy edges and dense, yet not hard, chewy centers. For an even firmer and more solid cookie, I personally enjoy chilling them in the freezer for a while. The freezer is also an excellent place for long-term storage of baked cookies, keeping them fresh and delicious for future enjoyment.
Notes
