Decadent Chocolate Chiffon Pie: A Timeless Classic Reimagined
Step back in time to an era of elegant, light-as-air desserts with the glorious **Chocolate Chiffon Pie**. If the name conjures images of a bygone era, you’re not wrong. This stunning dessert, with its cloud-like mousse and rich chocolate flavor, was a sensation for decades, particularly from the 1920s through the mid-century. Yet, for various reasons—perhaps shifting culinary trends, the rise of new dessert fads, or the concern over using raw egg whites—it quietly faded from the spotlight, much like the equally iconic Baked Alaska.
But true classics never truly disappear. After years of hearing whispers about its ethereal texture and unparalleled taste, I felt an irresistible pull to dive into the world of Chocolate Chiffon Pie. Yes, even with the raw eggs, which I confess, had kept me at bay for far too long. This week, I embarked on a mission to revive this delicate dessert, to understand its charm, and to bring its velvety magic back to modern kitchens. What I discovered was a dessert that is not only deeply satisfying but also surprisingly adaptable, offering a delightful journey into the art of classic American baking.
Join me as we explore the fascinating history of this pie, tackle its unique preparation, and uncover tips to make it a show-stopping success in your own home. Whether you’re a seasoned baker or a curious beginner, the allure of a perfectly crafted Chocolate Chiffon Pie is simply too strong to resist.
Jump to Recipe

The Sweet History of Chocolate Chiffon Pie
While light, airy gelatin-based desserts existed before its debut, the Chocolate Chiffon Pie as we know it today is often credited to the inventive mind of Monroe Boston Strause. Known affectionately as “The Pie King,” Strause supposedly conjured this masterpiece in 1926. His influence on American baking was immense, extending beyond the creation of chiffon pies. He even penned a comprehensive book on pies titled Pie Marches On, which served more as a guide for commercial bakeries rather than the home cook. This speaks volumes about the meticulousness and scale of his pie-making endeavors.
Strause was not just a master baker; he was also known for his charismatic personality and sharp wit, often reflected in his writings (such as a section in his book humorously titled “Taking the Cus out of Custard”). His strong opinions and innovative spirit undoubtedly contributed to his immense popularity and the enduring legacy of his creations. Interestingly, the chiffon pies featured in his book, which I had the pleasure of finding online, primarily focused on fruit variations. However, he did include chocolate and vanilla flavors, both of which notably called for cornstarch, adding a unique twist to their texture.
The exact origin of the name “chiffon” for these pies remains a delightful mystery, but popular lore suggests it was Strause’s mother who, upon tasting one, described its texture as “delicate as a pile of chiffons.” This poetic description perfectly captures the light, almost fabric-like quality of the pie’s filling. From its early days, the Chocolate Chiffon Pie quickly became a staple in American homes and diners, gracing holiday tables and everyday celebrations with its elegant simplicity. Its popularity endured for decades, a testament to its unique appeal and the culinary genius of its purported creator. Now, let’s continue our march to re-creating this fabulous pie!

Crafting the Perfect Chocolate Chiffon Pie: My Take on Maida Heatter’s Classic
When delving into the world of classic desserts, it’s almost impossible to ignore the influence of culinary legends. For this Chocolate Chiffon Pie, my inspiration—and starting point—was none other than Maida Heatter, a beloved figure in baking, often referred to as “the Queen of Cake.” Her recipe from The Book of Great Chocolate Desserts is a benchmark for many. I call my version “my take” because, while I initially followed her recipe precisely, I found that a few minor adjustments elevated the pie to my ideal standard, resulting in a slightly fluffier and intensely flavorful experience.
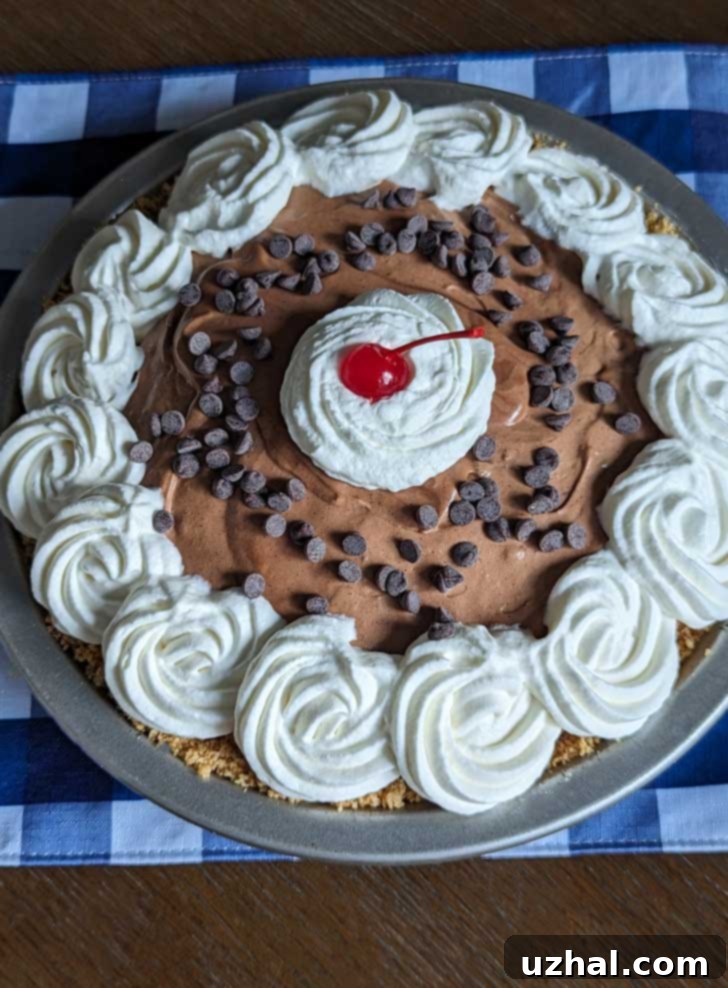
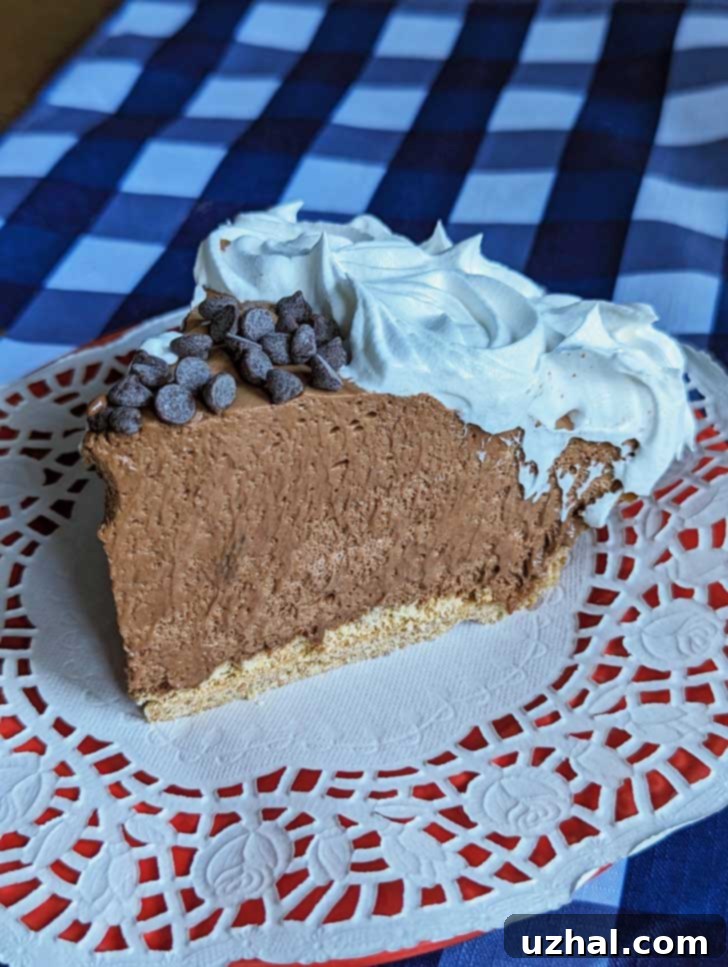
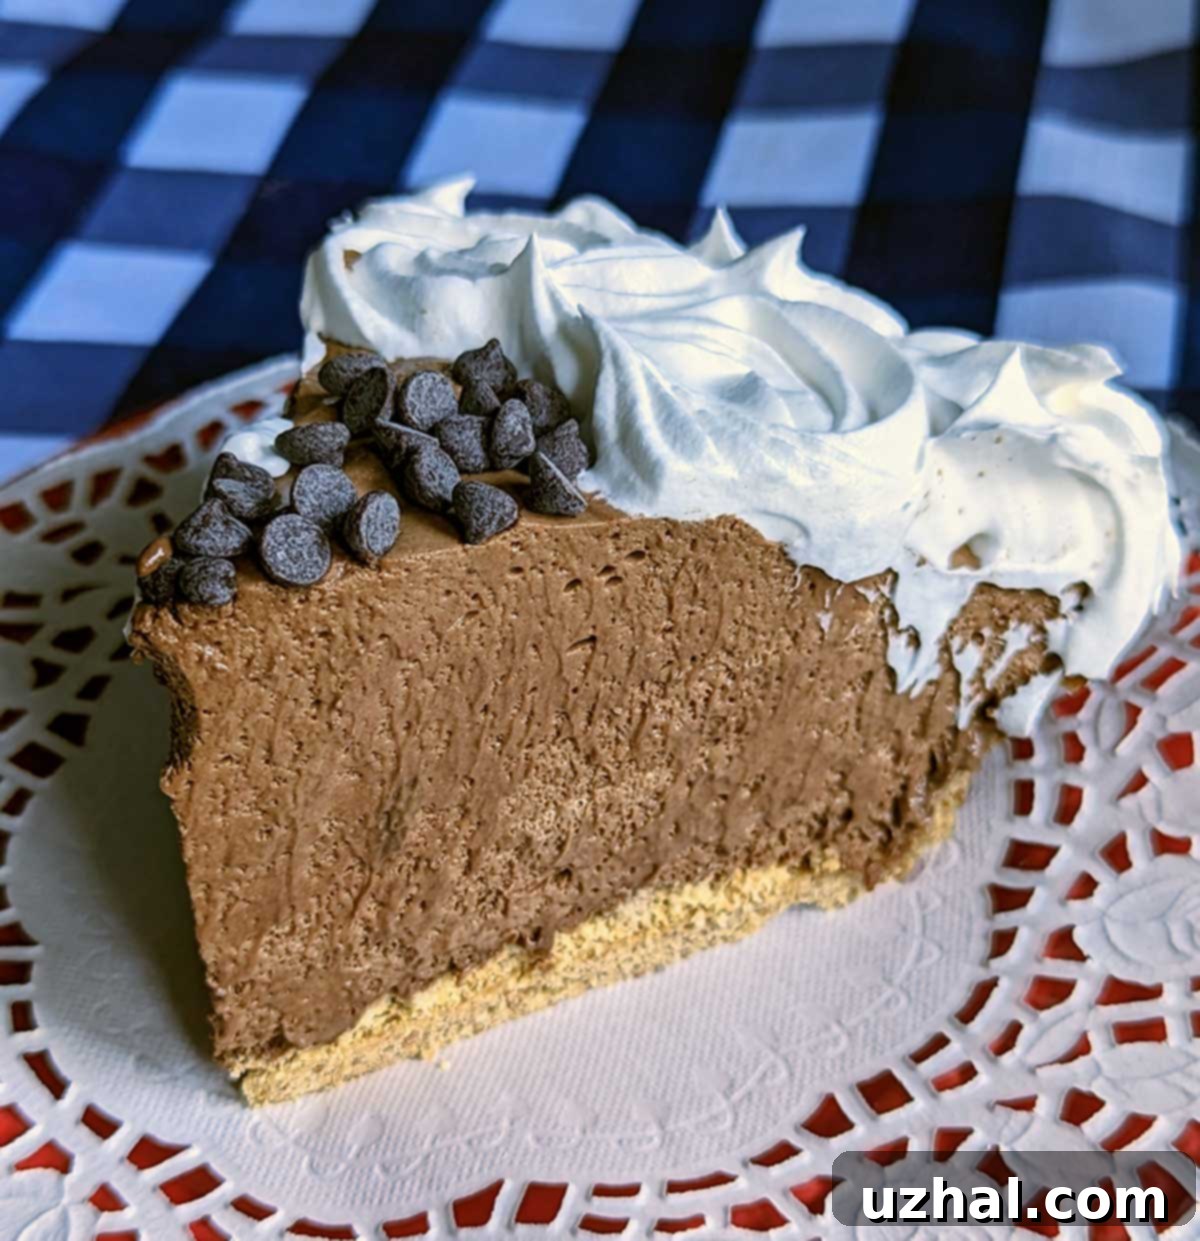
Heatter’s original recipe called for essential ingredients: plain gelatin, whole milk, eggs, a generous amount of semisweet or dark chocolate, sugar, a touch of instant coffee powder, and a substantial quantity of heavy cream. For the crust, she offered the versatile choice of either a classic graham cracker base or a traditional pastry crust. In my exploration, I experimented with both, finding distinct charms in each. The pie pictured below, showcasing its beautiful texture, features my favored rolled graham cracker crust, a delightful variation I’ll delve into shortly.
My modifications to Maida Heatter’s iconic recipe focused on balancing richness with lightness. I slightly reduced the heavy cream in the filling and adjusted the egg white ratio to achieve a more pronounced mousse-like texture. The instant coffee powder, while a subtle addition, plays a crucial role in enhancing the chocolate’s depth without imparting a strong coffee flavor. Each ingredient is thoughtfully selected to contribute to the pie’s overall harmony—the whole milk provides a creamy base, gelatin gives it structure, and the high-quality chocolate delivers the luxurious flavor that makes this pie so irresistible.

Navigating Raw Egg Whites: Safety and Alternatives
One of the primary reasons Chocolate Chiffon Pie, and many other vintage mousse-like desserts, fell out of mainstream popularity was the inclusion of raw egg whites. The concern, of course, centers around the risk of salmonella. After a careful review of current food safety statistics, the likelihood of contracting salmonella from commercially sold eggs in many regions is actually quite low. For individuals with healthy immune systems, the risk is minimal. However, it’s paramount to exercise caution.
For this version of the pie, I use two yolks and three uncooked whipped egg whites. While I’m personally comfortable with this for my own consumption, I would never serve this dessert to the immunocompromised, young children, pregnant individuals, or anyone without explicitly informing them about the raw egg whites. Transparency and personal judgment are key when it comes to egg safety. Always err on the side of caution and ensure your guests are fully aware.
For those who prefer to mitigate any risk, there are excellent alternatives. Using pasteurized egg whites is a straightforward solution; these are readily available in most grocery stores and have been heat-treated to eliminate harmful bacteria. Another fantastic option, which I am keen to experiment with further, involves gently heating the egg whites and sugar over a double boiler to 160°F (71°C) before whipping. This technique, similar to preparing a Swiss or Italian meringue, not only eliminates safety concerns but also yields a remarkably stable and glossy meringue, adding an extra layer of elegance to your chiffon pie. Given that a double boiler is already an essential piece of equipment for this recipe, integrating this step would be quite seamless and certainly worth the extra effort for peace of mind and an even more luxurious texture.
Essential Equipment for Chiffon Pie Mastery
Preparing Chocolate Chiffon Pie is a rewarding endeavor, but it does require a few specific pieces of equipment to ensure success. This isn’t a “one-bowl wonder” recipe, but the tools are standard for most well-equipped kitchens and streamline the process considerably. You’ll definitely need a **double boiler** for gently heating the chocolate and gelatin mixture. This indirect heat prevents scorching and ensures a smooth, lump-free base for your filling.
For whipping the cream and egg whites, an **electric mixer** is indispensable. You’ll need either a robust stand mixer with at least two mixing bowls (or one bowl and a clean, separate bowl for the egg whites after washing the whisk attachment) or a reliable handheld electric mixer along with two large mixing bowls. Modern handheld mixers are surprisingly powerful and efficient, so don’t feel you absolutely need a stand mixer if space or budget is a concern; they’ll get the job done beautifully, though perhaps with a bit more arm work.
A crucial element in achieving the perfect chiffon texture is the **ice bath**. This isn’t a fancy gadget, but rather a simple setup: a large bowl filled with ice water, big enough to comfortably submerge the top pot of your double boiler. It’s used to rapidly cool the chocolate mixture, preventing the gelatin from setting too quickly or unevenly. I typically use a sturdy metal bowl for my ice bath, as metal conducts cold efficiently.
A **chopper/grinder** is optional but highly recommended, especially for making homemade graham cracker crumbs or finely chopping chocolate. I rely on my Hamilton Beach Stack and Press – it’s an inexpensive workhorse powerful enough for tasks like making nut butter, and it makes quick work of crushing crackers or preparing chocolate. For first-timers, tackling this recipe in an unfamiliar kitchen or an AirBnB might prove challenging due to the specialized equipment and multi-step process. It’s best to prepare it in a space where you’re comfortable and have all your tools at hand.
The Foundation: Perfect Pie Crust Options
The crust is the unsung hero of any pie, providing a textural contrast and a flavorful foundation for the delicate filling. For Chocolate Chiffon Pie, a **graham cracker crust** is a classic and highly recommended choice. Its subtle sweetness and crisp texture perfectly complement the rich, airy chocolate. However, the versatility of this pie means you’re not limited to just graham crackers.
You can easily substitute graham crackers with chocolate sandwich cookies (like Oreos) for an even more intense chocolate experience, or experiment with other cookie varieties that appeal to your palate. The key is to ensure the crumbs are fine and evenly mixed with butter and sugar, then pressed firmly into the pie plate. The crust in my first photo, while delicious, was a result of an experimental variation I won’t detail just yet – suffice to say, it performed its duty admirably!
The crust prominently featured in the second photo is my absolute favorite: the **rolled graham cracker crust**. This is a truly fun and unique option. Instead of merely pressing crumbs into the pan, you actually create a graham cracker-flavored “dough” that can be rolled out, much like a traditional pastry crust. This method yields a crust that is not only sliceable and easily liftable from the pan, but also incredibly tender, reminiscent of the delightful cookie part of a Moon Pie. It offers a more structured yet still crumbly base that elevates the entire pie experience, providing a satisfying bite with every forkful.
Choosing the Best Chocolate for Your Chiffon Pie
The quality of your chocolate directly impacts the flavor of your Chocolate Chiffon Pie, so choosing wisely is crucial. The original recipe often specifies semisweet chocolate, which provides a balanced sweetness that many find appealing. However, I have a strong preference against using **semisweet chocolate chips** for the filling. Chocolate chips contain stabilizers that help them maintain their shape during baking, which can result in a less smooth, slightly grainy texture when melted for a mousse-like filling.
Instead, opt for **semisweet, bittersweet, or dark chocolate bars**. Look for high-quality baking chocolate in bar form. A fantastic and economical option is a 7-ounce block of Trader Joe’s Pound Plus chocolate, chopped into shards. This size works perfectly for the recipe and melts beautifully into a silky-smooth mixture. If you’re looking to splurge or want to explore different flavor profiles, premium brands like Guittard disks are also excellent choices, offering a superior melt and nuanced flavor.
Regarding preparation, Maida Heatter’s recipe suggests grinding the chocolate. While this can yield an incredibly smooth filling, I’ve found that with today’s high-quality baking chocolates, grinding isn’t strictly necessary. For my best pies, I simply chop the chocolate into small shards. This is particularly easy when working with a large block like the Trader Joe’s option. The finely chopped pieces melt quickly and uniformly in the double boiler, achieving the desired smoothness without the extra step of grinding. This small adjustment saves time without compromising on the luxurious texture of the filling.
Expert Notes and Tips for Chiffon Pie Success
- **Equipment Work-Arounds**: While I’ve detailed the ideal equipment, don’t let a lack of specialized tools deter you. You can absolutely make this pie with a pre-made crust to save time, or use a rolling pin and a sturdy bag to crush your own graham crackers. Instead of a dedicated food chopper, a sharp knife can be used to finely chop your chocolate. For whipping, modern **hand-held mixers** are incredibly powerful and efficient; paired with two large bowls, they’ll achieve the perfect peaks for your cream and egg whites with minimal extra effort.
- **Gelatin Measurement Precision**: Pay close attention to your gelatin. Many older recipes, and even some current ones, mention a “tablespoon” of gelatin as being equivalent to one packet. However, standard Knox brand unflavored gelatin packets consistently contain **2 ½ teaspoons**, not a tablespoon. Using the correct amount is crucial for the pie’s set and texture, so always measure carefully or rely on the packet quantity (2 ½ teaspoons).
- **Softening Gelatin Properly**: Gelatin softens and dissolves differently in various liquids. In cold milk, it takes approximately twice as long as it would in cold water. It’s vital to sprinkle the gelatin evenly over the cold milk and allow it to stand for a **full 5 minutes** to ensure it’s completely softened. Furthermore, gently tamp down the powder to ensure every granule is coated by the milk. If not adequately hydrated, you risk encountering **little blobs of clumped, undissolved gelatin** in your final filling, which are unpleasant and won’t dissipate even with heat.
- **Chopped vs. Ground Chocolate**: Maida Heatter’s original recipe recommends grinding the chocolate for the smoothest possible filling. While I did try this, and the filling was indeed smooth, I found that fillings made with **finely chopped chocolate** were equally luxurious in texture. The effort saved by simply chopping instead of grinding doesn’t compromise the end result with today’s quality chocolate bars. The key is to chop it finely enough so it melts seamlessly.
- **Coffee’s Role and Alternatives**: The instant coffee powder is a secret weapon in many chocolate desserts. It doesn’t make the pie taste like coffee; instead, it acts as a flavor enhancer, deepening and intensifying the chocolate notes. If you’re not a fan of coffee, or simply prefer a different aroma, you can easily substitute it with a little **vanilla extract**. Pure vanilla extract will add a classic warmth and roundness to the chocolate flavor.
- **Freezing Chiffon Pie**: Chiffon pies are not traditionally known for freezing well due to their delicate, airy structure which can sometimes become watery upon thawing. However, given the high fat content from the chocolate and cream in this particular recipe, I decided to conduct a little experiment. I froze a single slice for about 8 hours and then thawed it in the refrigerator. To my pleasant surprise, the texture was absolutely fine, retaining much of its original creaminess and lightness. This suggests that careful freezing of individual slices might be an option. I subsequently froze half a pie, and while I haven’t yet thawed it, the initial results are promising. When freezing, wrap tightly in plastic wrap and then foil to prevent freezer burn.
A Simpler Delight: The Easier Chocolate Chiffon Knock-Off
While the classic Chocolate Chiffon Pie is undeniably a triumph, sometimes you crave that rich, airy chocolate experience with less fuss and zero raw egg concerns. For those occasions, a delightful and much simpler alternative exists: the good old Hershey Bar Pie. This recipe delivers a wonderfully creamy chocolate pie with a similar mousse-like quality, but without the multiple steps, double boiler, or whipped egg whites of a traditional chiffon. It’s a fantastic option if you’re short on time, new to baking, or simply want a delicious dessert that requires minimal effort.
The Hershey Bar Pie typically involves melting chocolate bars into a creamy base and folding in whipped cream, often using a pre-made crust. The result is a rich, satisfying pie that, while not identical to a classic chiffon, certainly scratches that chocolate cream pie itch. It’s a lot less work and offers a comforting, nostalgic flavor that’s hard to beat. I’m planning on revisiting this recipe myself very soon to update its photo and share its enduring appeal.
- Unsweetened Chocolate Chiffon Pie
- Lemon Chiffon Cake
- Raspberry Chiffon Pie
- Chiffon Gingerbread
- Chiffon Cake — Classic Orange
Recipe

Chocolate Chiffon Pie
Anna
Pin Recipe
30 minutes
9 minutes
6 hours
6 hours
39 minutes
Desserts
American
8
Ingredients
Crust
- 1 ½ cups graham cracker crumbs (from 12 sheets or 24 squares)
- 3 tablespoons sugar
- 6 tablespoons unsalted butter
- ⅛ teaspoon salt
Chocolate Filling
- 1 cup whole milk (225 grams)
- 1 envelope unflavored gelatin (2 ½ teaspoons)
- 7 ounces semisweet chocolate, chopped or ground in a food processor or mini chopper (198 grams)
- ⅔ cup granulated sugar (130 grams)
- 2 large egg yolks
- 1 teaspoon dry instant coffee crystals
- pinch salt
- 1 cup heavy whipping cream (see note) (225 grams)
- 3 large egg whites or equivalent pasteurized egg whites (92 grams)
Whipped Cream Garnish
- ¾ cup heavy whipping cream
- 2 tablespoons confectioners’ sugar
- ½ teaspoon vanilla extract
Instructions
Graham Cracker Crust
-
Combine graham cracker crumbs, granulated sugar, melted unsalted butter, and a pinch of salt thoroughly. Press this mixture firmly into the bottom and up the sides of a 9-inch pie plate, creating an even layer. Bake the crust in a preheated oven at 350°F (175°C) for 8 minutes, then let it cool completely on a wire rack before adding the filling.
Chocolate Filling
-
Before you begin, ensure you have all the components for your ice bath ready. This includes a bowl large enough to comfortably submerge the top part of your double boiler, plenty of ice, and cold water. Do not prepare the ice bath yet; simply have the items at hand.
-
In the top portion of your double boiler, off the heat, pour the cold whole milk. Evenly sprinkle the unflavored gelatin powder over the surface of the milk. Allow it to soften and bloom in the cold milk for a full 5 minutes. Gently press down on any visible gelatin clumps to ensure all the powder is thoroughly coated by the milk, preventing undissolved gelatin later.
-
Meanwhile, add about an inch or two of water to the bottom pot of the double boiler and bring it to a gentle simmer over medium heat. Be careful not to let the water boil vigorously, as you want steady, indirect heat.
-
Once the gelatin has softened, whisk in ⅓ cup of the granulated sugar, the 2 large egg yolks, and the chopped (or ground) semisweet chocolate into the milk and gelatin mixture. Place the top pot over the hot simmering water in the double boiler. Stir continuously with a whisk or spatula until the chocolate is fully melted and the mixture is smooth and glossy. If using, stir in the instant coffee crystals until completely dissolved, which will enhance the chocolate flavor.
-
Carefully remove the top pot from the double boiler. Now, assemble your ice bath: fill the large bowl with ice and water. Submerge the bottom of the double boiler pot into the ice bath, taking great care not to splash any water into the chocolate mixture. Stir the chocolate mixture constantly until it cools to approximately the temperature of your wrist (or slightly cooler). Remove it from the ice bath once cooled. If the cooling process is slow, you can leave it in the ice bath while whipping the egg whites and cream, but monitor it closely to prevent it from thickening too rapidly.
-
In a large, clean mixing bowl, pour the 1 cup of heavy whipping cream. Using an electric mixer (stand or handheld), whip the cream until it forms medium-stiff peaks. Set aside. Thoroughly wash and dry your mixer beaters and bowl if you only have one.
-
In a second very clean mixing bowl (metal or glass works best for egg whites), add the 3 large egg whites and a pinch of salt. Begin beating them with the electric mixer. As they start to turn white and become foamy, gradually add the remaining ⅓ cup of granulated sugar, one tablespoon at a time, while continuing to beat. Continue whipping until the sugar is fully dissolved and the egg whites hold stiff, glossy peaks.
-
Return the pan containing the cooled chocolate mixture to the ice water. Stir vigorously and continuously, scraping the sides with a rubber spatula, until the mixture just begins to visibly thicken. This step is crucial for achieving the correct mousse-like consistency.
-
Begin to combine the components: Gently fold ⅓ of the slightly thickened chocolate mixture into the beaten egg whites until just combined. Next, gently fold another ⅓ of the chocolate mixture into the whipped cream. Finally, combine all three mixtures (the remaining chocolate, the egg white mixture, and the whipped cream mixture) together using a gentle folding motion until uniform in color and texture. Be careful not to deflate the air.
-
Carefully pour about two-thirds of the chiffon filling into your cooled pie shell, filling it just to the rim. Place this partially filled pie into the freezer for 5 minutes to allow it to firm up slightly. Leave the remaining filling at room temperature, or in the refrigerator if your kitchen is warm and it’s looking runny. After 5 minutes, remove the pie from the freezer and mound the remaining filling on top, creating an attractive dome shape.
-
For the final garnish, prepare sweetened whipped cream. In a clean bowl, beat the ¾ cup of heavy cream along with 2-3 tablespoons of confectioners’ sugar (adjust to taste) and ½ teaspoon of vanilla extract until stiff peaks form. Pipe or spread this whipped cream around the edges or over the entire top of the pie for a beautiful presentation.
-
Chill the finished Chocolate Chiffon Pie in the refrigerator for a minimum of 6 hours, or ideally, overnight, to allow the filling to set completely and for the flavors to meld beautifully.
Notes
Chiffon
Tried this recipe?
Let us know how it was!
