Indulge in the Ultimate No-Bake Peppermint Ice Cream Crunch Cake: A Refreshing Dessert Recipe
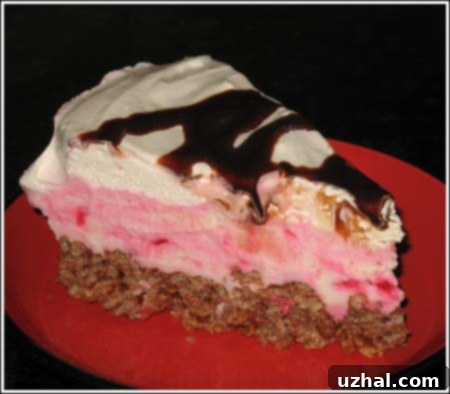
On a scorching summer day, or any time a craving for something cool and delightful strikes, there’s nothing quite like a homemade ice cream cake. This particular Peppermint Ice Cream Crunch Cake is a treasured old recipe, recently rediscovered and perfected, promising an unforgettable dessert experience. It’s a symphony of textures and flavors, featuring a rich, chocolatey Rice Krispies crust, a creamy layer of refreshing peppermint ice cream, all crowned with fluffy whipped cream and a decadent drizzle of chocolate syrup. While the concept is beautifully simple, the combination of its distinct components creates an intriguing and utterly delicious treat that’s surprisingly easy to assemble.
This dessert isn’t just a cake; it’s an event. Imagine the satisfying crunch of the crust giving way to the smooth, cool embrace of peppermint ice cream, followed by the light sweetness of whipped cream. It’s a perfect balance that appeals to all ages and makes for an impressive presentation with minimal effort. Whether you’re hosting a gathering, celebrating a special occasion, or simply treating yourself and your loved ones, this ice cream crunch cake stands out as a unique and refreshing alternative to traditional baked goods. Its no-bake nature makes it an ideal candidate for summer entertaining, as it keeps your kitchen cool and allows you more time to enjoy your guests.

Choosing the Perfect Pan for Your Ice Cream Crunch Cake
One of the beauties of this ice cream crunch cake recipe is its adaptability, starting with the choice of pan. My original recipe specifically calls for a 10-inch springform pan, which is ideal due to its removable sides that make unmolding incredibly simple. Springform pans are designed with a latching mechanism that releases the sides, allowing you to present your beautiful layered cake without disturbing its delicate structure. This is particularly advantageous for frozen desserts like ice cream cakes, where flipping or inverting could lead to disaster.
However, don’t fret if you don’t have that exact size. A 9-inch springform pan works equally well; you might just end up with a slightly taller cake, which is hardly a downside! The increased height can even add to the visual appeal, making each slice feel more substantial. Beyond springform pans, the versatility of this dessert allows for other options. An 8-inch or 9-inch square pan can certainly be used, though you’ll need to be a bit more careful when serving to ensure clean slices. For those who prefer a smaller batch or want to experiment with individual portions, a loaf pan or even muffin tins could be fantastic alternatives, reducing the scale but not the deliciousness. No matter your choice, the key is proper preparation to ensure a smooth release and beautiful presentation.
To prepare your chosen pan, especially for a springform, I highly recommend lining the inside with non-stick aluminum foil. This clever trick ensures the cake lifts out cleanly and effortlessly once frozen solid. The foil acts as a protective barrier, preventing the crust from sticking to the pan and making the transfer to a serving platter incredibly easy. If non-stick foil isn’t available, standard aluminum foil sprayed generously with cooking spray will achieve a similar result. The non-stick surface is crucial for preventing the chocolate Rice Krispies crust from adhering to the pan, allowing for that perfect, pristine presentation. Remember, a well-prepared pan is the first step to a stress-free, successful dessert experience, guaranteeing that your magnificent ice cream crunch cake comes out looking as good as it tastes.
Deconstructing the Delicious Layers: Components of Your Peppermint Ice Cream Crunch Cake
The magic of this ice cream crunch cake lies in the harmonious interplay of its three core components: the crispy crust, the creamy ice cream filling, and the luscious topping. Each layer contributes its unique texture and flavor, culminating in a dessert that’s far greater than the sum of its parts. Understanding the role of each ingredient and how to prepare it will ensure your cake is a resounding success, offering a delightful surprise in every spoonful.
The Irresistible Chocolate & Rice Krispies Crust
The foundation of this delectable cake is a simple yet brilliant crust made from melted butter, rich milk chocolate, and classic crispy rice cereal. This combination creates a unique texture that’s both crunchy and satisfyingly chewy. The butter and melted chocolate act as the binding agents, coating each piece of Rice Krispies cereal and holding them together to form a firm, robust base that stands up beautifully to the cold, creamy layers above it. When preparing the crust, ensure your butter and chocolate are fully melted and well combined to achieve a smooth, glossy mixture. This guarantees every Krispie is uniformly coated, leading to a consistent crunch and rich chocolate flavor in every single bite. After mixing, empty the cereal mixture into your greased, foil-lined pan and press it down very firmly and evenly. This compaction is absolutely vital for creating a sturdy crust that won’t crumble or fall apart when sliced, providing a stable platform for the subsequent layers. Freezing the crust for at least 20 minutes before adding the ice cream layer is crucial to allow it to set properly, becoming solid enough to support the next component.
Now, a note on the crust’s texture: my husband once commented that the crust doesn’t “yield easily enough to the fork.” While it’s true this crust is designed to be substantial and hold its form, this very characteristic is what makes it so appealing! The delightful resistance of the crispy chocolate base provides a wonderful counterpoint to the soft, smooth ice cream. It’s not meant to be a delicate, crumbly crust; rather, it’s a robust, textural element that defines the “crunch” in “crunch cake.” This contrast is a key feature of the dessert’s appeal, offering a pleasant surprise with every mouthful. For those who prefer a slightly less firm crust, you could consider slightly reducing the amount of chocolate or butter, but I personally find the specified proportions deliver the best textural contrast and ensure the cake holds its shape. You could also experiment with dark chocolate for a richer, more intense flavor profile or add a pinch of sea salt to enhance the chocolate notes and provide an extra layer of complexity.
The Cool & Creamy Ice Cream Layer
For the heart of the cake, the ice cream layer, traditional flavors like peppermint or chocolate mint are highly recommended. These provide a refreshing, bright counterpoint to the rich chocolate crust and make the cake feel incredibly festive, especially around the holidays or on a warm day. The cool, invigorating essence of peppermint perfectly complements the sweetness and crunch of the chocolate base, creating a balanced and exciting flavor profile. However, the beauty of this recipe is its flexibility. Feel free to unleash your creativity and choose any flavor of ice cream your heart desires! Vanilla, classic chocolate, coffee, strawberry, or even a cookies & cream ice cream would all make fantastic alternatives, allowing you to customize the cake to your personal taste or the preferences of your guests. The most important tip for this layer is to ensure your chosen ice cream is sufficiently softened before spreading. This allows for an even, smooth layer without lumps or air pockets, ensuring each slice has a uniform consistency. Take it out of the freezer about 15-20 minutes before you plan to spread it, or until it’s pliable enough to work with, but not so melted that it becomes liquid. A perfectly softened ice cream layer will integrate seamlessly with the crust and topping.
The Luscious Whipped Topping & Garnish
The final touch to this magnificent dessert is a generous layer of freshly whipped, sweetened cream or a convenient whipped topping like Cool Whip. Each option has its merits: Cool Whip offers unparalleled ease and stability, maintaining its form even after extended periods out of the freezer, which can be a boon for entertaining. However, homemade whipped cream provides an unmatched freshness, a delicate lightness, and a superior flavor that truly elevates the dessert. If opting for homemade, ensure your heavy cream, mixing bowl, and whisk attachment are thoroughly chilled for the best results; this helps the cream whip up faster and achieve greater volume. Whip the cream until stiff peaks form, then gently sweeten to your liking with powdered sugar and a hint of vanilla extract. Once the whipped cream is spread evenly over the semi-frozen ice cream layer, a final chill of at least 3 hours (or even overnight) is necessary to allow all layers to firm up and meld together beautifully. The cake will be much easier to slice cleanly when fully frozen.
The final garnish of chocolate syrup adds not only visual appeal but also another layer of rich chocolate flavor, tying all the components back to the crunchy crust. A generous drizzle creates an attractive marbled effect or a clean, elegant finish. Don’t hesitate to get creative with other garnishes too, such as chocolate shavings, crushed peppermint candies (especially if you’re using peppermint ice cream), a sprinkle of cocoa powder, or even fresh mint leaves for an extra pop of color and aroma. These small additions can turn an already delicious cake into a show-stopping masterpiece.
Making it Non-Dairy or Vegan
For those with dietary restrictions or preferences, this recipe is remarkably adaptable. You can effortlessly transform this decadent dessert into a non-dairy or even vegan-friendly treat without sacrificing flavor or texture. Simply substitute the traditional dairy butter with a high-quality plant-based butter, which is widely available and performs similarly in recipes. Opt for a dairy-free chocolate – many brands offer excellent vegan chocolate chips or baking bars made from ingredients like cocoa butter, sugar, and plant-based milks. The selection of vegan ice cream has exploded in recent years, so you can choose your favorite dairy-free ice cream; coconut, almond, oat, or cashew milk-based ice creams work wonderfully and come in a vast array of flavors, including peppermint. Finally, finish with a vegan or dairy-free whipped topping. There are fantastic products available today, from aerosol cans to tubs, that mimic the taste and texture of their dairy counterparts, ensuring everyone can enjoy a slice of this delightful crunch cake without compromise. This thoughtful adaptation makes the recipe inclusive and broadens its appeal significantly, proving that delicious desserts can be enjoyed by all, regardless of dietary needs.
- Pecan Crunch Cookies
- Marshmallow and Rice Krispies Topped Brownies
- Peppermint Bark for The Holidays
- Crunch Crust Brownies
- Small Batch Chocolate Peanut Butter & Krispies Topped Brownies
Recipe: Milk Chocolate Peppermint Ice Cream Crunch Cake

Milk Chocolate Peppermint Ice Cream Crunch Cake
Anna
Pin Recipe
Ingredients
- 8 tablespoons butter cut up (use plant-based butter for dairy-free/vegan)
- 6 ounces milk chocolate chopped (Hershey Bars or dairy-free chocolate for vegan)
- 3 cups crispy rice cereal (ensure gluten-free if needed)
- 6 cups softened peppermint ice cream (or any flavor, use dairy-free ice cream for vegan)
- 2 cups sweetened whipped cream or whipped topping (use vegan/dairy-free whipped topping for vegan)
- Chocolate syrup (for garnish, ensure dairy-free if needed)
Instructions
-
Line the inside of a 9-inch (or 10-inch) springform pan with non-stick aluminum foil. If using regular foil, spray it generously with cooking spray to prevent sticking. Ensure the foil covers the bottom and extends up the sides of the pan.
-
In a large, microwave-safe bowl, combine the cut-up butter and chopped milk chocolate. Microwave on high for 30-second intervals, stirring after each, until the chocolate is completely melted and smooth. This typically takes 1-2 minutes. Pour the crispy rice cereal into the melted chocolate mixture and stir gently until all the cereal is thoroughly coated. Empty the cereal mixture into your prepared, foil-lined pan and press it down very firmly and evenly to form a compact crust. Place the pan in the freezer for at least 20 minutes to allow the crust to set and firm up.
-
Once the crust is firm, remove the pan from the freezer. Evenly spread the softened peppermint ice cream over the top of the crust. Ensure the ice cream is softened enough to spread easily but not melted. Return the cake to the freezer and freeze until the ice cream layer is firm (this usually takes about an hour). After an hour, spread the sweetened whipped cream or whipped topping evenly over the now-firm ice cream layer. Cover the entire cake tightly with plastic wrap to prevent freezer burn and freeze for another 3 hours or more, ideally overnight, to ensure all layers are completely solid.
-
When ready to serve, grasp the foil lining and carefully lift the entire cake from the springform pan, then transfer it to a serving platter. Gently peel away the foil from the sides and bottom. Garnish generously with chocolate syrup. Let the pie sit at room temperature for about 15 minutes before cutting; this allows it to soften slightly, making it easier to slice. Using a sharp Chef’s knife, cut the cake into wedges for serving. Enjoy the delightful contrast of textures and flavors!
-
Note: If you line the pan with non-stick or greased foil, you won’t actually need to remove the sides of the springform pan in the traditional sense, as the foil creates an easy lift-out system. This method is particularly useful because springform pans generally offer the highest sides (a little over 3 inches), making them ideal for layered desserts like this, whereas regular 9-inch round cake pans can sometimes be too shallow for multiple layers.
Notes
