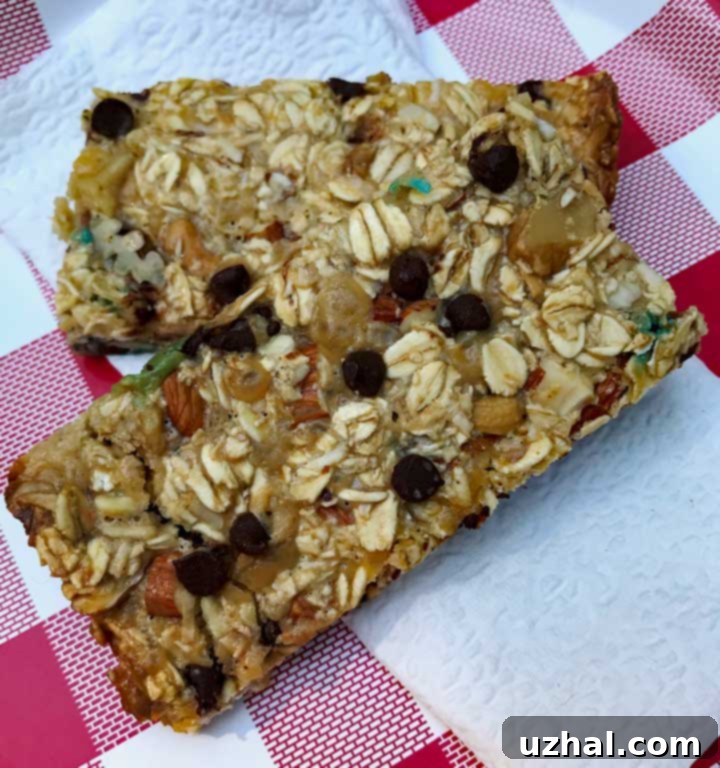
Irresistible Homemade Condensed Milk Granola Bars: Your Go-To Easy Recipe
Do you often find yourself with half a can of sweetened condensed milk lingering in the fridge after making a dessert or coffee? It’s a common dilemma, and one that often leads to food waste. But what if we told you there’s a wonderfully delicious, incredibly easy, and highly customizable solution to use up that leftover ingredient? Enter homemade
Inspired by a beloved recipe from Allrecipes.com – which, as you can see, consistently receives rave reviews – this version has been thoughtfully adapted. While the original calls for a full can of condensed milk, we’re focusing on a convenient half-batch. This scaled-down recipe is specifically designed to use that half-can, fitting perfectly into an 8-inch square pan, making it ideal for smaller households or when you just need a modest batch of deliciousness. Get ready to transform simple pantry staples into a batch of bars that are truly better than decent!

Why You’ll Fall in Love with These Granola Bars
Initially, I experimented with these bars, playfully naming them “Fairly Decent Granola Bars” because I enjoyed them but felt the condensed milk flavor was a bit too prominent for my taste at the time. However, palates evolve, and I’ve come to appreciate the rich, comforting sweetness that the condensed milk provides. Now, I wholeheartedly believe they’re a little better than “decent” – they’re genuinely fantastic! But beyond their improved flavor profile (in my humble opinion), their true charm lies in their incredible versatility. The ease with which you can mix and match ingredients means you’ll never get bored, and you can tailor them to suit any craving or dietary preference.
Forget the overly processed, sugar-laden store-bought granola bars. When you make them at home, you’re in complete control of the ingredients, ensuring quality and freshness. These homemade bars offer a satisfying chew, a perfect balance of sweetness, and the hearty goodness of oats, making them a much healthier and more economical alternative. They are the epitome of simple baking, requiring minimal effort for maximum reward.
The Magic of Sweetened Condensed Milk: More Than Just a Sweetener
Sweetened condensed milk is the unsung hero of this recipe. While it certainly brings a delightful sweetness, its primary role here extends far beyond that. It acts as an incredible binder, creating a cohesive, chewy texture that holds the granola bars together beautifully without the need for eggs or complex syrups. Its thick, viscous consistency ensures that all your oats and mix-ins are perfectly coated, resulting in a uniform, satisfying bar.
Moreover, the caramelization that occurs during baking gives these bars a depth of flavor that is truly irresistible. It contributes to a golden-brown finish and a slightly crisp edge, contrasting with the soft, chewy interior. This unique ingredient transforms humble oats and nuts into a gourmet-tasting treat, making these granola bars stand out from other recipes that rely solely on honey or maple syrup.
Unleash Your Creativity: Customizable Mix-Ins for Every Palate
This recipe truly shines when you embrace its customizable nature. Think of the core ingredients—oats, condensed milk, and butter—as your canvas, and the mix-ins as your palette of colors. The version featured here uses a classic combination of oats, mixed nuts, coconut flakes, and chocolate chips, a universally loved quartet. But don’t feel constrained! These Condensed Milk Granola Bars are practically begging for improvisation. Let your imagination run wild and use whatever combo of add-ins you like best.
Nuts and Seeds: Crunch and Nutrition
Nuts add a wonderful crunch and a boost of healthy fats and protein. Almonds, walnuts, pecans, and cashews are all excellent choices. For an extra layer of flavor and aroma, consider lightly toasting your nuts before adding them to the mixture. Seeds like pumpkin seeds (pepitas), sunflower seeds, chia seeds, or flax seeds are also fantastic for adding texture and nutritional value, including fiber and omega-3s.
Dried Fruits: A Burst of Sweetness
If you’re a fan of dried fruit, it’s a superb addition. Dried cranberries, raisins, chopped apricots, dried cherries, or even finely diced dates can introduce a lovely chewiness and a natural sweetness. If you’re not a fan, or simply prefer a simpler bar, you can easily leave them out without compromising the integrity of the recipe. Just remember to chop larger fruits into smaller pieces for even distribution.
Chocolate and Sweet Treats: Indulgence Options
Chocolate chips are a crowd-pleaser, but don’t stop there! Experiment with dark chocolate, milk chocolate, white chocolate, or even butterscotch chips. Mini M&Ms can add a fun pop of color and extra sweetness, especially if you’re making these for kids (or the kid in you!). Just ensure your mixture has cooled slightly before adding them to prevent them from melting completely before baking.
Flavor Enhancers: Beyond the Basics
A splash of vanilla extract can enhance all the flavors in the bar. A pinch of cinnamon, nutmeg, or even a touch of cardamom can add a warm, inviting spice. For a zesty twist, consider adding some finely grated orange or lemon peel. These small additions can elevate your granola bars from good to gourmet!
Essential Ingredients for Perfect Granola Bars
The beauty of this recipe lies in its simplicity and reliance on common pantry staples. Here’s a closer look at the key players:
Oats: The Heart of Your Granola Bar
This recipe calls for 1 ½ cups of quick-cooking oats, but old-fashioned rolled oats work just as well if that’s what you have on hand. Quick oats tend to yield a slightly softer, more uniform bar, while old-fashioned oats offer a chewier texture and a more rustic appearance. Both provide excellent fiber and a wholesome base for your bars.
Butter: Flavor and Foundation
Just one tablespoon of butter is all you need to start, plus a little extra for greasing the pan. The butter helps to bind the ingredients together, adds a touch of richness, and contributes to the bars’ golden-brown crust. It also helps prevent sticking, a crucial step for these notoriously sticky treats.
Sweetened Condensed Milk: The Star Binder
As discussed, half a can (6 to 7 oz) of sweetened condensed milk is the star of the show. It’s what gives these bars their signature chewiness, sweetness, and that delightful, slightly caramelized flavor profile. Make sure you use *sweetened* condensed milk, not evaporated milk, as they are very different products.
Your Chosen Mix-Ins: Personalizing Every Bite
You’ll need a total of 1 ½ cups of your preferred mix-ins. This is where you bring in the nuts, seeds, dried fruits, chocolate chips, coconut, or any other delicious additions you’ve chosen. The 1 ½ cup total ensures a good distribution without overwhelming the base.
Easy-to-Follow Recipe: Condensed Milk Granola Bars
Ready to make these incredibly easy and satisfying granola bars? Here’s your detailed recipe, ensuring success every time:
Ingredients
- 1 tablespoon butter, plus extra for greasing the pan
- Half a can of sweetened condensed milk (approximately 6 to 7 oz or about 200g)
- 1 ½ cups quick-cooking oats (old-fashioned rolled oats can also be used for a chewier texture)
- 1 ½ cups total of your choice of mixed nuts, chocolate chips, coconut flakes, dried fruit, or a combination thereof
Step-by-Step Instructions
- Prepare Your Oven and Pan: Preheat your oven to a moderate 350 degrees F (175 degrees C). This ensures the oven is at the correct temperature for even baking. Next, line an 8-inch square baking pan with foil. This is a critical step because these bars are delightfully sticky! Grease the foil generously with softened butter. If you happen to have non-stick foil, you can absolutely use that instead, which will save you the extra buttering step. The foil lining is key for easy removal of the entire slab of bars.
- Melt Butter and Combine Wet Ingredients: In a large, microwave-safe bowl (for convenience) or a 3-quart saucepan (if you prefer stovetop), melt the 1 tablespoon of butter. Once melted, remove it from the heat if using a saucepan. Stir in the half-can of sweetened condensed milk until well combined with the butter.
- Add Dry Ingredients and Mix-Ins: Now, add the 1 ½ cups of oats to the butter and condensed milk mixture. Follow with your chosen 1 ½ cups of mix-ins – whether that’s mixed nuts, chocolate chips, coconut, dried fruit, or a combination. Stir everything thoroughly until all the oats and mix-ins are evenly coated with the sticky condensed milk mixture. If you are adding any kind of chocolate chips and you melted the butter over the stove (which might retain residual heat), let the mixture cool slightly for about 5-10 minutes before adding the chocolate chips to prevent them from melting prematurely.
- Press and Bake: Transfer the granola bar mixture into your prepared 8-inch square pan. This is where patience pays off: press the mixture down *very tightly* and evenly across the bottom of the pan. Using the back of a spoon, a spatula, or even a piece of parchment paper to press with your hands, ensure it’s firmly compacted. The firmer you press, the less crumbly your bars will be. Bake in the preheated oven for 20 to 25 minutes, or until the edges are golden brown and the center is set. The top should feel firm to the touch.
- Cool and Cut: Once baked, remove the pan from the oven. Let the bars cool in the pan for about 20 minutes. While still warm, carefully lift the foil lining (with the entire slab of granola bars) out of the pan and place it on a cutting board. At this point, the bars are still pliable, which makes scoring them much easier. Score them into your desired bar sizes using a sharp knife. Then, let them cool completely at room temperature before breaking them apart. Complete cooling is essential for them to firm up properly and prevent crumbling. If you’re in a hurry and want them to firm up quickly, you can transfer the scored slab into the freezer for about 30 minutes.

Expert Tips for Granola Bar Perfection
- Don’t Skimp on Pressing: The most crucial step for firm bars is pressing the mixture tightly into the pan. This compression is what gives them their structure.
- Even Thickness: Ensure the mixture is spread evenly in the pan for consistent baking. Thicker spots might be undercooked, while thinner spots could become too crispy.
- Chill for Clean Cuts: While scoring warm is helpful, for the cleanest cuts, allow the bars to cool completely (or even chill in the fridge) before fully separating them. A warm knife can also help.
- Adjust Sweetness: While the condensed milk provides sufficient sweetness, if your chosen dried fruits are very tart (like cranberries), you might want to consider a tiny pinch more sugar in the mix, or balance it with sweeter additions like chocolate chips.
- Nutritional Boost: For an extra nutritional punch, consider adding a tablespoon or two of protein powder (unflavored or vanilla) or a spoonful of nut butter (like peanut butter or almond butter) to the mixture along with the condensed milk. This might slightly alter the texture, but often in a good way, adding more chewiness.
- Sticky Situation Solver: If your bars are too sticky to handle even after cooling, lightly dust your hands or cutting knife with a little flour or powdered sugar.
Storing Your Homemade Granola Bars
Proper storage is key to maintaining the freshness and texture of your homemade granola bars. Once completely cooled, store the bars in an airtight container at room temperature for up to 5-7 days. If you prefer them firmer or if your kitchen is particularly warm, you can store them in the refrigerator, where they’ll last for up to two weeks. For longer storage, these bars freeze beautifully! Wrap individual bars tightly in plastic wrap, then place them in a freezer-safe bag or container. They can be frozen for up to 3 months and thawed at room temperature, or enjoyed straight from the freezer for a chewy, cool treat.
Granola Bars for Every Occasion
These versatile condensed milk granola bars are perfect for a multitude of occasions. Pack them in lunchboxes for a wholesome and satisfying school or work snack. Grab one for a quick breakfast on the go when you’re short on time. They make an excellent pre- or post-workout fuel, providing sustained energy. And let’s be honest, they’re also a delightful treat with a cup of coffee or tea, satisfying that sweet craving without being overly indulgent. With their customizable nature, you can easily adapt them for different family members’ preferences or to match the season’s bounty.
So, the next time you find yourself with that half-can of condensed milk, don’t let it go to waste. Turn it into a batch of these truly irresistible homemade granola bars. They are simple to make, a joy to eat, and a testament to how humble ingredients can create something extraordinary. Happy baking, and enjoy your delicious, perfectly personalized granola bars!
