Easy & Delicious Rosemary Walnut Bread: Your New Favorite Homemade Loaf
There’s an undeniable joy that comes with baking homemade bread, especially yeast breads. The aroma filling your kitchen, the satisfaction of a perfectly risen dough, and the taste of a fresh, warm slice – it’s a culinary experience like no other. While I absolutely adore the complexity and depth of artisan-style loaves that demand sponges, starters, and days of patient flavor development, sometimes time just isn’t on my side. For those busy days, I often turn to quicker, yet equally satisfying, recipes.
My go-to list for a more immediate bread fix used to include the famed New York Times No-Knead recipe, along with other favorites like Pretzel Bread, fluffy Dinner Rolls, or tender Soft Breadsticks. These recipes offer a fantastic way to enjoy delicious, fresh bread without an extensive time commitment. However, I’ve recently discovered a new contender that has quickly risen to the top of that list: Rosemary Walnut Bread. This recipe offers a delightful blend of rustic charm and vibrant flavor, making it perfect for both everyday enjoyment and special occasions.

The Story Behind This Delightful Rosemary Walnut Bread
This fantastic Rosemary Walnut Bread recipe originates from an old issue of Cooking Light magazine, a publication known for its balanced and flavorful dishes. As is often the case when I bake, I couldn’t resist putting my own spin on the original, adapting it to better suit my preferences and my household’s needs. These modifications proved to be incredibly successful, resulting in a loaf that was even more delightful than anticipated.
My first key change was to halve the recipe. While two large loaves are wonderful for a big gathering, a single, perfectly sized loaf is ideal for a smaller family or when you want to enjoy fresh bread without an overwhelming amount. This adjustment ensures that every slice is savored, and there’s less chance of delicious bread going to waste.
Another significant alteration involved the yeast. The original recipe might have called for standard active dry yeast, but I opted for a fast-rising variety, specifically Platinum yeast. I was fortunate enough to find it on clearance – a fantastic baking score! Using fast-rising yeast significantly cuts down on proofing time, allowing you to enjoy your homemade bread sooner without compromising on quality. This particular brand, Platinum, seemed to deliver exceptional results, though any good quality fast-rising yeast should work beautifully.
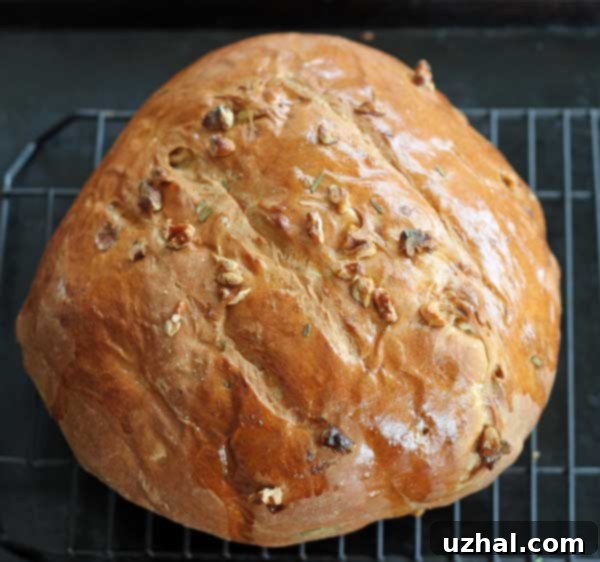
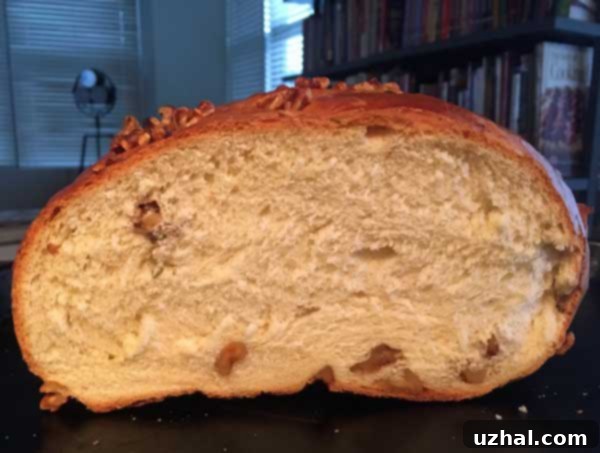
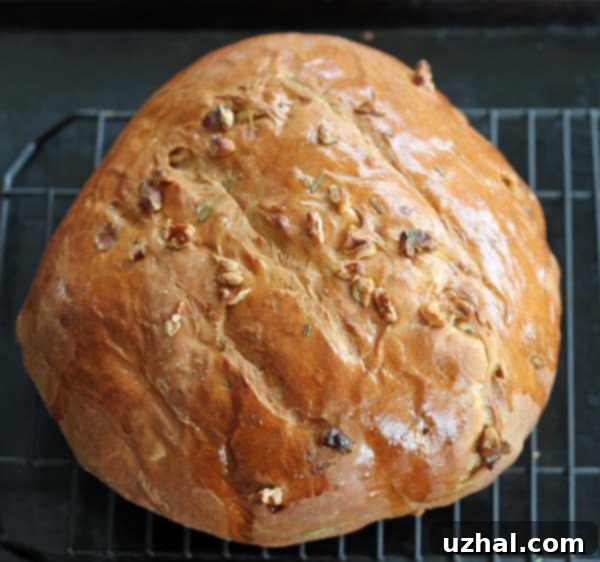
The combination of the fast-rising yeast and the inclusion of milk in the dough created a truly remarkable outcome. The loaf rose incredibly high, boasting an impressive volume that hints at its light and airy texture. Upon slicing, the crumb was tight yet tender, a testament to the dough’s strength and the yeast’s activity. And the crust? Oh, the crust was firm and wonderfully chewy, providing a satisfying contrast to the soft interior. This blend of characteristics made for a truly memorable loaf that exceeded all expectations.

Why You’ll Love Rosemary Walnut Bread: Flavor and Texture
What makes this Rosemary Walnut Bread so special? It’s the harmonious marriage of simple, wholesome ingredients with distinct flavors and textures. Each element plays a crucial role in creating a loaf that is both comforting and sophisticated.
The Aromatic Allure of Fresh Rosemary
Fresh rosemary is the star herb in this bread, lending a wonderfully fragrant, piney, and slightly peppery note that is both refreshing and earthy. When baked, rosemary releases its essential oils, infusing the entire loaf with an irresistible aroma that hints at the delightful flavors within. Beyond its culinary appeal, rosemary is known for its antioxidant properties and is often associated with Mediterranean cuisine, bringing a touch of the sun-drenched coast to your table. Using fresh rosemary is key here; its vibrant flavor far surpasses that of dried herbs, making a noticeable difference in the final product.
The Nutty Crunch of Walnuts
Chopped walnuts add a delightful textural contrast and a rich, earthy flavor to the bread. Their slightly bitter notes complement the fragrant rosemary beautifully, creating a complex taste profile that keeps you coming back for more. Walnuts are also packed with healthy fats, protein, and fiber, contributing to the nutritional value of this delicious bread. When baked, the walnuts toast slightly, enhancing their crunch and deepening their flavor, scattering pockets of goodness throughout the tender crumb.
The Perfect Crumb and Crust
As mentioned, the modifications to the original recipe, particularly the choice of yeast and milk, resulted in an exceptionally well-textured bread. The high rise ensures a light, airy loaf, while the tight crumb indicates a well-developed gluten structure that holds its shape and moisture perfectly. The firm, chewy crust offers a satisfying bite, characteristic of artisan-style breads, despite the faster preparation time. This combination of a tender interior and a robust crust is what elevates a good bread to a truly great one.
Baking Tips for a Perfect Loaf
Even with a relatively straightforward recipe, a few tips can ensure your Rosemary Walnut Bread turns out perfectly every time.
- Yeast Activation: If you’re using fast-rising yeast (also known as instant yeast), you can often mix it directly with the dry ingredients. However, if using active dry yeast, ensure your milk is heated to 105-115°F (40-46°C) to properly activate it. The recipe specifies “very warm low-fat milk (125 degrees)” for quick-rising yeast, which is a bit warmer than typical active dry yeast activation, but fine for instant yeast.
- Kneading is Key: Don’t skip the kneading process. Whether by hand or with a stand mixer, kneading develops the gluten, which is essential for the bread’s structure, elasticity, and that wonderful chewy texture. The dough should become smooth and elastic. The instructions suggest mixing the initial ingredients by hand and then using the dough hook for about 8 minutes, which is a great approach for ensuring thorough kneading.
- Proofing Patience: While this is a quicker bread, giving the dough adequate time to rise is still crucial. A warm, draft-free place is ideal for proofing. The dough should double in size. The first rise takes about an hour, and the second rise after shaping takes about 30 minutes. Don’t rush these steps!
- Incorporating Add-ins: Adding walnuts and rosemary after the first rise, as instructed, allows for better gluten development before these ingredients are worked in. Punching down the dough gently helps distribute them evenly without deflating the dough too much.
- Scoring for Success: Making diagonal cuts (scoring) on the top of the loaf isn’t just for aesthetics. It allows the bread to expand properly in the oven, preventing uncontrolled cracks and giving it a professional, rustic look. A sharp knife or razor blade works best for clean cuts.
- Oven Temperature Adjustment: Starting the bake at a higher temperature (400°F/200°C) and then reducing it to 375°F (190°C) helps create that desired firm, chewy crust and a good initial rise (oven spring).
- Shielding with Foil: The tip to shield the loaf with foil after about 30 minutes is excellent. This prevents the crust from becoming too dark or over-browning while the interior finishes baking.
- Cooling Time: Letting the loaf stand for 20 minutes before slicing is important. This allows the internal structure to set and the flavors to meld, resulting in a better texture and easier slicing.
Serving Suggestions and Variations
Rosemary Walnut Bread is incredibly versatile and can be enjoyed in countless ways. It’s truly a delight on its own, but also pairs beautifully with a variety of dishes.
- With Meals: Serve it as a side to hearty stews, soups, or roasted chicken. Its robust flavor can stand up to rich dishes.
- Breakfast or Brunch: Toast slices lightly and serve with butter, jam, or cream cheese. It also makes fantastic savory toast with avocado or eggs.
- Cheese Boards: The earthy notes of rosemary and walnuts make this bread a superb accompaniment to a cheese board. Pair it with goat cheese, cheddar, or a strong blue cheese.
- Sandwiches: While not a typical sandwich bread, slices can be used for open-faced sandwiches or mini sliders, especially with strong, savory fillings.
- Appetizer: Cut into cubes and serve with olive oil and balsamic vinegar for dipping.
For variations, consider adding a sprinkle of sea salt on top before baking for an extra crunch and flavor boost. You could also experiment with other herbs like thyme or sage, or a mix of nuts like pecans or hazelnuts, though the rosemary and walnut combination is truly special.
This Rosemary Walnut Bread has quickly become a beloved staple in my kitchen, a testament to its irresistible flavor and satisfying texture. I wholeheartedly encourage you to give this recipe a try. The process is rewarding, and the result is a loaf of bread that will impress your family and friends, and delight your taste buds.
We absolutely loved this bread, and I have a feeling you will too. If you do try it, please let me know how it turns out!
- Chicken with Rosemary, Red Pepper and Olives
- Small Batch Rosemary Focaccia
- Lemon Rosemary Cake Mini Bundts
- Rosemary Bacon Chicken over Lemon Garlic Pasta
- Rosemary’s Apple Crumb Pie from The Amish Kitchen
Recipe: Homemade Rosemary Walnut Bread

Rosemary Walnut Bread
Cookie Madness
Pin Recipe
Ingredients
- 2 ½ cups all-purpose flour (12.5 oz, plus up to ¼ cup more as needed)
- 1 ½ tablespoons granulated sugar
- 1 teaspoon salt
- 1 package quick-rising yeast (e.g., Platinum, RapidRise)
- 1 tablespoon unsalted or salted butter (melted)
- 1 cup very warm low-fat milk (approx. 125°F / 52°C)
- 2 tablespoons very warm water
- 1 large egg (lightly beaten; you will only use 2 tablespoons for the dough and the rest for egg wash)
- ½ cup chopped walnuts
- ½ to 1 tablespoon coarsely chopped fresh rosemary
- ½ tablespoon milk (for egg wash)
Instructions
-
In the large bowl of a stand mixer, combine 2 ½ cups (12.5 oz) of the flour, sugar, salt, and the package of quick-rising yeast. Whisk these dry ingredients together to ensure they are well combined.
-
Add the melted butter, warm milk, and warm water to the dry ingredients. Stir these liquids in until just combined, then add 2 tablespoons of the lightly beaten egg. Mix thoroughly with a sturdy spoon or the paddle attachment of your stand mixer until a soft dough begins to form. For better control, I often prefer to do this initial mixing by hand.
-
Attach the dough hook to your stand mixer and begin kneading the dough on a medium-low speed. If the dough seems too sticky and doesn’t clear the sides of the bowl easily, gradually add the remaining ¼ cup of flour, one tablespoon at a time, until the dough comes together and pulls away from the bowl. Continue kneading with the stand mixer for approximately 8 minutes, until the dough is smooth and elastic.
-
Lightly coat a large clean bowl with olive oil or cooking spray. Transfer the kneaded dough to this bowl, turning it once to ensure the entire surface is coated. This prevents the dough from sticking and drying out.
-
Cover the bowl with plastic wrap or a clean kitchen towel and let the dough rise in a warm, draft-free place for about 1 hour, or until it has visibly doubled in size. This first rise is crucial for developing flavor and a good texture.
-
Once the dough has risen, gently punch it down to release the air. Add the chopped walnuts and fresh rosemary to the dough. Knead briefly, either by hand or with the stand mixer, to evenly incorporate the walnuts and rosemary throughout the dough. Be careful not to overmix at this stage.
-
Shape the dough into a rustic, round ball and place it onto a baking sheet lined with parchment paper. Cover the shaped loaf with an inverted mixing bowl or a large piece of plastic wrap, and let it rise again for about 30 minutes in a warm spot. This second rise allows the loaf to become light and airy.
-
While the loaf is undergoing its second rise, preheat your oven to 400°F (200°C).
-
Prepare the egg wash: add ½ tablespoon of milk to the remaining beaten egg and whisk them together until well combined. Gently brush this egg wash generously over the top and sides of the risen loaf. This will give your bread a beautiful golden crust.
-
Using a very sharp knife or a clean razor blade, make 3 diagonal cuts, about ¼-inch deep, across the top of the loaf. These scores allow the bread to expand without tearing during baking.
-
Carefully place the prepared loaf into the preheated 400°F (200°C) oven.
-
Immediately reduce the oven temperature to 375°F (190°C). Bake for 40-45 minutes, or until the bottom of the loaf sounds hollow when tapped. To prevent the crust from getting too dark, it’s recommended to loosely tent the loaf with aluminum foil after about 30 minutes of baking. Once baked, transfer the loaf to a wire rack and let it stand for at least 20 minutes before slicing to allow the internal structure to set properly.
