Alice’s Tea Cup Pumpkin Scones: The Ultimate Recipe for Cozy Fall Baking
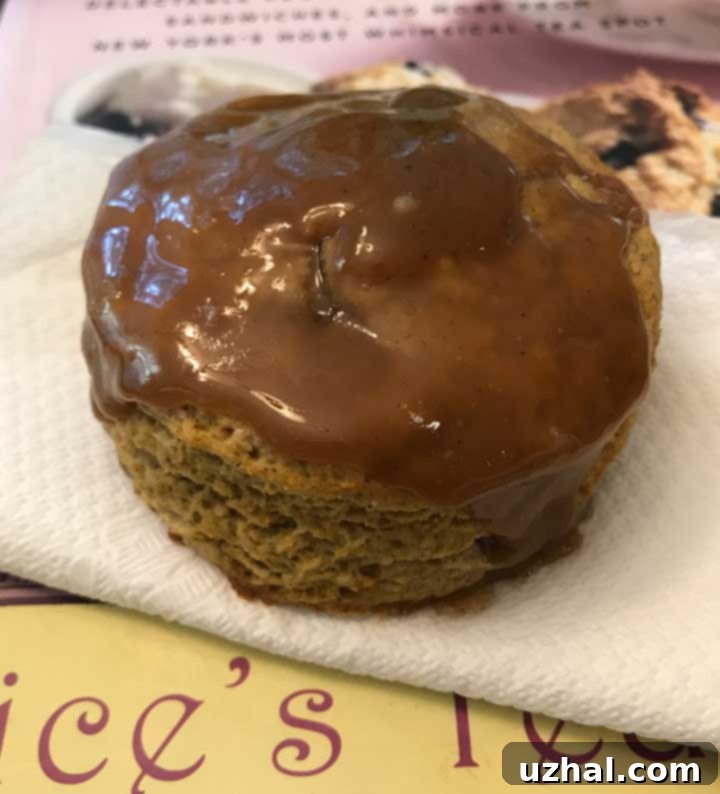
A few weeks ago, a delightful visit to New York’s enchanting Alice’s Tea Cup left me utterly captivated. Nestled amidst the city’s hustle, it’s a whimsical escape where perfectly brewed teas and exquisite pastries reign supreme. Among the many treats, their pumpkin scones truly stole my heart. Fluffy, fragrant, and utterly delicious, they were a taste of autumnal bliss I knew I had to recreate. While I eagerly await my next visit to this magical spot, I’ve been busy bringing a piece of Alice’s Tea Cup home, specifically by baking from their wonderful cookbook. Last night, the irresistible aroma of homemade pumpkin scones filled my kitchen, a testament to the joy of baking these beloved treats, perfect for any season but especially cherished in the fall.
Jump to Recipe

The Alice’s Tea Cup cookbook is a true treasure trove for any baking enthusiast, offering a glimpse into the magic behind their celebrated menu. Their scone recipes, in particular, are cherished for their unique texture and flavor profiles. The pumpkin scone recipe, while sharing a foundational structure with other scone variations in the book, introduces the warm, comforting essence of pumpkin and a symphony of spices. However, my initial ventures into baking these scones from the book presented a common challenge for home bakers: the dough was remarkably sticky and much softer than anticipated. This was a consistent observation, even with other fruit-infused scone recipes from the same cookbook, making the dough difficult to handle and shape effectively.
(Update: Since my initial baking adventures, I’ve refined this recipe by carefully reducing the milk content. This adjustment has proven to be a game-changer, transforming the dough into a perfectly workable consistency that is much easier to knead, pat out, and cut into beautiful scone shapes. This small but significant tweak not only enhances the baking experience but also ensures a superior final product, yielding scones that are both tender and beautifully formed.) This dedication to perfecting the recipe ensures that you, too, can achieve bakery-quality results right in your own kitchen, bypassing any potential frustrations of a sticky dough.
Why These Alice’s Tea Cup Pumpkin Scones Are a Must-Try
What sets Alice’s Tea Cup Pumpkin Scones apart, making them an absolute essential for your baking repertoire? It’s more than just the delicate, natural sweetness of pumpkin. It’s the thoughtful integration of warming spices – a blend that sings of autumn leaves, crackling fires, and cozy gatherings. These scones achieve a remarkable textural harmony: a tender, slightly crumbly interior encased in a wonderfully delicate, golden-brown crust. When crowned with their signature, luscious caramel glaze, they transcend a simple pastry, becoming an extraordinary treat that elevates any occasion, from a casual breakfast to an elegant brunch or a refined afternoon tea. They offer a tangible taste of the unique charm and culinary excellence of one of New York’s most beloved tea houses, now accessible for you to create in your own home. Whether you’re a seasoned baker seeking a new challenge or just beginning your scone-making journey, this carefully adapted recipe promises a delightful and rewarding experience.
The Journey to Perfect Scones: From Cookbook to Home Kitchen
My personal culinary journey with this recipe started with the boundless enthusiasm that often accompanies a new cookbook from a cherished establishment. However, as is common with adapting professional recipes for the home kitchen, I quickly encountered a few peculiarities. The initial stickiness of the dough, as mentioned, was my primary hurdle. Scone dough, ideally, should be moist yet manageable, allowing for gentle handling and precise shaping. An overly wet dough tends to spread excessively during baking, resulting in flatter, denser scones rather than the desired light, airy rise.
Through a process of meticulous observation and iterative adjustments – a hallmark of truly understanding a recipe – I discovered that a slight reduction in the buttermilk quantity was the key. This seemingly minor modification brought the dough to an ideal consistency, making it pliable enough to work with without losing its inherent tenderness. This experience underscores the valuable lesson that baking, while often precise, also benefits from a degree of intuition and willingness to adapt. It transforms the act of following a recipe into a dynamic, engaging, and ultimately more satisfying creative process.
The Spice Saga: Correcting a Cookbook Typo for Optimal Flavor and Aroma
Perhaps one of the most critical revelations during my experimentation with these pumpkin scones was uncovering a significant typo in the original cookbook’s spice measurements. When I first embarked on baking, the recipe indicated a surprisingly generous amount: a full ¼ cup each of ground ginger and ground cinnamon for a full batch. While the resulting scones were still quite flavorful, this quantity seemed unusually potent. My instincts, combined with further research and even confirmation from a televised demonstration of the Alice’s Tea Cup scone recipe, revealed that the correct, intended amount for a full batch was actually 2 tablespoons of each spice. Since the recipe I’m sharing here is a convenient half-batch version, I now confidently use 1 tablespoon each of ground ginger and ground cinnamon.
Even at 1 tablespoon of each for a half batch, this remains a wonderfully generous and assertive amount of spice. It’s this bold, aromatic blend that truly defines these pumpkin scones, providing that distinctive, warm, and inviting flavor profile without ever becoming overwhelming. This valuable correction ensures that your scones will possess the perfect balance of autumnal spice, creating an unforgettable sensory experience.
Another crucial insight I gained, which significantly impacts the dough’s workability, is the importance of **adding the milk gradually**. The exact moisture content of scone dough can fluctuate based on various factors, including the specific type of flour used, the ambient humidity in your kitchen, and even the moisture level of your pumpkin puree. By incorporating the buttermilk a little at a time, you gain precise control over the dough’s final consistency. This method prevents the dough from becoming excessively soft and difficult to manage, eliminating the need to resort to merely dropping the scones and ensuring you can achieve perfectly shaped, beautifully risen pastries every single time.
Freezing and Thawing Scones for Convenient Future Enjoyment
One of the most appealing aspects of baking scones, especially when you’re making a batch that might be too large for immediate consumption, is their excellent freezer-friendliness. As a household of three, I frequently opt to prepare a half batch, or freeze excess portions of either the shaped, unbaked dough or the fully baked scones in a large freezer bag. This clever strategy guarantees that a quick, warm, and freshly delicious treat is always within easy reach, perfect for unexpected guests or spontaneous cravings.
Optimal Tips for Freezing Baked Scones:
- Achieve Complete Cooling: It is absolutely essential to allow your baked scones to cool entirely before attempting to freeze them. Freezing warm scones will lead to condensation and the formation of ice crystals, which can result in a soggy and unappealing texture upon thawing.
- Individual Wrapping for Protection: For superior results and to prevent freezer burn, meticulously wrap each individual scone in plastic wrap. Following this, place the wrapped scones into a sturdy freezer-safe bag or an airtight container. This method not only preserves their quality but also allows for the convenience of grabbing just one or two at a time.
- The Best Reheating Strategy: My extensive experimentation has led to a highly effective two-step reheating process. Begin by microwaving a frozen scone on a low-to-medium setting for approximately 30-60 seconds. This initial step gently starts the thawing process from the inside. Subsequently, transfer the partially thawed scone to a preheated oven (around 300°F/150°C) for an additional 5-10 minutes. This finishes the thawing, warms the scone thoroughly, and crucially, helps to restore its delightful, crisp exterior, making it taste freshly baked.
- Glazing Post-Thawing: A crucial piece of advice: if you intend to freeze baked scones, refrain from applying the caramel glaze beforehand. The texture and aesthetic appeal of the glaze can be significantly compromised by the freezing and thawing cycle. Instead, thaw and warm your scones as instructed, then prepare the luscious caramel glaze fresh to ensure a perfect, glossy, and delicious finish.
Mastering the Art of Freezing Unbaked Scone Dough:
Freezing the shaped, unbaked scone dough is an equally brilliant option for ultimate convenience. After you’ve cut out your scone shapes, simply arrange them on a parchment-lined baking sheet and place them in the freezer until they are completely solid. Once frozen solid, transfer these individual dough pieces to a freezer-safe bag, ensuring they don’t stick together. When you’re ready to enjoy freshly baked scones, you can bake them directly from their frozen state. Be aware that baking from frozen may necessitate an additional few minutes in the oven, and they might not achieve quite the same lofty rise as dough baked immediately. Nevertheless, this method offers unparalleled convenience, allowing you to enjoy the unparalleled pleasure of warm, homemade scones with minimal effort whenever the craving strikes.
Essential Tips for Scone Baking Perfection
Baking truly perfect scones might seem like an elusive art, but with a few foundational principles, it becomes an entirely accessible and deeply satisfying endeavor. These tips will guide you toward consistently achieving light, flaky, and tender scones every time:
- Embrace Cold Ingredients: The golden rule for exceptional scones is to use very cold butter and buttermilk. This practice is vital because cold butter creates tiny pockets within the dough. During baking, these butter pieces melt, releasing steam that separates the layers of dough, resulting in that coveted flaky texture. Warm ingredients, by contrast, can lead to dense, cake-like scones.
- Resist Overworking the Dough: This is perhaps the most common pitfall in scone baking. Overworking the dough over-develops the gluten, which will inevitably lead to tough, chewy scones rather than tender ones. Mix the ingredients just until they are combined and barely holding together. Handle the dough as little and as gently as possible.
- Precision in Flour Measurement: For consistent and accurate results, avoid scooping flour directly from the bag, which can compact it and lead to using too much. Instead, lightly spoon your all-purpose flour into the measuring cup and then level it off with the back of a knife or a straight edge. For even greater precision, especially when specified, use a kitchen scale to measure by weight.
- The Art of Gradual Liquid Addition: As highlighted by our recipe adjustments, adding the buttermilk incrementally is crucial. This method allows you to precisely control the dough’s hydration, ensuring it achieves the ideal soft but workable consistency. Different flours and even ambient humidity can affect how much liquid is needed, so a gradual approach provides flexibility.
- Avoid Twisting the Cutter: When cutting your scones, always press the biscuit cutter straight down through the dough and lift it straight back up. Resist the urge to twist the cutter. Twisting seals the edges of the dough, which can impede the scones from rising fully and evenly in the oven.
- Harness the Power of a Hot Oven: Baking scones in a preheated, hot oven (like the 425°F specified) is key to their impressive rise and golden-brown crust. The high heat causes the butter to melt rapidly and the leavening agents to activate quickly, resulting in light, airy scones.
Mastering the Luscious Caramel Glaze
The caramel glaze is not merely an afterthought; it is an indispensable component that completes the Alice’s Tea Cup pumpkin scone experience. This rich, buttery, and subtly sweet topping perfectly complements the spiced pumpkin scone, adding a layer of luxuriousness without being cloyingly sweet. The secret to a perfect glaze lies in achieving the right consistency: it should be thick enough to generously coat the scone, yet still pourable and smooth. The final addition of heavy cream contributes to its silky texture, while a touch of freshly squeezed lemon juice introduces a bright counterpoint, cutting beautifully through the glaze’s richness. Do not rush this step; whisk gently and consistently over medium-low heat. Ensure the sugar dissolves completely before adding the cream, then continue whisking until it reaches your desired velvety smoothness and thickness. A perfectly executed glaze not only makes the scones visually irresistible but also enhances their overall deliciousness exponentially.
Recipe: Alice’s Tea Cup Pumpkin Scones (Half Batch)

Alice’s Tea Cup Pumpkin Scones
Recipe adapted by Cookie Madness
Pin Recipe
Ingredients
- 1 ½ cups all-purpose flour (210 grams, spooned and leveled for accuracy)
- 3 tablespoons granulated sugar (36 grams)
- ¼ teaspoon baking soda
- 1 ¼ teaspoons baking powder
- ⅜ teaspoon kosher salt (I used Morton brand)
- 1 tablespoon ground ginger
- 1 tablespoon ground cinnamon
- 6 tablespoons unsalted butter (cut into ½-inch pieces, ensure it’s very cold)
- 5 oz buttermilk (divided use) (approx. 132 grams, keep it very cold)
- ½ cup canned pumpkin puree (make sure it’s 100% pure pumpkin, not pumpkin pie filling)
- 1 tablespoon pure vanilla extract
For the Rich Caramel Glaze:
- 1 stick unsalted butter (114 grams)
- ½ cup firmly packed light or dark brown sugar (100 grams)
- ¼ teaspoon freshly squeezed lemon juice
- ⅛ teaspoon kosher salt
- ¼ cup heavy cream
Instructions
-
1. Prepare Dry Ingredients: Preheat your oven to 425°F (220°C). In a large mixing bowl, combine the all-purpose flour, granulated sugar, baking soda, baking powder, kosher salt, ground ginger, and ground cinnamon. Whisk these dry ingredients thoroughly to ensure even distribution and a uniform flavor.
-
2. Incorporate Cold Butter: Add the very cold, cubed unsalted butter to the dry mixture. Using your clean hands or a pastry blender, quickly work the butter into the dry ingredients. Rub the butter between your fingertips or cut it in until it is thoroughly incorporated and the mixture resembles coarse, fine breadcrumbs. Avoid overworking, as this keeps the butter cold and promotes flakiness.
-
3. Add Wet Ingredients Gradually: Create a deep well in the center of your dry ingredients mixture. Pour in HALF of the cold buttermilk, along with the entire amount of pumpkin puree and pure vanilla extract. Using your hands (or a sturdy spatula/dough scraper), gently begin to combine the ingredients, working from the center outwards, until all the dry mixture is just moistened. Now, begin to gradually add just enough of the remaining buttermilk, a tablespoon at a time, mixing lightly after each addition, until the dough comes together and is soft, cohesive, and workable but not overly sticky. The goal is to avoid overmixing.
-
4. Shape the Scones: Turn the dough out onto a lightly floured surface. Gently gather the dough together, pressing it lightly with your hands. Pat the dough evenly to form a disk approximately 1 ½ inches thick. Avoid kneading excessively, as this will toughen the scones. Using a 3- or 3 ½-inch biscuit cutter (or a sharp knife to cut into wedges), cut out as many scones as you can. Place the cut scones on a nonstick baking sheet, leaving a small amount of space between each. Lightly gather any remaining dough scraps, press them gently together again (do not re-knead), and cut out any additional scones until all the dough is used.
-
5. Bake to Perfection: Transfer the baking sheet to your preheated oven. Bake the scones for approximately 12 to 15 minutes, or until they are beautifully golden-brown on top and a wooden skewer or toothpick inserted into the center comes out clean. Baking times may vary based on your oven. Once baked, allow the scones to cool slightly on the baking sheet for about 20 minutes before proceeding to glaze them.
-
6. Prepare the Caramel Glaze: While the scones are cooling, prepare the luxurious caramel glaze. In a medium saucepan over medium heat, combine the unsalted butter, brown sugar (light or dark), freshly squeezed lemon juice, and kosher salt. Whisk gently and continuously until the mixture is smooth and the brown sugar has fully dissolved. Just as the mixture approaches a gentle boil, pour in the heavy cream. Immediately reduce the heat to low and continue to whisk well for approximately 2 minutes, or until the glaze thickens to a smooth, pourable, yet coating consistency. Remove the pan from the heat.
-
7. Glaze and Serve: To glaze each scone, carefully hold it by its bottom, then dip the top evenly into the warm caramel glaze, allowing any excess to drip off gently. Place the glazed scone back on the baking sheet or a wire rack to allow the glaze to set slightly. This half-batch recipe yields approximately 5 to 6 delightful scones. Serve them warm, ideally accompanied by your favorite cup of freshly brewed tea or coffee for an authentic Alice’s Tea Cup experience!
Notes
Additionally, the original recipe often yielded a very soft, challenging-to-handle dough. My adjustment, implemented here, involves reducing the initial buttermilk quantity and instructing to add the remainder gradually. This crucial step ensures the dough achieves a pliable yet manageable consistency, making it easy to pat out and cut, leading to beautifully shaped and risen scones every single time, rather than having to be dropped. For the best possible texture and flakiness, always use very cold butter and buttermilk.
Feel free to experiment with different spice ratios if you prefer a milder flavor, but the 1 tablespoon of each for a half batch truly captures the essence of Alice’s Tea Cup’s bold flavors.
