The Ultimate Guide to Perfectly Chewy Chocolate Chip Cookies: A Gourmet Recipe Unpacked
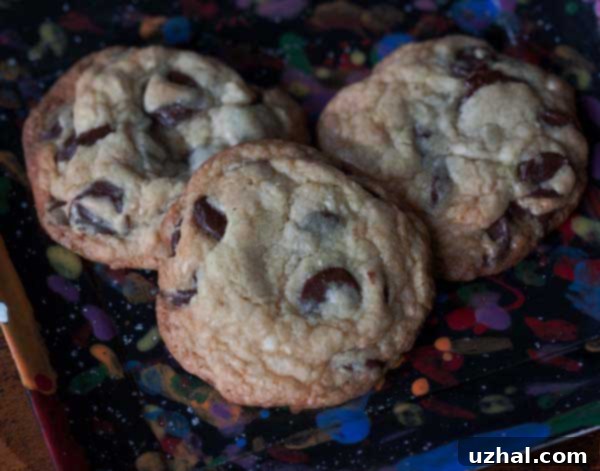
For years, this recipe for Chewy Chocolate Chip Cookies has been a steadfast favorite in my kitchen, a true standout among countless cookie experiments. It’s the one I consistently turn to when I crave a cookie that embodies perfection: a delightful balance of chewiness, rich chocolate, and a hint of salt. However, it’s fascinating to observe the diverse reactions this particular recipe, originally from Gourmet Magazine, has garnered. Some home bakers declare them the absolute best chocolate chip cookies they’ve ever made, while others have found them surprisingly bland or experienced issues like excessive spreading or a complete lack thereof, resulting in flat, lifeless discs. I’ve certainly encountered those less-than-perfect batches myself over the years, but after countless iterations, I’ve come to understand the nuances that transform a good cookie into an extraordinary one.

Mastering the Egg Ratio for the Perfect Chew
One of the most peculiar, yet critical, aspects of this recipe is its unusual egg requirement. In my household, we affectionately call them “the weird egg cookies” because the quantity is just shy of two and a half large eggs for a full batch. When preparing my scaled-down half version, this translates to one whole large egg plus approximately one tablespoon of a second beaten egg. For precision, particularly for those striving for consistent results, weighing your eggs is highly recommended. A typical large egg can range from 48 to 54 grams, with an additional tablespoon of beaten egg adding about 12 grams. Aiming for a total of 60 to 70 grams of egg for the half batch should yield optimal results. This might seem like an overly meticulous detail, but it’s crucial. Just like an excessive amount of flour, too much egg can lead to a cakey texture rather than the desired chewiness. While this recipe is quite generous with sugar, which helps to counteract cakiness, getting the egg ratio right is paramount for achieving that signature, melt-in-your-mouth chewy consistency that sets these cookies apart.
Precision in Flour: The Key to Cookie Structure
The quantity of flour is another variable that can significantly impact the outcome of your cookies, and it’s a common pitfall for many bakers. The full original recipe calls for three cups of flour, but relying solely on volumetric measurements can be misleading. For instance, three cups of flour for one person might weigh 420 grams due to packing density or measuring technique, while another might use a different brand of flour in a different environment and measure three cups at only 385 grams. This 35-gram difference, which seems minor, can dramatically alter the cookie’s texture and spread. In my half-batch rendition, I’ve experimented with quantities ranging from 190 to 210 grams. My preference leans towards 190 grams, especially when combined with a generous chill time. Using a kitchen scale for flour, and indeed for most dry ingredients, is arguably the single most effective way to ensure consistent and successful baking results. This precision helps prevent overly dense, cake-like cookies or ones that spread too thinly because of an imbalance in dry ingredients.
Navigating the Salty Sweetness: Understanding Kosher Salt Varieties
Salt plays a crucial role in enhancing the flavor profile of chocolate chip cookies, cutting through the sweetness and adding complexity. However, not all kosher salts are created equal, and this distinction is vital for achieving the intended taste. When I specify “kosher salt” in my recipes, I am always referring to Morton brand kosher salt, which is widely available in most American grocery stores. Many professional chefs and bakers, however, often use Diamond Crystal kosher salt, an excellent product that is approximately half as salty by volume as Morton’s. This difference means that a recipe calling for “kosher salt” without further specification can lead to vastly different results depending on the brand used. For this particular recipe, I opt for ¾ teaspoon of Morton kosher salt, which imparts a noticeable, yet delightful, salty kick that perfectly complements the sweetness of the sugars and chocolate. Some might find this level of saltiness quite bold, but I personally enjoy the sweet and salty dynamic. If you prefer a less pronounced salt flavor, or if you are using Diamond Crystal kosher salt, you might adjust the quantity accordingly, perhaps reducing it to ½ teaspoon or even less, especially if using a brand like Morton. My palate has changed over the years; what felt perfectly balanced when I was younger now tastes a little saltier, highlighting the importance of personal preference and understanding your ingredients.
The Transformative Power of Chilling Cookie Dough
Before the widespread understanding of its benefits, many classic cookie recipes, including this one, didn’t explicitly call for chilling the dough. However, the culinary world has since embraced this technique for good reason. While you can certainly bake these cookies immediately after mixing, and they will still be enjoyable, they often turn out flatter and sometimes lack the depth of flavor. Chilling the dough, ideally overnight or for at least a few hours, works wonders in several ways. First, it allows the flour to fully hydrate, resulting in a more tender and complex crumb. Second, the fats (butter) solidify, which helps the cookies maintain their shape and prevents excessive spreading during baking, leading to thicker, chewier cookies. Third, chilling concentrates the flavors, allowing the ingredients to meld together more harmoniously. When baked after a proper chill, these cookies consistently emerge thin, beautifully chewy, and visually more appealing, with a more defined texture. It’s a simple step that yields significant rewards, elevating an already excellent recipe to gourmet status.
Precision Baking: Temperature and Technique for Optimal Results
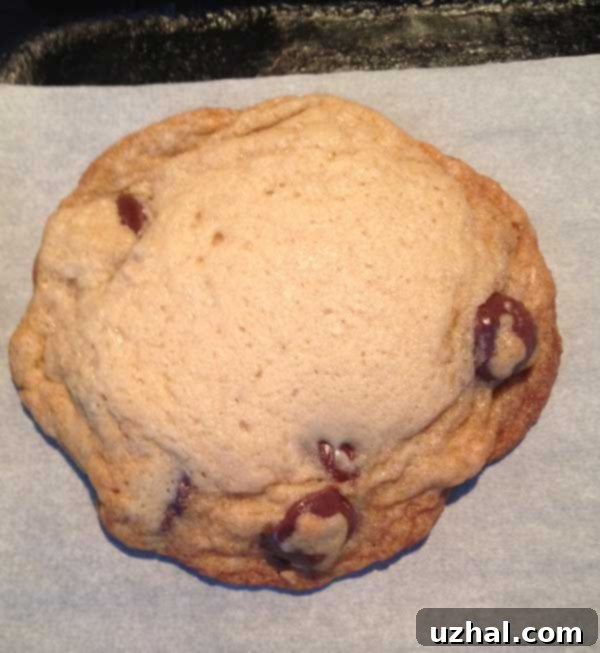
The baking temperature and duration are crucial variables that significantly influence the final texture of your chewy chocolate chip cookies. You have the option to bake them at either 350°F (175°C) or 375°F (190°C), each yielding distinct characteristics. Baking at 350°F will typically produce a cookie with a more uniform texture throughout – evenly golden and consistently chewy. Conversely, opting for 375°F results in delightfully crispy edges coupled with an even chewier, softer center. However, baking at the higher temperature requires a bit more vigilance, as the edges will brown and set much faster. When I bake at 375°F, I make sure to pull the cookie sheets from the oven when the centers still appear notably pale, even slightly underbaked. This seemingly early removal is intentional, as the cookies continue to “bake” internally and firm up as they cool on the hot baking sheet.

Another invaluable trick for achieving that desirable crinkled, ridged appearance is to employ the “spatula nudge” technique. As soon as you remove the hot pan from the oven, if the cookies have spread more than desired, gently use the tip or back of a spatula to push their edges inward. This subtle manipulation helps to create those appealing ripples and folds that give the cookies a more artisanal look. As the cookies gradually cool, they will set and firm up, developing a robust structure with those enticing ridges. It’s also worth noting that the middle of the cookies often continues to deepen in color slightly as it cools, developing a richer, more complex flavor profile.
Should you ever find yourself in a situation where you’ve pulled the cookies out of the oven too soon – perhaps the edges are beautifully browned, but the centers still seem excessively underbaked even after cooling – don’t fret. This is a common occurrence and easily remedied. Simply allow the cookies to cool completely, then place them in the freezer for a short period. This quick chill will help set the soft, underbaked centers, resulting in a wonderfully chewy texture without compromising on taste. They will still be delicious and perfectly enjoyable, perhaps even more so for those who adore a truly gooey center.
Ingredient Deep Dive: Enhancing Your Chocolate Chip Cookies
Beyond the fundamental ratios, the quality and type of your ingredients can subtly but significantly impact your cookies:
- **Chocolate Choice:** While the recipe suggests 1 ½ cups of chocolate chips, feel free to adjust this to your liking. For a less sweet cookie, extra dark or bittersweet chocolate chips (like Guittard) are excellent choices, providing a deeper cocoa flavor that balances the sugars. If using chocolate chunks instead of chips, be aware that they can sometimes cause cookies to spread more, so ensure your dough is well-chilled. Toasted nuts, such as walnuts or pecans, are also a fantastic addition, offering an extra layer of flavor and crunch.
- **Butter Quality:** The type of butter you use matters. European-style butters, like Plugra, have a higher fat content and less water than standard American butter. This higher fat content contributes to a slightly thicker, denser cookie with a richer flavor and can also help curb excessive spreading. While other European butters may work, Plugra has proven to yield consistent, superior results in this recipe.
- **Flour Type for Texture Control:** In addition to precise weighing, experimenting with different flour types can also influence texture. Substituting a small portion of the all-purpose flour with bread flour, which has a higher protein content, can also help to curb spreading, resulting in a chewier, more substantial cookie.
Troubleshooting Common Cookie Conundrums
- **Cookies Spreading Too Much?** This can be due to overly warm butter, insufficient chilling, too little flour, or using baking sheets that are greased or lined with parchment paper when the recipe specifies ungreased (the friction helps prevent spreading). Ensure your butter is completely cool after melting, chill your dough thoroughly, and use the recommended baking sheet preparation.
- **Cookies Not Spreading Enough?** This might be caused by too much flour, dough that is too cold, or an oven that isn’t preheated properly. Double-check your flour measurement by weight, allow very cold dough to sit at room temperature for a few minutes before baking, and ensure your oven is at the correct temperature.
- **Cakey vs. Chewy:** The egg-to-flour ratio is key here. If your cookies are consistently cakey, reduce the egg amount slightly (ensuring you’re within the 60-70g range for a half batch) or consider weighing your flour more precisely.
With these insights and careful attention to detail, you’re well-equipped to bake a batch of these truly gourmet chewy chocolate chip cookies. They are a testament to how small adjustments can lead to significant improvements, transforming a simple dessert into an unforgettable experience.
- Big, Flat Chewy Chocolate Chip Cookies
- Ice Cream Pie & Fudge Sauce
- Peanut Butter Coconut Bars
- Gourmet Deep Dark Chocolate Brownies
- Chicken with Sage and Wine from The Lazy Gourmet
Gourmet Chocolate Chip Cookies Recipe
Anna’s Gourmet Chewy Chocolate Chip Cookies
By Anna
Ingredients
- 1 large egg plus 1 tablespoon of beaten egg** (weighing 62-70 grams total for precision)
- 8 tablespoons unsalted butter, melted and completely cool (114 grams)
- ¾ cup packed light brown sugar (145 grams)
- ½ cup granulated sugar (95 grams)
- 1 teaspoon vanilla extract
- ¾ teaspoon baking soda
- ¾ teaspoon Morton Kosher salt, scant** or reduce to ½ if preferred
- 1 ½ cups unbleached all-purpose flour (preferably weighed, 190 grams-210 grams)
- 1 ½ cup extra dark chocolate chips or bittersweet chocolate (adjust amount as desired)
Instructions
-
In a large mixing bowl, combine the completely cooled melted butter with both the packed light brown sugar and granulated sugar. Using an electric mixer, beat at high speed for 1-2 minutes until the mixture appears noticeably lighter in color and creamy in texture.
-
Add the carefully measured egg (one large egg plus one tablespoon of beaten egg, total 62-70g) to the butter and sugar mixture. Continue beating with the mixer for about 1 minute until fully incorporated and creamy. Next, beat in the vanilla extract, baking soda, and salt.
-
Switch to a spatula or wooden spoon. Gently stir in the unbleached all-purpose flour until it is just blended into the wet ingredients. Be careful not to overmix. Finally, fold in the chocolate chips until evenly distributed throughout the dough.
-
Using a generously heaping tablespoon or a 1.5-2 tablespoon cookie scoop, portion the dough into 14 mounds. Arrange these mounds on a foil-lined plate or baking sheet. Chill the dough for at least 30 minutes, or ideally overnight, until thoroughly firm.
-
Preheat your oven to 350°F (175°C) for a more uniformly chewy cookie, or 375°F (190°C) for cookies with crisper edges and softer centers. Prepare two ungreased cookie sheets. While parchment paper can be used, leaving the sheets ungreased or using regular foil (not non-stick) often results in less spreading due to better grip.
-
Place the chilled dough mounds about 2 ½ inches apart on the prepared cookie sheets (approximately 7 cookies per sheet to allow for spreading).
-
Gently press down the center of each dough mound just slightly. Bake one sheet at a time on the center rack of your oven for about 12-15 minutes, or until the edges are golden brown. Remember to pull them out when the centers still look a little pale if baking at 375°F.
-
Immediately after removing the pan from the oven, if the cookies have spread excessively, use the back of a spatula tip to gently push the edges inward. This helps create those desirable ridges and a thicker cookie.
-
Allow the cookies to cool on the hot cookie sheet for about 3 minutes to set. Then, carefully transfer them to a wire rack to cool completely.
Notes
- **Egg Precision:** The specific egg amount is unusual but crucial for the chewy texture. While you might try a jumbo egg if you don’t want to measure, for best results, beat two large eggs together and measure out 62-70 grams for a half batch. This ensures consistency.
- **The Magic of Chilling:** Chilled dough not only enhances flavor but also results in cookies with a superior, thicker, and chewier texture. I often bake a few cookies right away and store the remaining dough mounds in a heavy-duty freezer bag in the refrigerator or freezer. If baking directly from frozen, you may need to increase the baking time by a few minutes.
- **Temperature Play for Texture:** Baking at 375°F yields crispier edges and paler, softer centers, while 350°F provides a more uniform chewiness. If using 375°F, it’s vital to pull the cookies when their middles still look slightly underbaked; they will continue to set and “bake” internally as they cool on the hot pan.
- **Melted Butter & Sugar:** Ensure your melted butter is completely cool before adding the sugars. If the butter is still hot, it can melt the sugar, potentially leading to shiny, thin cookies and may require longer chilling times for the dough to firm up properly.
- **Chocolate Quantity and Type:** The 1 ½ cups of chocolate chips might seem generous, but it creates a perfect balance with the dough once spread. For a less sweet profile, I highly recommend using extra dark or bittersweet chocolate chips (Guittard is a great option). Feel free to add toasted nuts for extra flavor and crunch!
- **Chocolate Chunks:** If you opt for chocolate chunks over chips, be sure to chill the dough well, as some brands of chocolate chunks can cause cookies to spread more.
- **European Butter Advantage:** Using European-style butter, particularly Plugra, can contribute to slightly thicker and denser cookies due to its higher fat content. Other European butters may vary.
- **Bread Flour for Structure:** Incorporating a small amount of bread flour into your all-purpose flour can help curb spreading and enhance the chewiness of the cookies.
- **Saltiness Adjustment:** The ¾ teaspoon of Morton Kosher salt provides a distinct salty kick that I enjoy. If you prefer less salt, or are using a different brand (like Diamond Crystal which is less salty by volume), you might want to reduce the amount to ½ teaspoon.
