Delicious & Nutritious Homemade Grain-Free Granola: Your Ultimate Paleo-Friendly Recipe
The first time I experienced the delightful taste of grain-free granola was at a local grocery store. A charming local company was offering samples of their “paleo-friendly” granola, and I was instantly captivated. The flavor profile was exceptional – a perfect blend of nuts, seeds, and natural sweetness. I was ready to buy a bag on the spot, but the hefty price tag of $10 per small package made me pause. Knowing my love for homemade treats and a good challenge, I immediately decided that creating this deliciousness at home would be a far more economical and satisfying endeavor. After some extensive research and exploring countless recipes, I discovered the secrets to making incredible grain-free granola right in my own kitchen.
If you’re looking to embrace a grain-free lifestyle, whether for paleo principles, gluten sensitivity, or simply to reduce grain intake, this granola recipe is an absolute game-changer. Not only does it offer a fantastic source of healthy fats, fiber, and protein, but it also provides sustained energy without the common sugar crash associated with many store-bought granolas. Making it yourself means you control the ingredients, ensuring the freshest, highest-quality components and avoiding any unwanted additives or excessive sugars. Plus, the satisfaction of creating something so wholesome and delicious from scratch is truly rewarding.

Unpacking the Ingredients: What Makes Grain-Free Granola Special?
Grain-free granola stands in a league of its own, distinct from traditional oat-based versions. The fundamental difference lies in its composition: oats, which are the backbone of conventional granola, are completely replaced by a rich assortment of ground nuts and generous coconut flakes. This unique ingredient swap not only caters to grain-free dietary needs but also contributes to a vastly different and equally delightful texture and flavor profile.
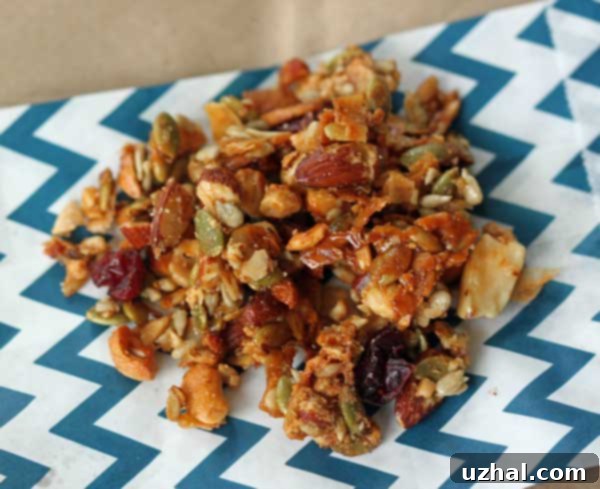
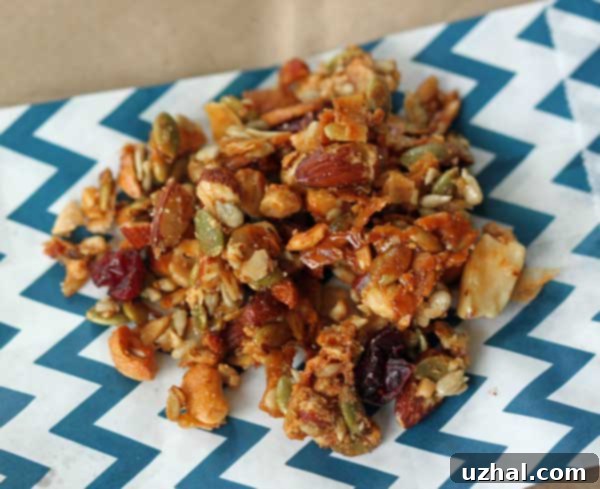
Unlike the dry, often brittle crispness of oat-based granola, grain-free granola offers a wonderfully sticky and satisfyingly crunchy experience. This characteristic texture is primarily due to the natural oils from the nuts and seeds, combined with the binding properties of honey or maple syrup. Each bite delivers a burst of flavor and a delightful chewiness that many find irresistible. While some might worry about its stickiness, especially for dental work, it’s truly a minor trade-off for the incredible taste and nutritional benefits. Think of it as a delightful, chewy energy bite rather than a delicate cereal.
The beauty of this recipe lies in its adaptability. While I personally prefer making small batches to ensure freshness and manage our consumption, the recipe is incredibly easy to scale. If you’re preparing it for a larger family, a gathering, or simply want to stock up for the week, feel free to double or even triple the quantities. The process remains the same, just adjust your baking sheet size accordingly. Experiment with different nuts and seeds to discover your favorite combination and personalize your homemade grain-free granola.
Key Benefits of Choosing Grain-Free Granola
- Gluten-Free & Paleo-Friendly: Ideal for those with gluten sensitivities, celiac disease, or following a paleo diet.
- Rich in Healthy Fats: Packed with beneficial monounsaturated and polyunsaturated fats from nuts and seeds, promoting heart health and satiety.
- Excellent Source of Fiber: Supports digestive health and helps keep you feeling full longer.
- High in Protein: Contributes to muscle repair and growth, and helps stabilize blood sugar levels.
- Nutrient-Dense: Provides essential vitamins and minerals like Vitamin E, magnesium, zinc, and selenium.
- Sustained Energy: The combination of healthy fats, protein, and fiber offers a slow-release energy source, avoiding energy spikes and crashes.
- Grain Free Banana Muffins
- Small Batch Whole Grain Almond Biscotti
- Whole Grain Vegan Cookies
- Great Granola
- Maple & Honey aka Morey Girls Granola
Homemade Grain-Free Granola Recipe

Small Batch Grain Free Granola
Cookie Madness
Pin Recipe
Ingredients
- 1 ¼ cup raw mixed nuts A blend of almonds, cashews, brazil nuts, and hazelnuts works beautifully, offering a diverse nutritional profile and texture. You can customize this mix to your preference.
- ¼ cup pumpkin seeds Also known as pepitas, these add a delightful crunch and a boost of zinc.
- 2 tablespoons unsalted raw sunflower seeds For added texture and a mild, nutty flavor. Ensure they are unsalted to control the overall sodium content.
- ⅓ cup unsweetened coconut flakes Essential for that classic granola flavor and a slightly chewy texture. Make sure they are unsweetened to avoid extra sugar.
- 1 tablespoon coconut oil Helps bind the granola and adds a subtle tropical note. Melt it gently before mixing.
- 2 tablespoons honey or maple syrup or 1 of each These natural sweeteners provide both flavor and stickiness. Using a blend of both can offer a more complex sweetness.
- ½ teaspoon vanilla extract Enhances all the flavors and adds a warm aroma.
- ⅛ teaspoon sea salt A pinch of salt balances the sweetness and brings out the nutty flavors.
- Dried fruit of your choice I particularly enjoy dried cranberries for their tartness or a vibrant dried tropical fruit mix for a fun twist. Add after baking to prevent burning.
Instructions
-
Prepare your oven and baking sheet: Begin by preheating your oven to 275°F (135°C). This lower temperature is crucial for slowly toasting the nuts and seeds without burning them, ensuring a golden, flavorful result. Line a rimmed baking sheet with parchment paper or nonstick foil. The rimmed sheet will keep the granola mixture contained, and the lining prevents sticking, making cleanup a breeze.
-
Process the nuts and combine dry ingredients: Take 1 cup of your raw mixed nuts and place them into a mini chopper or food processor. Pulse a few times until you achieve a mix of finely ground bits and small, chunky pieces. This variation in texture is key to homemade granola. Transfer this mixture to a medium-sized bowl. Then, add the remaining ¼ cup of whole nuts, along with the pumpkin seeds, sunflower seeds, and unsweetened coconut flakes. Stir gently to combine all the dry ingredients evenly.
-
Melt the wet ingredients: In a medium-sized saucepan, combine the coconut oil with your choice of honey, maple syrup, or a tablespoon of each for a balanced flavor. Place the saucepan over medium heat, stirring continuously until the coconut oil has fully melted and the mixture is smooth and well-combined. This liquid base will coat the nuts and seeds, providing both sweetness and a binding agent.
-
Combine wet and dry: Remove the saucepan from the heat immediately after the wet ingredients are melted. Pour this warm, fragrant mixture over the bowl of nuts, seeds, and coconut flakes. Add the vanilla extract and sea salt. Stir everything thoroughly with a spatula or spoon until all the dry ingredients are evenly coated. Ensure no dry spots remain, as this guarantees uniform flavor and texture throughout your granola.
-
Bake to perfection: Spread the granola mixture evenly onto the prepared lined baking sheet. Press it down slightly with the back of your spoon or spatula to encourage clumping, which is desirable for granola. Bake in the preheated oven for approximately 25 minutes. It’s a good practice to check it around the 20-minute mark to prevent over-browning. The granola should be lightly golden and fragrant. Resist the urge to stir it during baking, as this helps it form delicious clusters.
-
Cool completely for the best texture: Once baked, remove the baking sheet from the oven. At this stage, the granola might still appear soft and somewhat wet, which is perfectly normal for grain-free varieties. Do not touch or move it! Allow it to cool completely on the baking sheet at room temperature. As it cools, the honey/maple syrup will firm up, and the granola will solidify, developing its characteristic sticky-chewy texture. While it won’t become completely crispy like oat granola, it will achieve a satisfying crunch.
-
Add dried fruit and serve: Once the granola is entirely cool and firm, use your hands to break it into desired pieces or clusters. This is the perfect time to stir in your choice of dried fruit. Dried cranberries add a wonderful tart counterpoint, while a tropical mix brings a burst of exotic sweetness. Store your homemade grain-free granola in an airtight container to maintain its freshness.
Serving Suggestions for Your Grain-Free Granola
This versatile grain-free granola isn’t just for breakfast! Here are some delightful ways to enjoy your homemade creation:
- Classic Breakfast: Serve with your favorite yogurt (dairy or non-dairy), a splash of almond milk, or on its own for a quick and satisfying start to your day.
- Snack Time: Grab a handful as an energy-boosting snack between meals. It’s perfect for fueling workouts or curbing afternoon cravings.
- Dessert Topping: Sprinkle over fruit salads, smoothie bowls, or even a scoop of dairy-free ice cream for added crunch and flavor.
- Baking Ingredient: Incorporate into energy bars, healthy cookies, or use as a crumb topping for baked apples or peaches.
Customization and Flavor Variations
The beauty of making your own granola is the ability to customize it to your taste. Don’t hesitate to experiment!
- Nut & Seed Mix: Swap out some of the mixed nuts for pecans, walnuts, or macadamia nuts. Add chia seeds or flax seeds for extra omega-3s and fiber.
- Spices: Introduce warm spices like a pinch of cinnamon, nutmeg, or even a dash of ginger or cardamom for an aromatic boost.
- Sweeteners: While honey and maple syrup are fantastic, you could explore other liquid sweeteners like agave nectar or date syrup, adjusting quantities to taste.
- Flavor Extracts: Beyond vanilla, consider almond extract for a marzipan-like note or a few drops of orange zest for citrusy brightness.
- Dried Fruit: The options are endless! Try chopped dried apricots, figs, dates, cherries, or blueberries. Remember to add dried fruit *after* baking to prevent them from becoming hard or burnt.
- Chocolate: For a decadent treat, stir in some dark chocolate chips or cacao nibs after the granola has completely cooled.
Storage Tips for Optimal Freshness
To keep your grain-free granola fresh and delicious for as long as possible:
- Airtight Container: Store cooled granola in an airtight container at room temperature. A glass jar with a tight-fitting lid works perfectly.
- Avoid Humidity: Keep it away from humid environments, as moisture can make it lose its crunch and potentially spoil faster.
- Refrigeration (Optional): While not strictly necessary, refrigerating can extend its shelf life, especially in warm climates.
- Freezing: For long-term storage, you can freeze grain-free granola in a freezer-safe bag or container for up to 3 months. Thaw at room temperature before serving.
Typically, a batch of homemade grain-free granola will stay fresh for up to two weeks when stored properly. However, it’s so delicious, it rarely lasts that long in my house!
Embracing a grain-free lifestyle doesn’t mean sacrificing flavor or satisfying snacks. This homemade grain-free granola recipe proves that you can enjoy incredibly delicious, nutrient-dense foods that support your dietary goals and keep you energized throughout the day. Say goodbye to expensive store-bought versions and hello to the fresh, customizable goodness of your own kitchen creation. Give this recipe a try, and you might just find your new favorite healthy staple!
