Irresistible Homemade Cookie Dough Truffles: Your Guide to a Safe and Sweet No-Bake Treat
There’s something inherently delightful about cookie dough, a treat that many of us secretly adore even before it transforms into baked cookies. For a long time, my relationship with raw cookie dough was primarily limited to enjoying it mixed into ice cream. I wasn’t typically one to crave it straight from the bowl while baking. However, that perspective shifted dramatically after I embarked on a journey to create the perfect Cookie Dough Truffles. What started as a somewhat reluctant experiment blossomed into a genuine appreciation for these bite-sized wonders. Today, I’m excited to share a perfected version of this recipe, incorporating crucial food safety steps, especially the method for toasting flour to ensure a deliciously safe raw cookie dough experience. These truffles are not only incredibly easy to make but also offer a unique texture and flavor profile that will surely win over any dessert enthusiast.
Jump to Recipe
Why You’ll Love These Edible Cookie Dough Truffles
Cookie dough truffles are a fantastic dessert for several reasons. First and foremost, they satisfy that undeniable craving for raw cookie dough in a perfectly safe and delightful way. They require no baking, making them ideal for warm weather or when you simply don’t want to turn on the oven. Their bite-sized nature makes them perfect for parties, potlucks, or simply as a special treat for yourself. Each truffle offers a rich, creamy interior encased in a crisp chocolate shell, providing a satisfying contrast in textures. They are also highly customizable, allowing you to experiment with different flavors and coatings to suit any preference or occasion. Whether you’re a long-time cookie dough lover or a curious newcomer, these truffles are guaranteed to become a new favorite in your dessert repertoire.
Crafting the Perfect Cookie Dough Truffle: The Magic of Condensed Milk
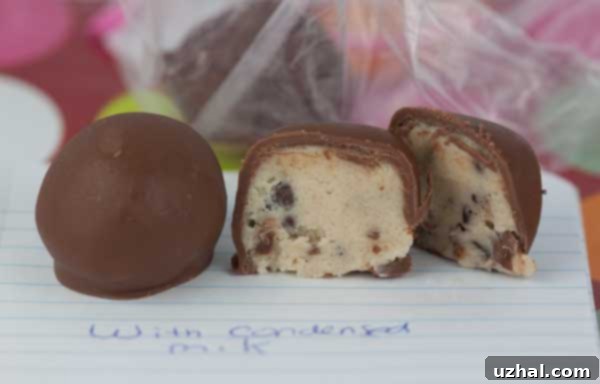
My journey to find the ideal cookie dough truffle recipe involved testing several different approaches. Some recipes left a noticeable “flour taste” or a slightly gritty texture, which diminished the overall enjoyment. However, out of the various methods I explored, one particular recipe stood out as the clear winner: a version that uses sweetened condensed milk. This ingredient proved to be a game-changer, not only in masking any raw flour flavor but also in creating an incredibly smooth, luxurious texture that is simply unmatched. The condensed milk contributes a delightful sweetness and creaminess, making the dough exceptionally palatable and preventing it from tasting overly “floury.”
The specific recipe that truly shone during my testing phase came from Allrecipes.com. Its brilliance lies in the condensed milk, which acts as a binder and a flavor enhancer, replacing the need for eggs and ensuring a wonderfully cohesive dough. This means the cookie dough is inherently safer and ready to eat once the flour is properly treated. Beyond the core ingredients, I found that the addition of toffee chips elevated the truffles to another level, providing a delightful crunch and a buttery, caramelized flavor. While optional, I highly recommend including them for that extra touch of indulgence. However, feel free to get creative with other mix-ins like sprinkles, different types of chocolate chips, or chopped nuts to personalize your batch.
The Art of the Chocolate Coating
No truffle is complete without its decadent chocolate coating. The beauty of these cookie dough truffles is their versatility when it comes to dipping chocolate. You have the freedom to choose your favorite type of chocolate – whether it’s the classic sweetness of milk chocolate, the intense richness of dark chocolate, or even the creamy luxury of white chocolate. For my preferred coating, I opted for milk chocolate, which provides a lovely balance against the sweet cookie dough center. To achieve a perfectly smooth, dippable consistency and a shiny finish, I recommend mixing in a small amount of coconut oil. Just a teaspoon or two per pound of chocolate can make a significant difference, helping the chocolate melt evenly and preventing it from becoming too thick or brittle. This slight addition of fat ensures a beautiful, soft coating that melts delightfully in your mouth.
When melting your chocolate, whether you use a double boiler or the microwave, it’s crucial to do so gently to prevent seizing or burning. If using a microwave, heat in short bursts (e.g., 30 seconds at a time), stirring well after each interval until the chocolate is mostly melted and smooth. The double boiler method offers more controlled heat, reducing the risk of overheating. The goal is a velvety, fluid chocolate that effortlessly coats each truffle, creating a professional-looking finish. Don’t be afraid to experiment with different types of chocolate to discover your ultimate flavor combination!

The Secret to Smoother Truffles: Freezing Overnight
Through my experimentation, I discovered a crucial step that significantly enhances the texture and flavor of these cookie dough truffles: freezing them for a day or two after they’ve been dipped. While they are delicious immediately after setting, a period in the freezer truly transforms them. I noticed that some of the initial slight grittiness, which can sometimes be present in raw dough, completely disappeared, leaving the centers incredibly smooth and uniform. This overnight freezing process allows the flavors to meld and the ingredients to fully hydrate, resulting in a more refined and enjoyable eating experience. Furthermore, these truffles freeze exceptionally well, making them perfect for meal prepping desserts or making a large batch ahead of time for future enjoyment. Stored in an airtight container, they retain their delightful texture and taste for weeks, ready to be pulled out whenever a craving strikes.
Update: Ensuring Food Safety by Toasting Flour for Cookie Dough
When edible cookie dough first gained popularity, the primary concern for food safety often revolved around raw eggs. However, culinary science and food safety guidelines have evolved, and we now understand that raw flour can also be a carrier of harmful bacteria, such as E. coli. While eggs are often pasteurized for commercial products, raw flour from your pantry has not undergone any heat treatment to eliminate potential pathogens. Therefore, for any recipe involving raw flour that is meant to be consumed without baking, it is absolutely essential to heat treat the flour first. This simple step eliminates any risk, allowing you to enjoy your cookie dough truffles with complete peace of mind.
The recommended internal temperature for safe flour consumption is 160-165°F (71-74°C). Reaching this temperature effectively kills any bacteria that might be present. There are two primary methods for heat-treating flour at home, both straightforward and quick:
Method 1: Oven (Best for even heating)
This method ensures the most even heat distribution, reducing the chances of burning one spot while another remains untreated.
- Preheat Oven: Set your oven to 350°F (175°C). This temperature is high enough to quickly heat the flour but not so high that it burns easily.
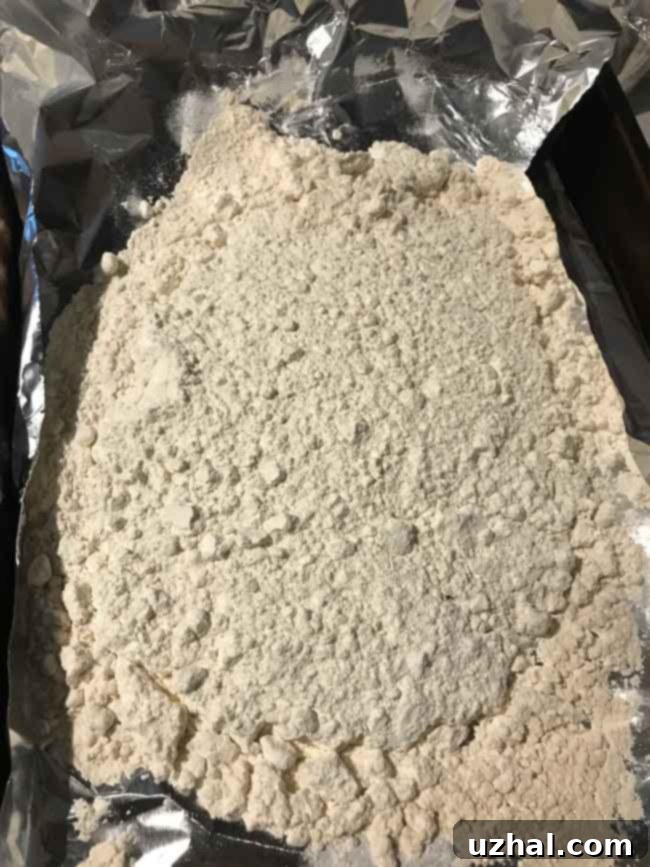
- Spread Flour: Place your desired amount of all-purpose flour in an even, thin layer on a rimmed baking sheet or shallow pan. A thin layer ensures that heat penetrates thoroughly.
- Bake and Stir: Bake for approximately 5-10 minutes. It’s crucial to stir the flour once or twice during this period to ensure even toasting and prevent any parts from burning or browning too much. You want the flour to be heated through, not necessarily colored.
- Check Temperature: The most important step for safety! Use an instant-read thermometer to check the internal temperature of the flour in several spots. It should reach and maintain at least 165°F (74°C) to be considered safe. If it hasn’t reached this temperature, return it to the oven for another minute or two and recheck.
- Cool and Sift: Once the flour is properly heated, remove it from the oven and let it cool completely. After cooling, it’s a good idea to sift the flour to remove any small lumps that may have formed during the heating process, ensuring a smooth dough texture.
Method 2: Microwave (Faster option)
If you’re short on time, the microwave offers a quicker alternative for heat-treating flour.
- Place in Bowl: Put the flour in a microwave-safe bowl. Do not pack it too tightly.
- Heat in Intervals: Microwave the flour on high power in 30-second intervals. After each interval, remove the bowl and stir the flour thoroughly. This prevents hot spots and ensures even heating. Continue this process until the flour reaches the target temperature.
- Check Temperature: Again, use an instant-read thermometer to verify that the flour has reached 165°F (74°C) throughout.
- Cool and Sift: Allow the heat-treated flour to cool completely before using it in your recipe. Sifting it will help remove any lumps and ensure a fine, smooth flour for your dough.
By taking this extra, simple step, you can confidently enjoy these delicious cookie dough truffles without any health concerns, knowing your ingredients are perfectly safe for consumption.
Variations and Customizations for Your Cookie Dough Truffles
While the classic chocolate chip and toffee chip combination is phenomenal, these cookie dough truffles are an excellent canvas for creativity. Consider these variations to make them truly your own:
- **Nutty Additions:** Fold in finely chopped pecans, walnuts, or almonds for added crunch and flavor.
- **Candy Crush:** Crush your favorite candies (like Oreos, M&M’s, or peanut butter cups) and mix them into the dough.
- **Different Chocolate Chips:** Swap semi-sweet chips for milk chocolate, dark chocolate, white chocolate, or even butterscotch chips.
- **Flavor Extracts:** Beyond vanilla, try a dash of almond extract, peppermint extract, coffee extract, or orange zest for a different aromatic profile.
- **Creative Coatings:** Dip truffles in white chocolate and drizzle with dark chocolate, or vice versa. Roll them in sprinkles, cocoa powder, shredded coconut, or finely crushed cookies before the chocolate sets for an extra decorative touch and texture.
- **Peanut Butter Swirl:** Swirl a tablespoon or two of creamy peanut butter into the dough for a peanut butter cookie dough truffle.
Serving and Storage Tips
These cookie dough truffles are best served chilled, straight from the refrigerator or freezer. Their firm texture and cool temperature enhance the flavor and provide a refreshing bite. For presentation, arrange them on a platter dusted with cocoa powder or placed in mini paper liners. To store, keep them in an airtight container in the refrigerator for up to 2 weeks, or in the freezer for up to 3 months. If frozen, allow them to sit at room temperature for 5-10 minutes before serving for optimal texture, or enjoy them straight from the freezer for a firmer, chewier treat.
- Chocolate Bourbon Truffles
- Raw Hemp Chocolate Chunk Blondies
- Amaretto and Honey Truffles
- Vegan Chocolate Truffles
- Holiday Chocolate Truffles
Recipe

Cookie Dough Truffles
Anna
Pin Recipe
Ingredients
- ½ cup good quality salted butter softened to room temperature
- ¾ cup packed brown sugar use light brown sugar or a mix of light and dark for richer flavor
- 1 ½ teaspoons vanilla extract
- 2 ¼ cups all-purpose flour (approx. 10.1 oz), heat-treated for safety (see instructions above)
- 1 14 ounce can sweetened condensed milk
- ½ cup miniature semisweet chocolate chips
- ½ cup toffee baking bits optional, but highly recommended for extra flavor and crunch
- 1 pound good quality chocolate for melting and dipping (milk, dark, or semi-sweet)
- Coconut oil as needed, for thinning chocolate (about 1-2 tablespoons)
Instructions
-
First, ensure your flour is heat-treated for safety (refer to “How to Toast Flour” section above). In a large bowl, beat the softened butter and packed brown sugar with an electric mixer until the mixture is light, fluffy, and well combined, usually about 2-3 minutes. Beat in the vanilla extract until fully incorporated.
-
Gradually add 2 cups of the heat-treated flour alternately with the sweetened condensed milk, beginning and ending with flour. Mix on low speed or stir by hand until the dough is smooth and creamy.
-
At this stage, taste the cookie dough. If the dough appears too loose or sticky, you may gradually add the remaining ¼ cup of heat-treated flour, mixing until the desired consistency is reached. The dough should be pliable but not overly sticky.
-
Gently fold in the miniature semisweet chocolate chips and toffee baking bits (if using) until they are just evenly distributed throughout the dough. Avoid overmixing to keep the chips and bits intact.
-
Using a small cookie scoop or a tablespoon, portion out uniform mounds of cookie dough. Place these mounds onto a baking sheet lined with foil or parchment paper. Transfer the sheet to the refrigerator and chill for about 40 minutes, or until the dough is firm enough to easily roll into smooth balls.
-
Once chilled, roll the firm dough mounds into smooth, even balls. For best results and easier dipping, place the shaped dough balls back into the freezer for at least 30 minutes, or until they are very cold and firm. This prevents them from falling apart when dipped into warm chocolate.
-
Chop the good quality chocolate into small pieces to facilitate even melting. Melt the chocolate using a double boiler method for gentle, controlled heat, or carefully in the microwave (heating in 30-second intervals and stirring well between each) until smooth. If desired, stir in about 1-2 tablespoons of coconut oil to thin the chocolate for a smoother coating and shinier finish.
-
Maintain the melted chocolate at a just-slightly-warm temperature, ensuring it’s fluid but not hot. Working quickly with the very cold cookie dough balls, dip each one into the melted chocolate, turning to coat completely. Allow any excess chocolate to drip off before carefully placing the coated truffle back onto the foil-lined baking sheet.
-
Once all truffles are dipped, refrigerate them until the chocolate coating is completely firm, typically 30-60 minutes. For an even smoother texture and enhanced flavor, consider freezing the finished truffles for at least 24 hours before serving. Store any leftover truffles in an airtight container in the refrigerator or freezer.
