Mastering James Beard’s Buttermilk White Bread: A Classic, Fluffy Recipe Revisited for Modern Bakers
Stepping into the kitchen to bake bread is a truly rewarding experience, and few names inspire home bakers quite like James Beard. His seminal work, “Beard on Bread,” remains a cherished guide for enthusiasts seeking to master the art of baking. Among its many treasures, the recipe for Buttermilk White Bread stands out as a testament to Beard’s philosophy: simple ingredients, expertly combined, yield extraordinary results. This particular loaf, known for its incredibly soft texture and rich flavor, is a must-try for anyone looking to create delicious, homemade sandwich bread. If you’re pondering a gift for the baker in your life, “Beard on Bread” is an unparalleled choice that continues to educate and inspire. Alternatively, delve into his fascinating life with “The Man Who Ate Too Much,” a captivating biography that chronicles the culinary icon’s journey – a book that, much like this bread, is an absolute delight. I’m genuinely surprised no one has adapted his story for the screen yet; I’d certainly be streaming it! But for now, let’s focus on the delicious task at hand: crafting this iconic buttermilk white bread.
Jump to Recipe

Achieving the Perfect Buttermilk White Bread Loaf: Pan Size Matters
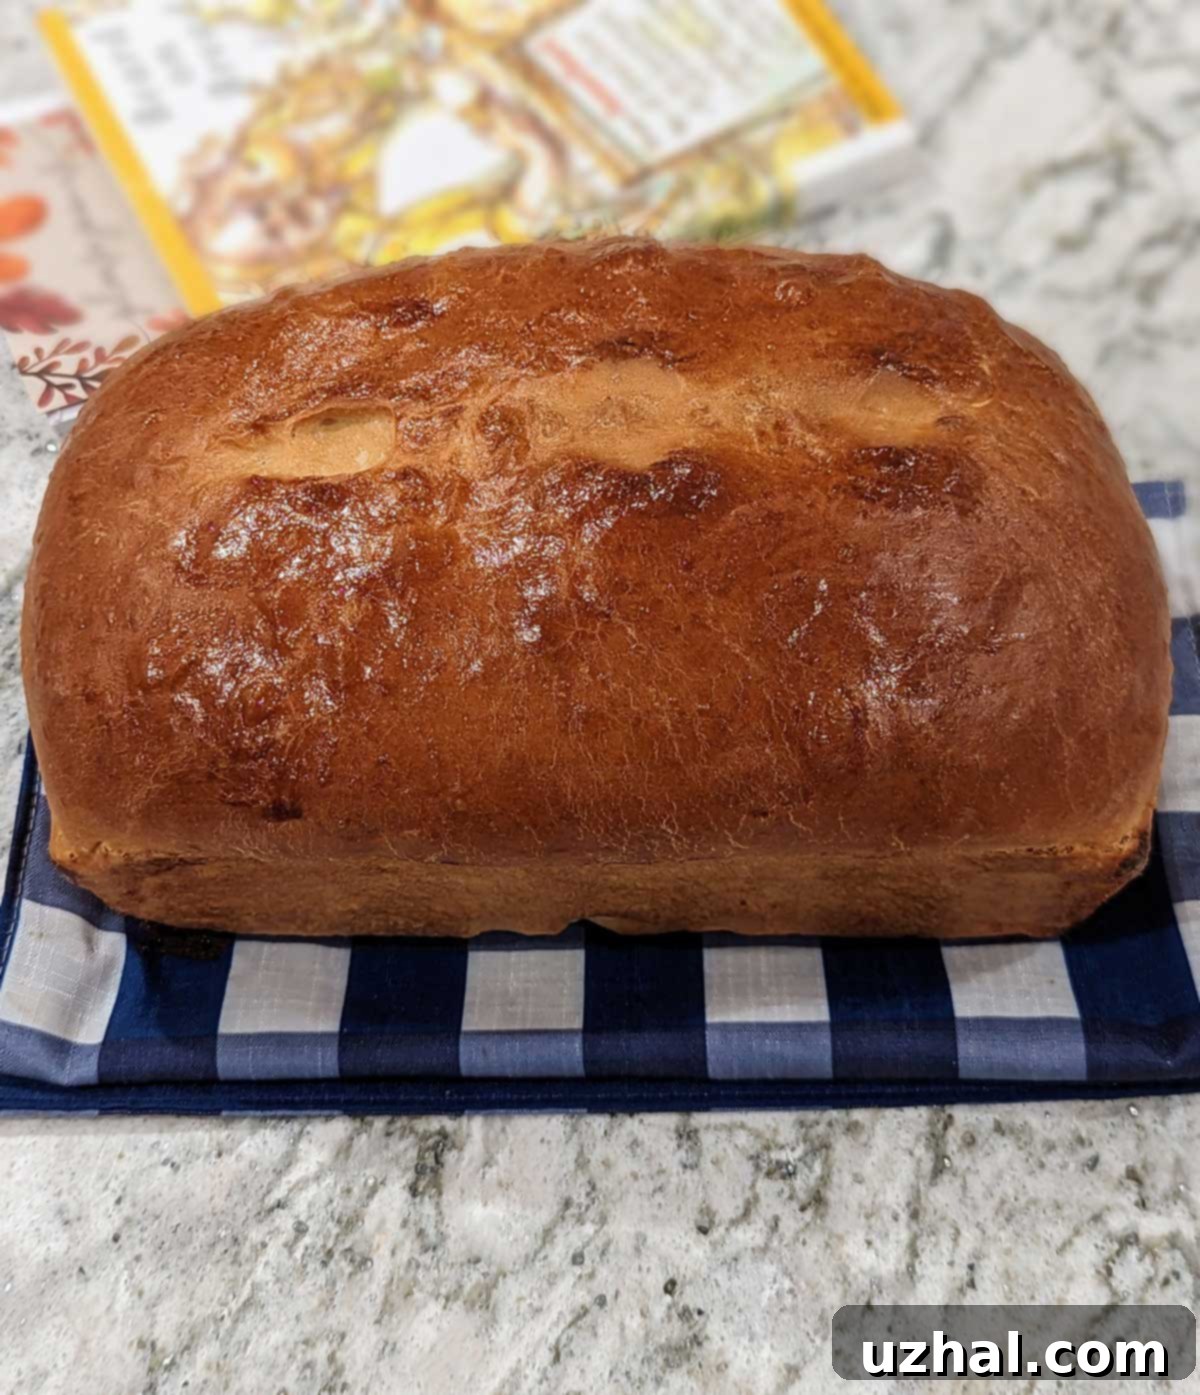
James Beard’s Buttermilk White Bread is celebrated for its generous size, fluffy interior, and wonderfully light texture, all while delivering a subtly tangy, rich flavor that only buttermilk can provide. The original recipe is specifically tailored for a standard 9×5 inch loaf pan, a size that allows the bread to develop a substantial, impressive rise, resulting in those large, inviting slices perfect for hearty sandwiches. While I often opt for slightly smaller 8.5×4.5 inch pans for most of my bread endeavors, I embraced Beard’s vision for this recipe and baked these loaves in the larger recommended size. The result was magnificent: truly grand loaves, some of which found their way into the freezer for future enjoyment, and one was eagerly shared with a friend.
If you prefer a more modest loaf, or wish to divide the recipe, you could certainly make two smaller 8×4 inch loaves. However, for that authentic, full-bodied sandwich bread experience, the 9×5 inch pan truly excels. The extra volume in the pan allows the dough to spread and rise more freely before it begins to set, contributing to the signature airy crumb and impressive height. This size not only creates beautiful presentation but also provides a more substantial slice of bread, ideal for everything from classic deli sandwiches to thick slices of toast. Experimenting with pan sizes can be fun, but for your first attempt at this classic, sticking to the 9×5 inch pan will give you the most accurate representation of Beard’s original intention.

Embracing Adaptation: James Beard’s Philosophy on Recipe Modifications
It might seem almost sacrilegious to suggest altering a recipe by a culinary master like James Beard. However, anyone familiar with his writings, particularly “Beard on Bread,” understands that he actively encouraged home bakers to experiment and adapt. His books are not merely collections of instructions but invitations to understand the fundamentals of baking, empowering you to make informed adjustments. As Beard himself implied, making changes signifies that you’re not just following blindly, but truly engaging with the process and, importantly, thinking for yourself. He would undoubtedly appreciate a baker who adapts a recipe to their taste, their ingredients, or even their precise measurements.
In that spirit, I’ve made a few minor adjustments to this beloved recipe. For one, incorporating gram amounts for flour offers a level of precision that Beard, a champion of culinary accuracy, would likely applaud. While cups are common, grams provide consistent results regardless of how one packs their flour, leading to more reliable outcomes. Furthermore, subtle tweaks to the ingredient ratios, such as the exact amount of buttermilk, or a slight reduction in salt, can fine-tune the flavor profile to better suit modern palates or specific ingredient brands. These aren’t radical overhauls, but rather thoughtful refinements that enhance the baking experience while staying true to the essence of Beard’s original genius. Understanding the ‘why’ behind each ingredient and technique is key, and Beard’s legacy encourages us to do just that.
Common Queries and Expert Answers for Your Buttermilk Bread Bake
I’m currently experimenting with this FAQ format to present key information in an easily digestible manner, hoping it clarifies common points of confusion rather than causing annoyance. Some of these insights will become particularly relevant as you embark on the baking process, offering solutions and explanations precisely when you need them most.
The original recipe for this buttermilk white bread specifies a range of 1 to 1 ½ cups of buttermilk for 4 cups of flour. What’s notably absent is the crucial guidance to “start with 1 cup liquid” or to “add buttermilk gradually.” This implies an assumed level of baking knowledge, expecting the baker to gauge the dough’s hydration. Buttermilk is a highly variable ingredient, and its thickness can differ between brands. For bread, the goal is a soft, pliable, and slightly tacky dough, not a wet or overly stiff one. After extensive testing, I found that 1 ⅓ cups of buttermilk provided the perfect consistency for a smooth, elastic dough that rose beautifully and resulted in the ideal fluffy texture. Always remember that environmental factors like humidity can also affect how much liquid your flour absorbs, so observing your dough is paramount. Begin with 1 cup and add the remaining ⅓ cup slowly until you reach the desired consistency.
James Beard’s general guideline was to use one tablespoon of salt for every pound of flour, a ratio he applies in this particular bread recipe. While this might have been a standard of his era, he himself noted earlier in “Beard on Bread” that a tablespoon could be excessive for some palates. In the context of this recipe, I wholeheartedly agree; a full tablespoon was noticeably too much for my taste, resulting in a bread that was overly salty and somewhat masked the delicate buttermilk flavor. Salt is vital in bread baking—it enhances flavor, controls yeast activity, and strengthens the gluten structure. However, too much can impede yeast and create an unpleasant taste. I found that reducing the salt to 2 ¼ teaspoons achieved a much better balance, allowing the inherent flavors of the flour and buttermilk to shine through while still fulfilling its functional role. This adjustment makes for a more universally appealing and balanced loaf.
Many recipes within “Beard on Bread” simply call for “butter,” but in certain instances, Beard specifically requests “sweet butter,” which is the historical term for unsalted butter. Given this distinction, where he explicitly differentiates when he wants unsalted, it’s reasonable to assume that when he just says “butter” as in this recipe, either salted or unsalted butter can be used. There are only 3 tablespoons of butter in this recipe, a relatively small amount that primarily contributes to the bread’s tender crumb and subtle richness rather than its salt content. If you’ve already followed my recommendation to reduce the added salt to 2 ¼ teaspoons, the type of butter you use (salted or unsalted) will have an even more negligible impact on the final salinity. Feel free to use what you have on hand, or choose unsalted butter if you prefer to have absolute control over the salt levels in your baking.
While you technically can omit buttermilk, doing so means you won’t be making “James Beard’s Buttermilk White Bread.” Buttermilk is a defining ingredient for this particular recipe, contributing not only its namesake tangy flavor but also a unique tenderness and moistness to the crumb. The acidity in buttermilk reacts with baking soda (though not a primary leavening agent here, it contributes to softness if present in other recipes, or directly with flour proteins for tenderization), and its specific proteins help to create a very fine, soft texture. If you’re out of buttermilk or prefer not to use it, the best approach is to select an alternative white bread recipe that doesn’t rely on it. For instance, consider trying one of the other excellent plain white bread recipes mentioned below, which are formulated without buttermilk and designed to deliver delicious results using different liquid bases. Attempting to substitute buttermilk directly with plain milk or water in *this* specific recipe without other adjustments would fundamentally alter its character and texture, yielding a loaf that isn’t quite the same.
Exploring Easy Bread Recipes Without Buttermilk
For those new to the wonderful world of bread baking, James Beard’s Buttermilk White Bread is a fantastic starting point due to its relatively straightforward process and forgiving nature. However, if you’re seeking an even simpler entry into homemade bread, or if you simply don’t have buttermilk on hand, there are numerous approachable recipes that don’t require this specific ingredient. These alternatives often rely on common pantry staples like milk or water, making them incredibly accessible.
Two excellent examples that come to mind are the classic Gold Medal White Bread and the Basic White Bread Without a Bread Machine. Both offer a simpler ingredient list and often a more traditional, less acidic flavor profile. The Gold Medal recipe is a time-tested favorite, known for its consistent results and soft texture, perfect for everyday sandwiches. Similarly, a basic white bread recipe without a machine focuses on fundamental hand-kneading or stand-mixer techniques, teaching you the core principles of dough development and fermentation without the complexity of specific liquids. These recipes are ideal for building confidence and understanding the basic mechanics of yeast, flour, and water before venturing into more specialized breads. They provide a solid foundation from which any aspiring baker can grow and experiment.
Discovering Buttermilk Whole Wheat Bread: A Heartier Alternative
If your preference leans towards heartier loaves, or if you simply have a bag of whole wheat flour waiting to be used, you might be interested in the whole wheat counterpart to this recipe: Buttermilk Whole Wheat Bread. I shared a recipe for this back in August. While it shares the “buttermilk” component, the inclusion of whole wheat flour dramatically transforms the final product. Unlike the light and fluffy texture of the white bread version, the whole wheat loaf tends to be denser and more robust.
The difference in texture stems primarily from the bran and germ present in whole wheat flour. These components, while packed with nutrients, interfere with gluten development, resulting in a bread that has a chewier, more substantial crumb rather than the airy, soft qualities of white bread. The flavor profile is also richer and nuttier, characteristic of whole grains. So, while both recipes utilize buttermilk for tenderness and flavor, they cater to distinctly different preferences. If you’re looking for a wholesome, rustic loaf with a deeper flavor and a firmer bite, the Buttermilk Whole Wheat Bread is an excellent choice. It’s a wonderful way to enjoy the benefits of whole grains in a delicious, homemade form.
The Enduring Legacy of James Beard in Your Kitchen
James Beard wasn’t just a chef; he was a pioneer of American gastronomy, often referred to as the “Dean of American Cookery.” His influence extends far beyond professional kitchens, deeply permeating the world of home cooking. His philosophy was rooted in using fresh, quality ingredients and approaching food with honesty and joy. “Beard on Bread” exemplifies this ethos, demystifying the bread-making process and encouraging countless individuals to conquer their fear of yeast and bake their own loaves. He believed that good food should be accessible and that the act of cooking was a fundamental pleasure.
When you bake a James Beard recipe, you’re not just following instructions; you’re connecting with a culinary tradition that emphasizes flavor, technique, and the sheer satisfaction of creating something delicious from scratch. His encouragement to adapt recipes, to truly understand the ingredients and the process, empowers home cooks to become more intuitive and confident in their abilities. This Buttermilk White Bread, for instance, is more than just a recipe; it’s an invitation to explore the nuances of fermentation, the magic of a good rise, and the unparalleled taste of freshly baked bread. In every fluffy slice, Beard’s enduring legacy continues to enrich our kitchens and our lives.
Tips for Perfect Buttermilk White Bread Every Time
Achieving a consistently perfect loaf of James Beard’s Buttermilk White Bread involves a few key considerations that can elevate your baking from good to extraordinary. First, **ingredient temperature is crucial.** Ensure your warm water is between 100-110°F (38-43°C) for optimal yeast activation. Cold water will inhibit the yeast, while water that’s too hot can kill it. Similarly, room temperature buttermilk and butter will incorporate more smoothly into the dough.
Second, **don’t skimp on kneading.** Whether by hand or with a stand mixer, developing the gluten sufficiently is vital for the bread’s structure and signature fluffiness. Aim for dough that passes the “windowpane test” – you should be able to stretch a small piece until it’s thin enough to see light through without tearing. This indicates well-developed gluten.
Third, **allow for adequate rising time.** Bread baking is a patient art. The initial rise (bulk fermentation) and the second rise (proofing in the pan) are essential for flavor development and a light texture. A warm, draft-free place is ideal; a turned-off microwave with a cup of hot water inside can create a perfect environment. Don’t rush these steps, and always let the dough more than double in bulk.
Finally, **proper baking and cooling.** Bake until the crust is golden brown and the internal temperature reaches 200-210°F (93-99°C). An instant-read thermometer is your best friend here. And as tempting as it is, resist the urge to slice into your warm loaf immediately. Cooling completely on a wire rack allows the internal structure to set and prevents a gummy texture, ensuring every slice is as perfect as it should be.
Serving and Storage Suggestions for Your Homemade Loaf
Once your James Beard Buttermilk White Bread has cooled completely, the possibilities are endless. This versatile loaf is exceptionally soft and flavorful, making it ideal for a multitude of uses. It truly shines as the foundation for classic sandwiches—think a simple ham and cheese, or a hearty turkey club. Its sturdy yet tender crumb holds up beautifully to fillings without becoming soggy. It also makes for incredible toast, transforming with a crispy exterior and a wonderfully soft interior, perfect for butter and jam, or a savory avocado smash.
For storage, once completely cool, wrap the bread tightly in plastic wrap or aluminum foil, or store it in an airtight bread box at room temperature. It will remain fresh and delicious for 3-4 days. If you’ve baked a large loaf, or simply want to extend its life, this bread freezes exceptionally well. Slice the cooled loaf, then wrap individual slices or portions tightly in plastic wrap before placing them in a freezer-safe bag or container. This allows you to pull out just what you need, defrost, and enjoy fresh-tasting bread anytime. Thawed slices can be reheated gently in a toaster or oven for that fresh-baked feel.
- James Beard Gingerbread Recipe
- Best Yet Pumpkin Pie – James
- James Villas Pecan Chocolate Chip Cookies
- David’s Double Fudge Cookies
- Vanilla Bean Banana Pudding
Recipe

James Beard’s Buttermilk White Bread
Anna
Pin Recipe
Ingredients
- 2 packets active dry yeast (approx. 4 ½ teaspoons or 14g total)
- 1 tablespoon granulated sugar
- ½ cup warm water (100 to 110 degrees F / 38-43 degrees C)
- 4 cups bread flour (King Arthur recommended) (560 grams)
- 2 ¼ teaspoons salt (reduced from original 1 tablespoon)
- 3 tablespoons melted butter
- 1 ⅓ cups buttermilk (approx. 320ml; adjusted from original 1 to 1 ½ cups)
Instructions
-
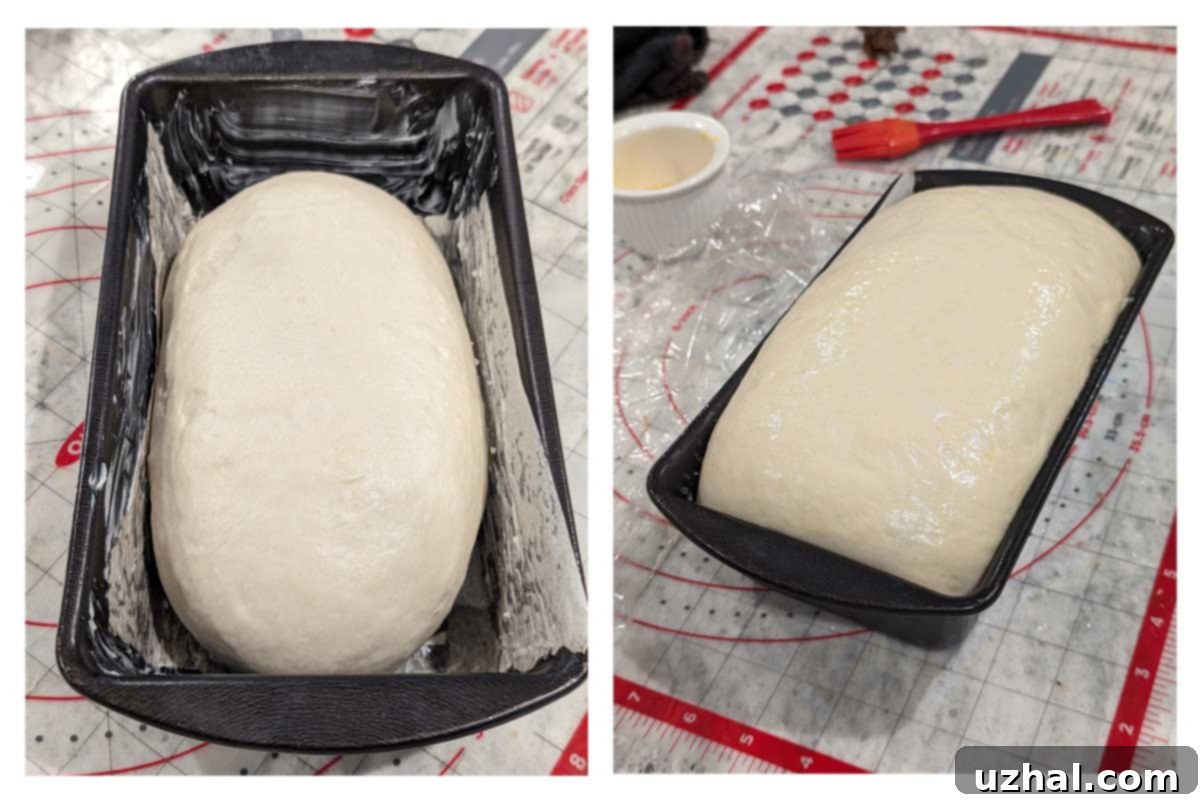
Prepare your 9×5 inch loaf pan by greasing it thoroughly. Set it aside for later use while your dough rises.
-
In a small bowl, combine the ½ cup warm water (ensure it’s between 100-110°F), 1 tablespoon sugar, and the two packets of active dry yeast. Stir gently and let the mixture sit for 5 to 10 minutes until it becomes foamy, indicating the yeast is active.
-
In the bowl of a stand mixer fitted with the paddle attachment (or a large mixing bowl if kneading by hand), combine the 4 cups of bread flour, 2 ¼ teaspoons salt, and 3 tablespoons melted butter. Pour in 1 cup of the buttermilk. Stir these ingredients together until just combined.
-
Add the activated yeast mixture to the flour mixture and stir well. At this stage, the dough will likely be quite dry and shaggy. Gradually add an additional ⅓ cup of buttermilk, a spoonful at a time, until the dough starts to come together. Switch to the dough hook attachment (or continue kneading by hand) and knead for 5 to 7 minutes. The goal is a smooth, elastic, and slightly tacky dough. If the dough still feels heavy, dry, or tears easily, continue adding very small amounts of buttermilk until it reaches the desired texture.
-
Turn the dough out onto a very lightly floured pastry mat or clean counter. Knead by hand for another 2 minutes. The dough should feel very smooth, firm, and bouncy, but importantly, it should not be sticky.
-
Place the dough into a lightly buttered or oiled large bowl, turning it once to coat all sides. Cover the bowl with plastic wrap or a clean kitchen towel and let it rise in a warm, draft-free place (a turned-off microwave with a cup of hot water can work wonders) until it has more than doubled in bulk. This typically takes about 1 hour to 1 ½ hours, depending on your kitchen’s temperature.
-
Once risen, gently punch down the dough to release the air. Turn it out onto your lightly floured surface. Form the dough into a rough rectangle, then shape it into a neat loaf by folding in the shorter ends first, followed by folding in the longer sides, creating tension on the surface.
-
Carefully place the shaped loaf into your prepared 9×5 inch greased pan. Cover the pan loosely with greased plastic wrap and allow the dough to rise for a second time, for approximately 1 hour, or until it has risen about 1 inch over the edge of the pan in the middle. Preheat your oven to 375°F (190°C) during the last 15-20 minutes of this rise.
-
Bake the bread in the preheated oven for about 45 minutes, or until the crust is golden brown and the internal temperature reaches 200-210°F (93-99°C). Once baked, let the bread cool in the pan for about 5 minutes before carefully removing it to a wire rack. Allow it to cool completely before slicing and serving. This ensures the internal structure sets properly and prevents a gummy texture.
