Authentic Small Batch Kolaches: Soft, Sweet, and Easy to Make with Cream Cheese & Fruit Fillings
Do you adore the idea of fresh, homemade pastries but shy away from deep-frying? Are you a connoisseur of creamy cheese and vibrant fruit fillings? If your answer is a resounding “yes” to these questions, then it’s time to dive into the wonderful world of kolaches! These delightful, pillowy soft pastries are incredibly fun to make and even more enjoyable to eat. For those new to this Central European-inspired treat, or if you simply prefer baking in smaller quantities, we’ve curated the perfect small batch kolache recipe to get you started on your delicious journey.
Jump to Recipe

The Enduring Charm of Kolaches: A Sweet Heritage
Kolaches (pronounced “koh-LAH-chees”) are a beloved pastry with deep roots in Czech Republic cuisine, brought to America by Czech immigrants, particularly flourishing in areas like Texas. Traditionally, these yeast-leavened delights feature a sweet, soft dough with a depression in the center, generously filled with a variety of sweet ingredients. While the classic kolache is a sweet indulgence, a savory variation known as klobasnek (often filled with sausage) is also incredibly popular, especially in Texas bakeries. They offer a unique blend of bread-like comfort and dessert-like sweetness, making them ideal for breakfast, brunch, or an afternoon snack. Our small batch kolache recipe captures the essence of this rich culinary history, ensuring an authentic taste experience.
A Legacy of Softness: Mrs. Jerabek’s Original Dough Recipe
This particular kolache recipe is a cherished adaptation, inspired by what is affectionately known as “Mrs. Jerabek’s Kolaches.” This original recipe is renowned for its reliability and its signature tender texture. What makes Mrs. Jerabek’s approach stand out is the strategic use of shortening or margarine, paired with an egg yolk instead of a whole egg in the dough. These specific choices are key to achieving an exceptionally soft and airy crumb, reminiscent of the traditional kolaches we fondly remember from bakeries in places like La Grange, Texas.
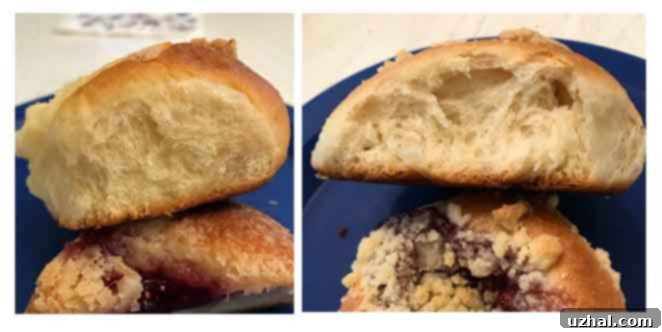
For years, I’ve suspected that margarine plays a crucial role in creating a softer kolache, or at the very least, a much thinner and more delicate crust. My recent experiments comparing Country Crock Plant Butter (a form of margarine) to regular butter further reinforced this belief. While both versions resulted in delicious kolaches, those made with the Country Crock Plant Butter consistently exhibited a noticeably softer crumb and a beautifully thin crust. This slight difference in texture can elevate your homemade kolaches, making them truly irresistible. The image below showcases this distinction, with the margarine-based kolache on the left and its butter-based counterpart on the right, allowing you to visually appreciate the subtle textural variations.

Crafting the Perfect Kolache Fillings
Irresistible Kolache Fillings
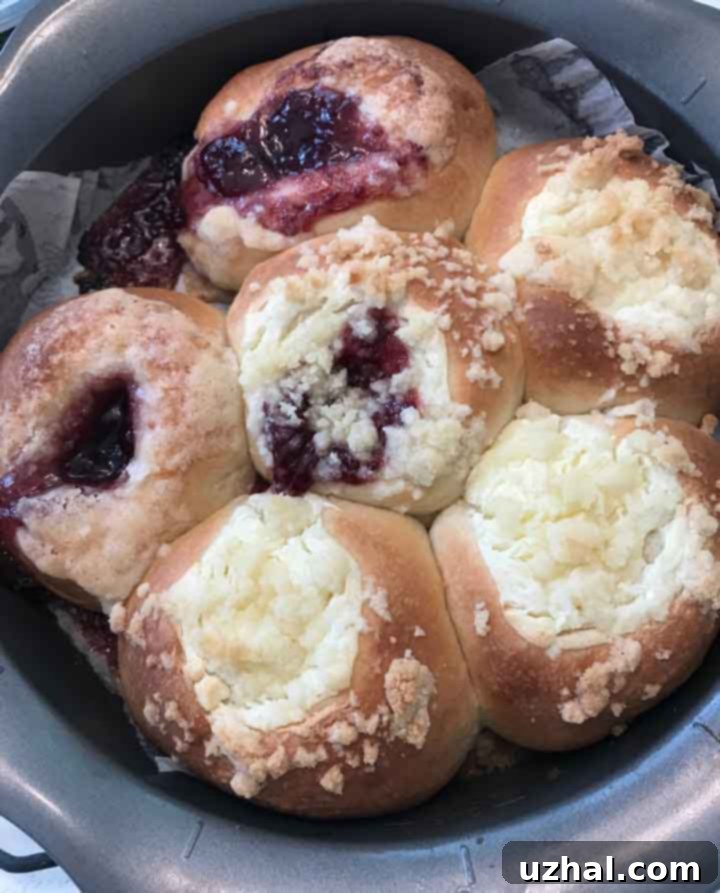
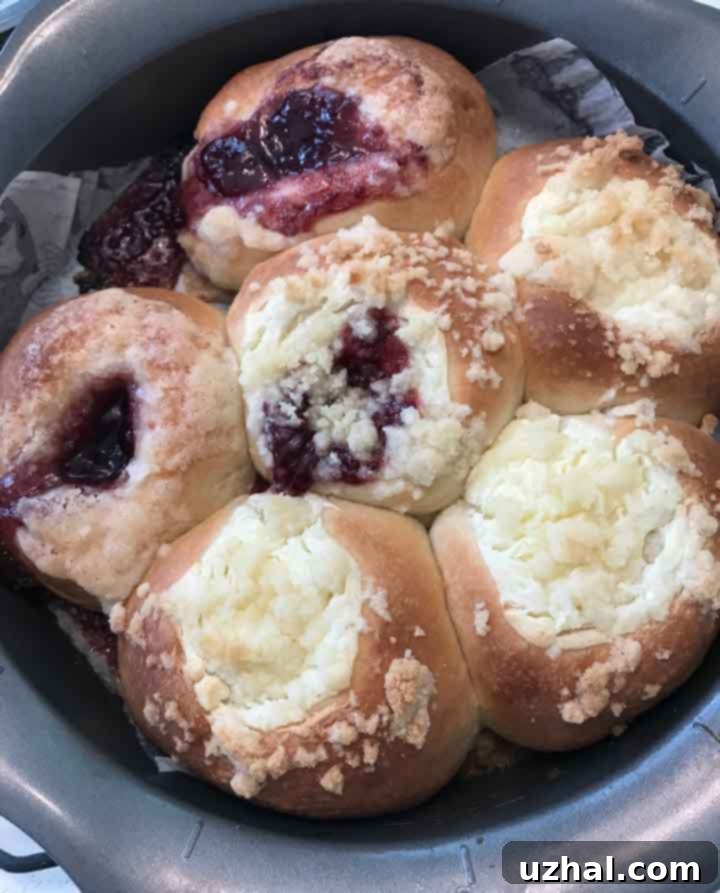
The heart of a great kolache lies in its filling, and this recipe offers a fantastic base for both classic cream cheese and delightful fruit variations. For the luscious cream cheese filling, I consistently rely on the same tried-and-true recipe. Conveniently, it calls for precisely half an egg yolk, which you’ll have leftover from preparing the kolache dough, ensuring no waste and perfect synergy between components. To introduce variety and prevent a single flavor from dominating, I often prepare half of my small batch kolaches with just the rich cream cheese filling, and the other half with a delightful combination of both cream cheese and a vibrant fruit filling.
When it comes to fruit fillings, canned pastry or pie filling is generally preferred. Its denser consistency makes it heavier and less prone to bubbling up excessively during baking, which helps maintain the kolache’s neat appearance. However, if convenience is your priority, high-quality fruit preserves or jams can also be used. If opting for preserves, consider reducing them slightly on the stovetop to thicken them, ensuring they hold their shape better in the pastry. Popular traditional fruit fillings include apricot, prune, poppy seed, and cherry, each offering a unique burst of flavor that beautifully complements the sweet, soft dough. Don’t hesitate to experiment with your favorite fruit combinations!

The Benefits of a Small Batch: Perfectly Fresh Kolaches Every Time
Is This Batch Too Small? Or Just Right?
This recipe is designed specifically for a small batch, yielding six perfectly sized kolaches. For many households, including ours, a smaller quantity is ideal, especially when there are often various other sweets and baked goods around. This ensures that every kolache is enjoyed at its freshest, minimizing waste and maximizing satisfaction. However, if you find yourself consistently needing more, or if this recipe becomes a household favorite, feel free to double it! If enough readers indicate a preference for a larger quantity, I’m happy to update the recipe to reflect a doubled batch.
Beyond convenience, a small batch is also an excellent opportunity for culinary experimentation. I’ve been considering this particular dough as a perfect base for exploring savory kolaches, or klobasneks. The dough for these small batch kolaches isn’t overly sweet to begin with, making it highly adaptable for savory applications. You could easily reduce the sugar by just 1 tablespoon and wrap the dough around savory fillings like cooked sausage and cheese, or even a mix of diced ham and cheddar. Imagine a breakfast kolache with bacon, egg, and cheese! I plan to try this variation soon and will update the post with my findings and any specific modifications. The versatility of this dough truly makes it a fantastic starting point for both sweet and savory adventures.
Recipe

Small Batch Kolache Recipe
Pin Recipe
Equipment
-
Stand mixer with dough hook
Ingredients
For the Dough
- 3 tablespoons full fat margarine or salted butter (42 grams, softened)
- 3 tablespoons granulated sugar (40 grams)
- ½ of an egg yolk (reserve the other half for the cream cheese filling)
- ½ teaspoon salt (a scant half teaspoon, adjust if using salted butter/margarine)
- 3 to 4 oz hot milk (warmed to about 130 degrees F / 55 degrees C)
- 1 ½ cups all-purpose flour (190 grams)
- 1 ⅛ teaspoons fast rising yeast (approximately half a standard packet)
- ⅛ teaspoon vanilla extract
For the Crumble Topping
- 1 tablespoon melted salted butter
- 2 tablespoons granulated sugar
- 3 tablespoons all-purpose flour
For the Cream Cheese Filling
- 4 oz cream cheese (softened at room temperature)
- 2 tablespoons granulated sugar
- ½ an egg yolk (the other half from the dough preparation)
- 1 pinch lemon zest
- ⅛ teaspoon vanilla extract
Instructions
-
In the bowl of a stand mixer fitted with a paddle attachment, combine the softened margarine or butter with the sugar. Mix on medium speed until creamy, about 1-2 minutes. Add the reserved half egg yolk and salt, mixing well until thoroughly incorporated. Next, add the flour and fast-rising yeast to the bowl and mix until just combined. Gradually add ¼ cup (2 oz) of the warm milk. The dough should appear somewhat dry at this stage. Add an additional 2 tablespoons (1 oz) of milk; the dough should now be slightly sticky. If the dough still feels very dry, slowly incorporate the remaining 2 tablespoons of milk, a little at a time, until the desired consistency is reached. In most cases, 3 oz of milk total is sufficient.
-
Switch to the dough hook attachment on your stand mixer and begin kneading the dough on low to medium speed. The dough will initially be sticky but should gradually transform into a smooth, elastic ball that clears the sides of the mixer bowl while clinging lightly to the bottom. Occasionally stop the mixer to loosen the dough from the hook and check its elasticity by gently pulling a small piece; it should stretch without tearing easily (the “windowpane test”). Continue kneading for approximately 4 to 5 minutes, though actual time may vary depending on your mixer’s power. The goal is a soft, pliable dough that is easy to handle.
-
Once kneaded, cover the bowl tightly with plastic wrap or a damp cloth and let the dough rise in a warm, draft-free place for about one hour. For a clear visual of its progress, you can transfer the dough to a greased 2-cup Pyrex liquid measuring cup. While it may not completely double in size, it should increase by approximately 75% to 80%, indicating successful activation of the yeast.
-
While the dough is undergoing its first rise, prepare both the cream cheese filling and the crumble topping. For the cream cheese filling, beat together the softened cream cheese and sugar until light and fluffy. Then, beat in the remaining half egg yolk, a pinch of lemon zest, and vanilla extract until the mixture is completely smooth and creamy. To make the delightful crumble topping, simply melt the butter (or ensure it’s very soft), then combine it thoroughly with the granulated sugar and flour until crumbly.
-
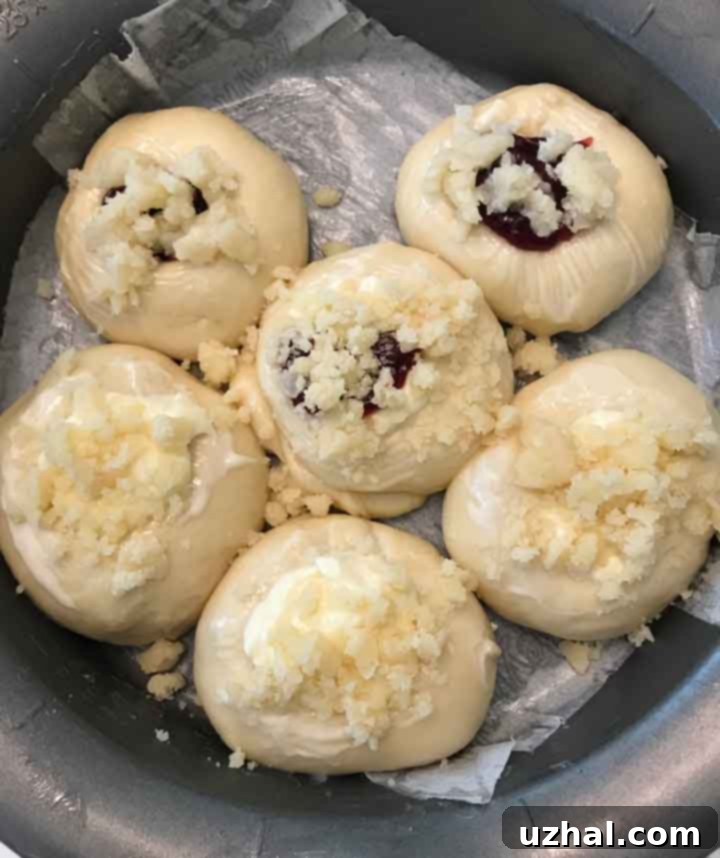
After the first rise, gently punch down the dough and divide it into 6 equal pieces. Roll each piece into a smooth ball. Arrange these dough balls about 1 inch apart in a lightly greased 9-inch square or round baking pan. Loosely cover the pan with plastic wrap and allow the kolaches to undergo their second rise for another hour in a warm place. Once risen, use your thumb or the back of a spoon to create a deep indentation in the center of each dough ball. Fill these depressions generously with the prepared cream cheese mixture, your chosen fruit preserves/filling, or a delightful combination of both. Finally, using a pastry brush, lightly brush the exposed dough around the filling with a little melted butter or plant-based butter for added richness and a golden crust.
-
Preheat your oven to 375 degrees F (190 degrees C). Sprinkle the prepared crumble topping evenly over the filled kolaches. Bake in the preheated oven for approximately 25 minutes, or until the kolaches are beautifully golden brown and the filling is set. Once baked, remove the pan from the oven and allow the kolaches to cool in the pan for about 20 minutes before serving warm. For long-term storage, let the kolaches cool completely, then seal them tightly in a freezer-safe bag or airtight container. To reheat from frozen, wrap them loosely in aluminum foil and warm them in a 350-degree F (175 degrees C) toaster oven or conventional oven until heated through and soft again.
Notes
Expert Tips for Kolache Success
Achieving the perfect kolache isn’t just about following the steps; it’s about understanding the nuances of yeast baking. Here are some extra tips to ensure your small batch kolaches turn out beautifully every time:
- **Dough Consistency is Key:** The initial dough should be on the drier side before adding the last bit of milk. This allows for better control over the final stickiness. A perfectly kneaded dough will be smooth, elastic, and pass the “windowpane test” – where a small piece of dough can be stretched thin enough to see light through it without tearing.
- **Warmth for Rising:** Yeast thrives in warm environments. If your kitchen is cool, try placing the covered dough bowl in a slightly warm (but not hot) oven that has been turned off, or near a warm spot like a sunny window or pilot light. Avoid drafts, which can hinder rising.
- **Creating the Indentation:** When making the well for the filling, be firm but gentle. You want to create a substantial depression to hold ample filling without tearing the dough or deflating it too much. The back of a greased spoon or even your thumb works well.
- **Don’t Overfill:** While tempting, overfilling the kolaches can cause the filling to bubble over and burn during baking. Aim for a generous but controlled amount that sits nicely within the indentation.
- **Golden Brown Perfection:** Keep an eye on your kolaches during the last few minutes of baking. They should achieve a beautiful golden brown color on top. If they’re browning too quickly, you can loosely tent them with aluminum foil.
Storing and Reheating Your Delicious Kolaches
One of the beauties of homemade kolaches is their versatility, even after baking. While they are undoubtedly best enjoyed fresh and warm from the oven, they also store and reheat remarkably well, making them ideal for meal prep or a quick treat.
- **Room Temperature:** Freshly baked kolaches can be stored in an airtight container at room temperature for up to 2 days. For optimal freshness, consider placing a slice of bread in the container with them; it helps absorb moisture and keeps the pastries soft.
- **Refrigeration:** If you plan to keep them longer, store kolaches in an airtight container in the refrigerator for up to 5 days. Reheat gently before serving for the best texture.
- **Freezing:** Kolaches freeze beautifully! Once completely cooled, wrap each kolache individually in plastic wrap, then place them in a freezer-safe bag or airtight container. They can be stored in the freezer for up to 2-3 months.
- **Reheating:** To bring frozen kolaches back to life, you don’t even need to thaw them first. Simply wrap them loosely in aluminum foil and bake in a preheated oven or toaster oven at 350°F (175°C) for 15-20 minutes, or until warmed through and soft. From the refrigerator, a shorter reheating time of 10-15 minutes will suffice. This method ensures they retain their tender crumb and delicious flavor.
Frequently Asked Questions about Kolaches
- Can I use whole milk instead of hot milk?
- Yes, whole milk is generally recommended for its fat content, which contributes to a richer, softer dough. Ensure it’s warmed to the specified temperature (around 130°F / 55°C) to properly activate the yeast.
- What if my dough isn’t rising?
- Several factors can affect yeast activity. Ensure your yeast is fresh and not expired, and that your milk is at the correct temperature (too hot will kill the yeast, too cold won’t activate it). Also, make sure your rising environment is warm and free of drafts.
- Can I use other types of yeast?
- This recipe specifies fast-rising yeast, which is convenient as it can be mixed directly with the dry ingredients. If using active dry yeast, you would typically need to proof it first in the warm milk for 5-10 minutes until foamy before adding it to the rest of the ingredients.
- My filling bubbled out during baking. What went wrong?
- This usually happens if the filling is too liquid or if the indentation in the dough isn’t deep enough. Using canned pie filling (which is thicker) or reducing fruit preserves can help. Also, ensure you create a deep, well-defined cavity for your filling.
- Can I make the dough ahead of time?
- Yes, you can prepare the dough and let it complete its first rise. After the first rise, punch it down, cover it tightly, and refrigerate for up to 24 hours. When ready to bake, let it come to room temperature for about 30-60 minutes before proceeding with shaping and the second rise.
Making kolaches at home is a rewarding experience, transforming simple ingredients into a delightful pastry that brings joy with every bite. Whether you’re a seasoned baker or just starting out, this small batch kolache recipe offers a straightforward and satisfying way to enjoy these sweet, soft treats. Experiment with different fillings, perfect your technique, and savor the taste of tradition. We encourage you to try this recipe and share your creations with us!
