Authentic Red Velvet Cake with Cream Cheese Frosting: A Timeless Classic Recipe
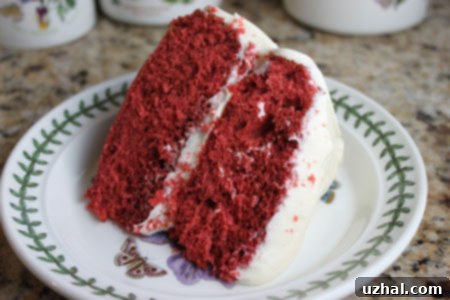
There are few desserts as iconic and universally loved as a perfectly baked Red Velvet Cake. With its striking crimson hue, subtle cocoa notes, and the unmistakable tang of cream cheese frosting, it’s a cake that truly stands apart. This particular recipe is one of my most cherished and frequently used, consistently delivering a moist, flavorful cake that captures the essence of a true Southern classic. It draws inspiration from the legendary original Waldorf Astoria Red Velvet Cake, a recipe that has captivated dessert lovers for decades. However, our adaptation refines the classic by incorporating butter for a richer, more nuanced flavor profile instead of shortening, and utilizing delicate cake flour in place of all-purpose flour to ensure an exceptionally tender crumb. While some may perceive it as having less fat compared to certain other recipes, rest assured that when prepared with the correct type and quantity of flour, this cake remains incredibly moist and utterly irresistible. It’s a testament to how slight adjustments can elevate an already beloved recipe to new heights, making it a staple for celebrations and everyday indulgence alike.
Unlocking the Authentic Red Velvet Flavor Profile
What truly distinguishes this cake and makes it a favorite among many is its authentic, traditional red velvet flavor. Unlike some modern interpretations that overemphasize chocolate, this recipe strikes the perfect balance, delivering just the right amount of subtle cocoa without overpowering the distinctive “red velvet” taste. This unique flavor is a harmonious blend of several key components: the bright tang of buttermilk, the mellow depth of cocoa, and the warm, aromatic sweetness of vanilla. The buttermilk reacts with the cocoa and baking soda to create a delicate crumb and a very slight reddish tint, a precursor to the vibrant red we achieve today with food coloring. Historically, the red hue was less pronounced, resulting from the chemical reaction between acidic cocoa powder and baking soda, along with naturally occurring pigments in older cocoa varieties. Today, food coloring ensures the iconic deep red, but the underlying flavor remains rooted in this classic combination. It’s a flavor that evokes nostalgia and comfort, making every slice a truly satisfying experience.
The choice of ingredients plays a crucial role in developing this signature taste. Using natural unsweetened cocoa powder, as specified in the recipe, is important. Dutch-processed cocoa, while common, is less acidic and won’t interact with the buttermilk and baking soda in the same way, potentially dulling the classic flavor. Furthermore, ensuring your buttermilk is at room temperature contributes to a smoother batter and a more evenly textured cake. Each ingredient, from the precise amount of vanilla to the specific type of flour, has been carefully selected to contribute to the overall balance and authenticity of this Red Velvet masterpiece. Understanding these elements helps appreciate the tradition behind this beloved dessert and ensures you achieve that true, unmistakable red velvet essence.
The Quintessential Cream Cheese Frosting
No Red Velvet Cake is complete without its perfect partner: a rich, tangy, and impossibly smooth cream cheese frosting. This recipe’s frosting is adapted from cherished family recipes, much like Aunt Mildred’s Red Velvet Cake, and shares similarities with esteemed versions like King Arthur’s. Growing up in Texas, cream cheese frosting was the only acceptable choice for Red Velvet, and that tradition continues with this recipe. Its delightful tanginess beautifully complements the cake’s subtle chocolate and buttermilk notes, creating a flavor combination that is truly unmatched. The frosting is thick enough to spread generously, yet fluffy and light, making each bite a creamy dream.
For those who might prefer an alternative, the fluffy boiled type of icing, traditionally known as “Ermine Icing” or “Flour Buttercream,” is another classic pairing, especially in older Red Velvet recipes. While I personally opt for cream cheese, Taste of Home offers an excellent version of this cooked icing. I’ve also shared various icing and frosting recipes on Cookie Madness over the years, including those that replicate the boiled type. It’s interesting to note the regional differences in terminology; in Texas and across much of the Southern U.S., we often refer to all sweet toppings as “icing,” even if they are technically a thick, fluffy “frosting.” Whichever term you use, the goal is always a delicious, well-balanced topping that enhances the cake without overwhelming it. For this recipe, the cream cheese frosting is designed to be incredibly easy to make, requiring just a few simple ingredients and a stand mixer to achieve that desirable smooth and creamy consistency. Ensure your cream cheese and butter are softened to room temperature for the best results, preventing lumps and achieving a perfectly whipped texture. The optional touch of fresh lemon juice adds an extra layer of bright tartness that elevates the flavor even further.
Versatile Red Velvet: From Layer Cake to Sheet Cake
While the classic presentation of Red Velvet is often a stunning multi-layered round cake, its versatility means it can adapt to various forms, including an easy-to-make sheet cake. I often transform this very recipe into a sheet cake, especially when preparing it for larger gatherings or festive occasions. The bake time typically adjusts to about 28 minutes for a standard sheet pan, though this can vary slightly depending on your oven and the dimensions of your pan. Baking it as a sheet cake simplifies the process significantly, making it less intimidating for novice bakers and perfect for potlucks or casual celebrations.

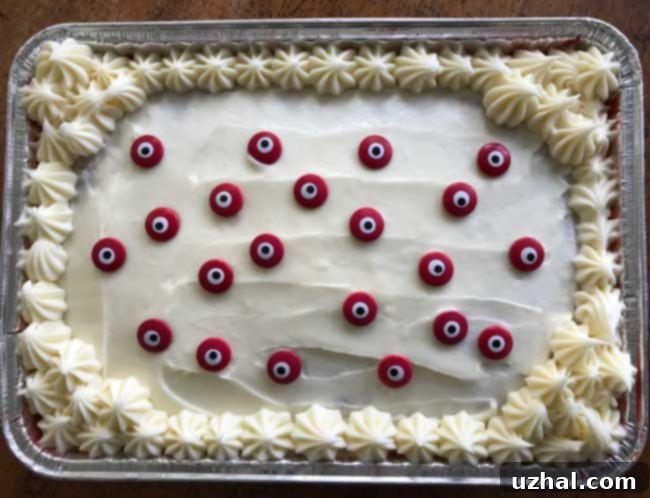
One memorable occasion involved making this Red Velvet as a sheet cake for Halloween, adorning it with whimsical candy eyeballs all over the top. This playful decoration highlighted how adaptable the Red Velvet Sheet Cake is for themed events, allowing for creative expression beyond the traditional. The flat surface of a sheet cake provides an ideal canvas for various decorations, from simple sprinkles to intricate designs, making it a fantastic choice for customizing your dessert. Whether you’re baking it for a holiday, a birthday, or just a weekend treat, the sheet cake format ensures all the rich flavor and moist texture of the original, but with added convenience.
Beyond the layer and sheet cake formats, the versatility of Red Velvet extends to many other delightful desserts. From bite-sized Red Velvet Cheesecake Cups to crunchy Red Velvet Biscotti, and even chewy Red Velvet White Chip Cookies, the distinctive flavor profile of Red Velvet lends itself beautifully to a wide array of treats. These variations allow you to enjoy the beloved taste in different textures and formats, catering to various preferences and occasions. The core elements – cocoa, buttermilk, and a touch of vanilla – provide a robust foundation that can be reimagined in countless ways, proving that Red Velvet is more than just a cake; it’s a celebrated flavor in its own right.
Tips for Baking the Perfect Red Velvet Cake
Achieving a truly magnificent Red Velvet Cake requires attention to a few key details beyond just the ingredients. Firstly, ensure all your cold ingredients, especially butter, eggs, and buttermilk, are at room temperature. This allows them to emulsify properly with the other ingredients, resulting in a smooth, consistent batter and a more uniform, tender crumb. Cold ingredients can cause the batter to curdle and affect the cake’s texture. Secondly, don’t overmix the batter once the flour is added. Overmixing develops the gluten in the flour, leading to a tough, dry cake instead of the desired moist and velvet-like texture. Mix just until the ingredients are combined.
The reaction between baking soda and vinegar is crucial for this cake’s rise and tender texture. Combine them just before adding to the batter to ensure maximum fizz and leavening power. Incorporate this foaming mixture quickly and gently stir it into the batter before immediately pouring it into your prepared pans and placing them in the oven. This rapid action helps activate the leavening agents efficiently. Lastly, proper cooling is essential. Allow the cakes to cool in their pans on a wire rack for about 10-15 minutes before inverting them to cool completely. This prevents the cakes from breaking and helps them retain their shape and moisture. Rushing the cooling process can lead to structural issues and a less appealing finished product. Patience in baking always pays off, especially with a classic like Red Velvet.
- Waldorf Astoria Original Red Velvet Cake with Cooked Icing
- Easiest Red Velvet Cake
- Red Velvet Biscotti
- Red Velvet Cheesecake Cups
- Red Velvet White Chip Cookies
Recipe: Classic Red Velvet Cake with Cream Cheese Frosting

Red Velvet Cake with Cream Cheese Frosting
Anna
Pin Recipe
Ingredients
- 4 oz unsalted butter, room temperature (114 grams)
- 1 ½ cups granulated sugar (300 grams)
- ½ teaspoon salt
- 1 teaspoon vanilla extract
- 2 large whole eggs, room temperature
- 2 tablespoons unsweetened natural cocoa powder (10-12 grams)
- ¼ cup red food coloring (58 grams)
- 2 ¼ cups cake flour (250 grams)
- 1 cup buttermilk (228 grams)
- 1 teaspoon baking soda
- 1 tablespoon white vinegar
Frosting for Red Velvet Cake
- 8 oz cream cheese, softened (240 grams)
- 1 stick butter, salted or unsalted (114 grams)
- 1 ¼ teaspoons vanilla extract
- 3 ¼ cups confectioners’ sugar (around 350 grams)
- 1 teaspoon fresh lemon juice optional
Instructions
-
Preheat your oven to 350 degrees F (175 degrees C). Prepare two 8-inch round cake pans by spraying them generously with baking spray, or by greasing and flouring them thoroughly using your preferred method. This step ensures easy release of your beautiful cake layers.
-
In the large bowl of a stand mixer fitted with the paddle attachment, or using an electric hand mixer, cream together the softened butter, granulated sugar, and salt until the mixture is light, fluffy, and pale in color. This typically takes about 2-3 minutes. Beat in the vanilla extract, then add the eggs one at a time, beating for 30 seconds after each egg is fully incorporated. In a separate small bowl, combine the red food coloring with the unsweetened natural cocoa powder to form a smooth paste. Add this vibrant cocoa paste to the creamed butter mixture and beat until thoroughly combined, ensuring a uniform red color. Now, gradually add the buttermilk and the cake flour alternately to the batter, beginning and ending with the flour. Beat at a low speed just until everything is mixed, being careful not to overmix.
-
In a small cup, combine the baking soda and white vinegar. Watch as it immediately foams up and becomes active. Promptly pour this foaming mixture into your cake batter. Stir gently but quickly until it is just mixed in. Do not overmix after adding the soda and vinegar. Immediately divide the batter evenly between the two prepared 8-inch pans. Bake for approximately 27-30 minutes, or until a wooden skewer or toothpick inserted into the center of the cakes comes out clean.
-
Once baked, remove the cakes from the oven and let them cool in their pans on a wire rack for 10 minutes. This short cooling period in the pan helps the cakes set without breaking. After 10 minutes, carefully invert the cakes from the pans onto the wire rack to cool completely. Ensure the cakes are entirely cool before attempting to frost them; warm cakes will melt the frosting. While the cakes are cooling, proceed to make your delicious cream cheese frosting.
-
To make the frosting, in the bowl of a stand mixer or with an electric hand mixer, beat the softened cream cheese and butter until the mixture is perfectly smooth and creamy, with no lumps. Beat in the vanilla extract. Gradually add the confectioners’ sugar, one cup at a time, beating on low speed until fully incorporated and the frosting is smooth and fluffy. If desired, beat in the fresh lemon juice for an added touch of tartness that beautifully balances the sweetness. Spread this luscious cream cheese frosting generously over your completely cooled Red Velvet Cake.
More Red Velvet Inspiration
If you’ve fallen in love with the classic Red Velvet, there’s a whole world of related desserts to explore. From traditional versions with different frostings to innovative twists, the possibilities are endless for enjoying this iconic flavor.
- Waldorf Astoria Original Red Velvet Cake with Cooked Icing: Explore the historic recipe that inspired many, featuring the traditional Ermine Icing.
- Red Velvet Cake Category: Discover a wide array of Red Velvet cake recipes, tips, and variations on our site.
- Red Velvet Cheesecake Cups: A delightful, portion-controlled dessert combining the rich flavors of Red Velvet with creamy cheesecake.
- Easy Red Velvet Cupcakes: Perfect for parties or individual servings, these cupcakes are just as moist and flavorful as the cake.
- Red Velvet Cheesecake: For the ultimate Red Velvet enthusiast, a decadent cheesecake twist that amplifies the beloved flavors.
Storing Your Red Velvet Masterpiece
To keep your Red Velvet Cake fresh and delicious, proper storage is key. If your cake is covered with cream cheese frosting, it’s best to store it in an airtight container in the refrigerator. The frosting, being dairy-based, benefits from refrigeration. The cake will remain moist and flavorful for up to 3-4 days in the fridge. For longer storage, slices or even whole cakes can be frozen. Wrap individual slices tightly in plastic wrap, then place them in a freezer-safe bag or container. They can be frozen for up to 2-3 months. Thaw frozen cake in the refrigerator overnight before serving. This ensures that every bite, whether fresh or thawed, delivers the same exceptional Red Velvet experience you’ve come to love from this recipe.
