The Secret to Light & Fluffy Homemade Bread: Ultimate Cottage Cheese Sandwich Loaf
There are few culinary delights as satisfying as a perfectly baked, high-rising loaf of bread, especially when it comes straight from your own oven. And when it comes to delivering on that promise, this incredible **Cottage Cheese Bread recipe** stands head and shoulders above the rest, quite literally! This isn’t just any bread; it’s one of the highest rising and lightest textured loaves I’ve ever had the pleasure of baking. The magic lies in a classic recipe, originally found on Allrecipes.com and designed for bread machines, which I’ve meticulously adapted for the home baker using a stand mixer. With a few subtle tweaks, this recipe transforms into an accessible and rewarding baking experience, yielding an exceptional homemade bread that’s perfect for everything from sandwiches to garlic toast.
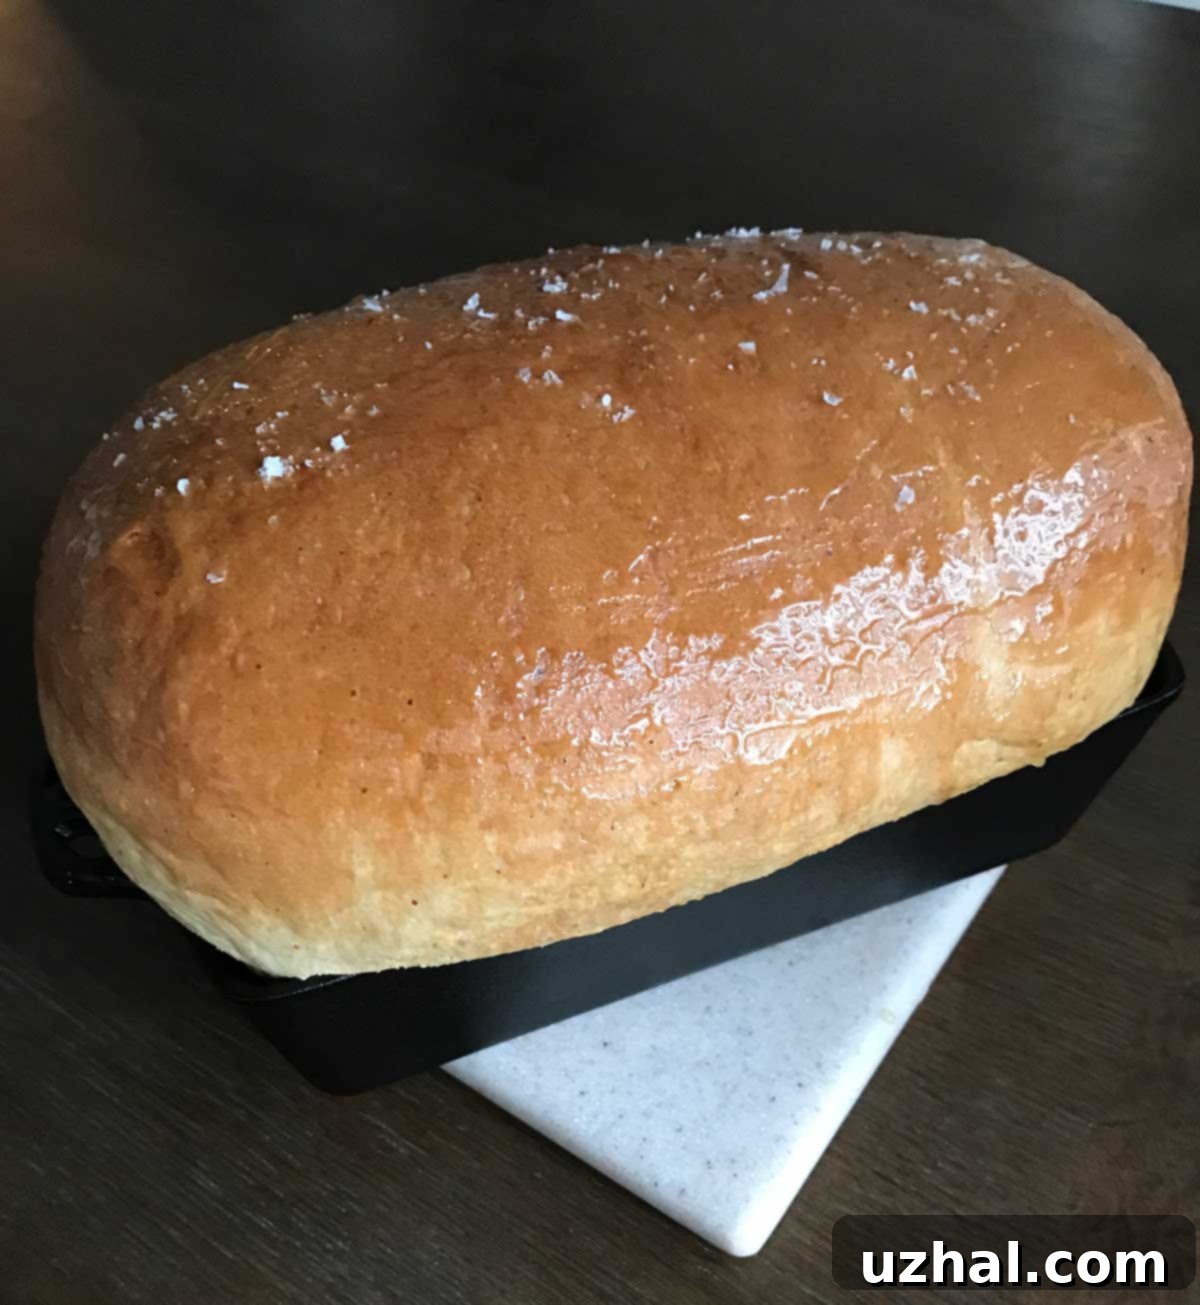
Imagine pulling this beauty from the oven: a golden, majestic loaf, brushed generously with a hint of sweet honey and sprinkled with a delicate crunch of flaky sea salt. The aroma alone is enough to make your kitchen feel like the warmest, most inviting bakery. This particular loaf, baked in my trusty cast iron loaf pan, soared to impressive heights, almost making me wonder if I’d be able to slice it cleanly. However, as is often the case with well-structured loaves, once it had cooled completely, slicing was a breeze. In fact, like many artisan breads, it became even easier to achieve perfectly uniform slices after being chilled for a bit, making it ideal for meal prepping or preparing for a busy week.
Observing the dough through its transformation is truly fascinating. Typically, when my bread dough reaches such an impressive height in the pan during its second rise, it tends to hold that shape in the oven, without much further expansion. This **Cottage Cheese Bread** defies that expectation! It continues its remarkable ascent even during baking, reaching new peaks of fluffy perfection. What’s even better is that it never collapses, a common pitfall for exceptionally high-rising loaves. I initially attributed this incredible structural integrity to the protein content within the cottage cheese, providing a robust framework for the airy dough. However, through further experimentation, I’ve discovered that sour cream can achieve similarly fantastic results, proving that the dairy component, rich in protein and fat, is key. I’ve included notes in the recipe card below on how you can easily substitute sour cream for cottage cheese, offering even more flexibility for this versatile bread.
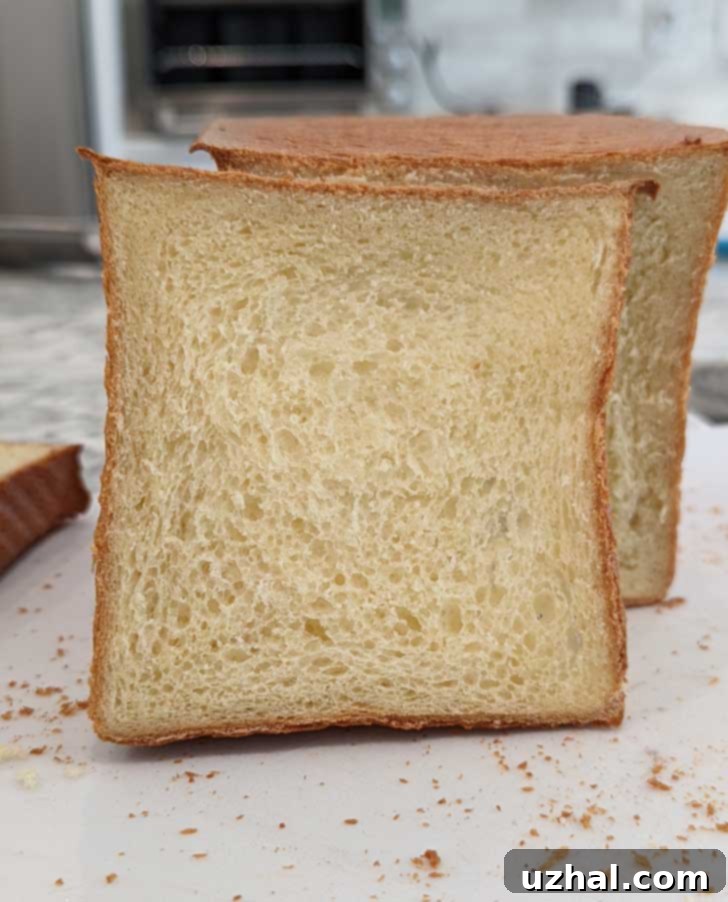
The texture of this homemade bread is genuinely unique and delightful. One particularly insightful review described it as “somewhat like angel food cake.” Initially, I was a bit skeptical, wondering how a savory bread could achieve such a delicate, ethereal quality. But that reviewer was absolutely right! This **cottage cheese sandwich bread** boasts an incredibly light and airy crumb, reminiscent of angel food cake, yet it possesses a wonderful chewiness and enough structural integrity to hold up beautifully to all sorts of sandwich fillings. It’s truly a marvel. Beyond sandwiches, its tender interior and subtle flavor make it an absolute showstopper when transformed into garlic toast. The way it crisps up on the outside while remaining soft and flavorful on the inside is simply unparalleled, elevating a simple side dish to a gourmet experience.
Baking Cottage Cheese Bread in a Pullman Loaf Pan
For those who love perfectly square, uniformly shaped slices of bread, a Pullman loaf pan is an invaluable tool. I’ve been a long-time fan of my Pullman pan for its high sides, which naturally help loaves rise taller and maintain a beautiful, straight shape. However, my journey with this specific pan took an exciting turn when I decided to experiment with using its lid for the first time with this **cottage cheese bread recipe**. The lid is designed to create that iconic, perfectly square slice, but it requires a precise amount of dough to work correctly. Unsure of the exact quantity needed, I took a leap of faith, bravely (or perhaps foolishly!) attempting to fit all two pounds of my dough into the pan, fully aware that I was likely heading for a minor challenge. As expected, the dough rose about half an inch above the rim, which meant that when it came time to slide the lid into place for baking, it required a bit of a squash. To add to the adventure, I couldn’t quite get the lid to fully seal, leaving a small vent near one edge. This allowed a small portion of the dough to bake up and escape, resulting in my beautiful loaf sporting a whimsical little “tail.” Despite this minor, comical setback, the bread baked magnificently! A quick snip with a knife removed the adventurous tail, leaving behind a flawless, square loaf of delicious **homemade Pullman bread**.

Calculating the Ideal Dough Amount for a Pullman Pan
To avoid any “dough tails” and achieve a truly perfect square loaf every time, it’s crucial to use the correct amount of dough for your Pullman pan. Had I been a bit more organized during my initial Pullman experiment, I would have consulted the invaluable equation provided by Kneadrisebake.com. Chris and Carrie, the experts behind the site, suggest that the ideal amount of dough for a Pullman pan should be approximately 5.5 times the volume of your pan, measured in grams. This simple calculation helps ensure your dough fills the pan perfectly without overflowing or leaving too much empty space. To get started, you first need to determine the precise volume of your specific Pullman pan. This is straightforward: simply multiply its depth (D) by its width (W) by its height (H). Once you have that cubic inch measurement, the formula truly comes into play.
The recommendation to multiply by both 5 and 6, rather than simply using 5.5, is designed to give you a practical range: a bottom-end amount and a top-end amount for your dough. This flexibility is incredibly helpful, as different doughs can vary slightly in density and rise. By calculating both ends of the spectrum, you can adjust based on the specific recipe and desired density of your final loaf, ensuring consistent results. This methodical approach takes the guesswork out of Pullman pan baking.
Example: Precision for Your Pullman Loaf. Let’s walk through an example using my own Pullman pan to illustrate this helpful calculation. My pan measures 4 inches in depth (D) by 7.6 inches in width (W) by 4.5 inches in height (H). Multiplying these dimensions (4″ x 7.6″ x 4.5″) gives us a total volume of 137 cubic inches. Now, applying the formula:
First, multiply the volume by 5: 137 x 5 = 685 grams.
Next, multiply the volume by 6: 137 x 6 = 822 grams.
To find the sweet spot, we average these two figures: (685 + 822) / 2 = 753.5 grams. Rounding slightly, the target amount of dough for my pan should be approximately 753 grams. This means I could use as little as 685 grams or as much as 822 grams for optimal results. During my initial, slightly overzealous attempt, I crammed in just under 900 grams, which was indeed a tad too much, leading to that amusing “tail.” Next time I bake this delightful **Cottage Cheese Bread**, I’ll know to measure more precisely and aim for about 753 grams, which is roughly 27 ounces or 1 pound 11 ounces. This precise measurement will yield a perfectly formed, square loaf, ideal for slicing.
A natural question arises: Will this equation work seamlessly for other types of bread dough? That remains an exciting area for future experimentation! However, based on the results and the principles behind it, this calculation certainly appears to be an effective guide for our **Cottage Cheese Bread recipe**. I’m eager to put it to the test with my basic white bread recipe next, hoping to achieve equally perfect loaves.
Crafting Gluten-Free Cottage Cheese Bread: A Successful Experiment
For those with gluten sensitivities or dietary preferences, the challenge of creating a truly satisfying, high-rising sandwich bread can be daunting. I recently embarked on testing this beloved **Cottage Cheese Bread recipe** with the innovative new King Arthur Gluten-Free Bread Flour. My initial attempt, however, highlighted a crucial difference in gluten-free baking: moisture absorption. I made the common mistake of simply dumping in 400 grams of the gluten-free flour rather than gradually incorporating it. This led to a dough that was significantly drier than anticipated, immediately indicating a need for more liquid to achieve the correct consistency. It turns out that this specific gluten-free bread flour absorbs moisture much more rapidly and effectively than traditional all-purpose flour. Despite this initial misstep, I was pleasantly surprised to still produce a rather decent loaf of gluten-free sandwich bread, enriched with the familiar goodness of cottage cheese. The texture was promising, but I knew it could be even better with a more refined approach. I am planning another test with the new gluten-free bread flour, this time starting with a more cautious 300 grams of flour and adjusting from there. Update: Success! After another round of testing, using gluten-free flour worked beautifully. The optimal amount needed was significantly less, falling between 250 and 300 grams, proving that careful flour addition is key for gluten-free recipes.
Update: The Perfected Gluten-Free Cottage Cheese Bread Formula. For everyone who has been following the exciting trials and tribulations of developing a successful gluten-free cottage cheese bread, I am thrilled to share my most successful formulation to date! I’ve achieved the best results using the following proportions: 300 grams of King Arthur Gluten-Free Bread Flour, ½ cup of warm water, 2 teaspoons of instant or active dry yeast, 4 teaspoons of sugar, 1 teaspoon of salt, ¼ teaspoon of baking soda, 1 large egg, 1 cup of cottage cheese, and 2 tablespoons of softened butter. This combination yields a dough that is thick and manageable, allowing you to shape it much like you would traditional bread dough. Place the shaped dough into a loaf pan (a Pullman pan is highly recommended for its superior shape), allow it to rise for approximately 1 hour in a warm spot, and then bake it at 350°F (175°C) for at least an hour. While this gluten-free loaf may not achieve the exact “light and fluffy” texture of its gluten-containing counterpart, it consistently bakes into a wonderfully structured loaf that holds its shape and, crucially, does not collapse in on itself. It makes for a fantastic and reliable gluten-free sandwich bread, offering a satisfying texture and rich flavor.
Explore More Delicious Recipes Featuring Cottage Cheese
If you’re a fan of the subtle creaminess and delightful texture that cottage cheese brings to baked goods, you’ll love these other recipes. Cottage cheese is a versatile ingredient that adds moisture, tenderness, and a protein boost to a variety of sweet and savory dishes, proving its utility far beyond just this fantastic bread. Expand your culinary repertoire with these unique and flavorful creations:
- Cottage Cheese Banana Bread
- Cottage Cheese Cookies
- Butter Crunch Lemon Cheese Bars
- Cottage Cheese Dinner Rolls
- Caraway Cottage Cheese Bread
- Gluten-Free Sorghum Bread
Recipe: High-Rising Cottage Cheese Sandwich Bread

Cottage Cheese Sandwich Bread
Anna
Pin Recipe
Ingredients
- ½ cup warm water (110-115 degrees F / 43-46 degrees C)
- 2 teaspoons instant yeast
- 4 teaspoons granulated sugar
- 3 ½ cups all-purpose flour, divided use (approximately 470 grams total)
- ¼ teaspoon baking soda
- 1 teaspoon salt
- 1 cup cottage cheese, brought to just shy of room temperature (microwave for 10-15 seconds to remove chill)
- 1 large egg, at room temperature** (approximately 60 grams, important for dough consistency)
- 2 tablespoons light olive oil or a combination of half olive oil and half unsalted butter (approximately 28 grams, adds richness and tenderness)
Instructions
-
In the bowl of a stand mixer, carefully pour the ½ cup (114 grams) of warm water. Sprinkle the instant yeast over the water and add one teaspoon of the sugar. Allow this mixture to proof for about 5-10 minutes until you see a frothy layer of bubbles forming on the surface, indicating the yeast is active. Once proofed, add the remaining sugar, only 3 cups (400 grams) of the all-purpose flour initially, the baking soda, and the salt to the bowl. Stir briefly to combine these dry ingredients. Then, incorporate the gently warmed cottage cheese, the room temperature egg, and the olive oil (or the oil/butter combination). Attach the paddle attachment to your stand mixer and mix on low speed until all ingredients are just combined into a shaggy dough.
-
Switch to the dough hook attachment. Begin kneading the dough on medium-low speed. At this stage, the dough will be quite wet and sticky. Gradually add another ¼ cup of flour, one tablespoon at a time, allowing it to incorporate fully before adding more. Continue kneading and periodically scraping down the sides of the bowl to ensure all dough is incorporated. Keep adding the remaining flour, one tablespoon at a time, and kneading until the dough begins to gather around the hook and pulls cleanly away from the sides and bottom of the bowl. The final dough should be very smooth and elastic, still a tiny bit sticky to the touch but easily handled if your fingers are lightly oiled. This is a firm yet supple dough that will produce a wonderfully structured loaf. Be patient, as this dough takes its time to rise, but the results are worth the wait.
-
Prepare a large clean bowl by adding a little extra olive oil to its interior. Swirl the oil around to coat the entire surface.
-
Transfer the kneaded dough into the oiled bowl, then turn it over once or twice to ensure the entire surface of the dough is lightly coated with oil. This prevents it from drying out during the first rise. Cover the bowl loosely with plastic wrap or a clean kitchen towel. Place it in a warm, draft-free spot and allow it to rise until it has visibly doubled in size. This crucial first rise typically takes at least an hour, and sometimes up to an hour and a half, depending on your kitchen’s temperature.
-
Once doubled, gently punch down the dough to release the accumulated gases. Transfer the dough to a lightly floured surface and gently shape it into a rectangular form, roughly the length of your loaf pan.
-
Beginning from one of the longer sides of the rectangle, tightly roll the dough into a cylinder, pressing out any large air bubbles as you roll to create a denser, more uniform crumb. Once rolled, firmly pinch the seams and ends of the cylinder to seal them completely. Carefully place the shaped dough, seam-side down, into a greased 8 ½ x 4 ½ inch loaf pan or a slightly larger 9×5 inch loaf pan. Note: Using the smaller 8 ½ x 4 ½ inch pan will result in an exceptionally high-rising loaf, which, while dramatic and impressive, can be a little more challenging to slice evenly. I personally enjoy the “drama” and often opt for this size. However, for everyday practicality and easier slicing, a 9×5 inch pan is a more conventional and manageable choice.
-
Cover the loaf pan loosely with a piece of plastic wrap that has been lightly greased on the side facing the dough. Place it back in a warm spot for its second rise. Allow the dough to rise until it forms a noticeable dome, about an inch high (in the center) over the edge of the pan. This secondary rise typically takes around 45 minutes, but keep an eye on it as rising times can vary.
-
While the dough is completing its second rise, preheat your oven to 400 degrees F (200 degrees C). Once the loaf is ready and the oven is preheated, carefully place the loaf pan into the hot 400-degree oven. Immediately close the oven door and reduce the oven temperature down to 375F (190 degrees C). Bake for 35 minutes, or until the crust is deeply golden brown and the internal temperature reaches 200-210F (93-99C). Promptly remove the perfectly baked loaf from the oven and, while it’s still hot, brush the top generously with honey and sprinkle with a pinch of flaky sea salt for an added layer of flavor and texture.
-
Allow the baked loaf to cool in the pan for approximately 20 minutes. This allows the crumb to set and makes it easier to remove. After 20 minutes, carefully invert the pan to release the loaf and transfer it to a wire rack. Let it cool completely to room temperature before slicing and serving. This ensures the best texture and prevents a gummy interior. Enjoy your magnificent homemade Cottage Cheese Sandwich Bread!
Notes
