Easy Gluten-Free Dutch Oven Bread: Achieve the Perfect No-Knead Boule
Embarking on the journey of baking gluten-free yeast bread can be quite a challenge, often leading to dense “bricks” or unusually textured loaves. However, after extensive experimentation and refinement, I’ve cultivated a select group of reliable recipes. Among these, my Easy Gluten-Free Dutch Oven Bread stands out as a true success. This recipe draws its inspiration from Jim Lahey’s celebrated No-Knead Bread, delivering a beautifully rounded, chewy loaf, often referred to as a boule, baked to perfection in a Dutch oven. While the preparation itself is remarkably straightforward, achieving the ideal texture requires a crucial element: time. Allowing the bread to rest adequately is essential for its interior to dry out properly, effectively preventing any undesirable gumminess. This artisanal-style bread promises a delightful crust and a soft, flavorful crumb, making it a fantastic addition to any gluten-free kitchen.
Selecting the Best Gluten-Free Flour Blends for Baking
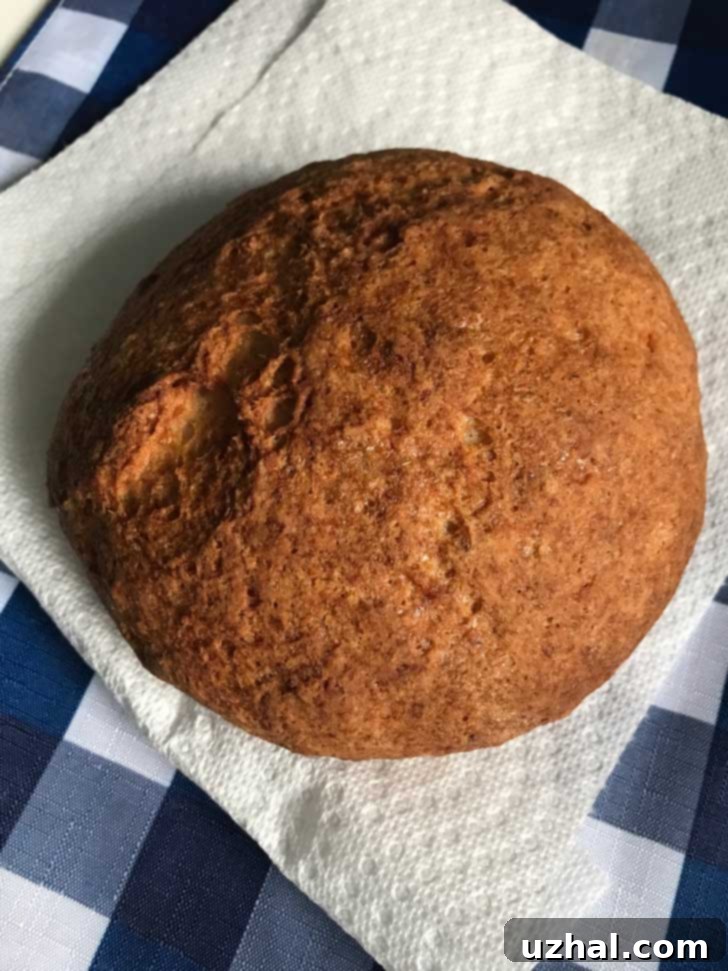
Unlike traditional wheat flour, which contains gluten to provide structure and elasticity, gluten-free baking relies on a carefully balanced combination of different flours and starches. These blends are designed to mimic the properties of gluten, offering the necessary binding and texture. For this specific Dutch oven bread recipe, a high-quality gluten-free flour blend is critical, but it’s important to understand that not all blends perform identically. My testing has revealed significant differences between brands, primarily due to their unique ratios of rice flours, starches (like tapioca and potato), and added gums (such as xanthan gum).
Here are the blends I’ve successfully tested and recommend, each offering distinct characteristics:
- Pillsbury’s Multipurpose Gluten-Free Blend: Packaged in a distinctive greenish bag, this blend consistently delivered excellent results in my early trials. It produced a lighter, softer crumb. While it may be less common to find in stores currently, it’s a solid choice if available. This blend often contains rice flour, potato starch, pea protein, tapioca starch, and xanthan gum, contributing to its balanced performance.
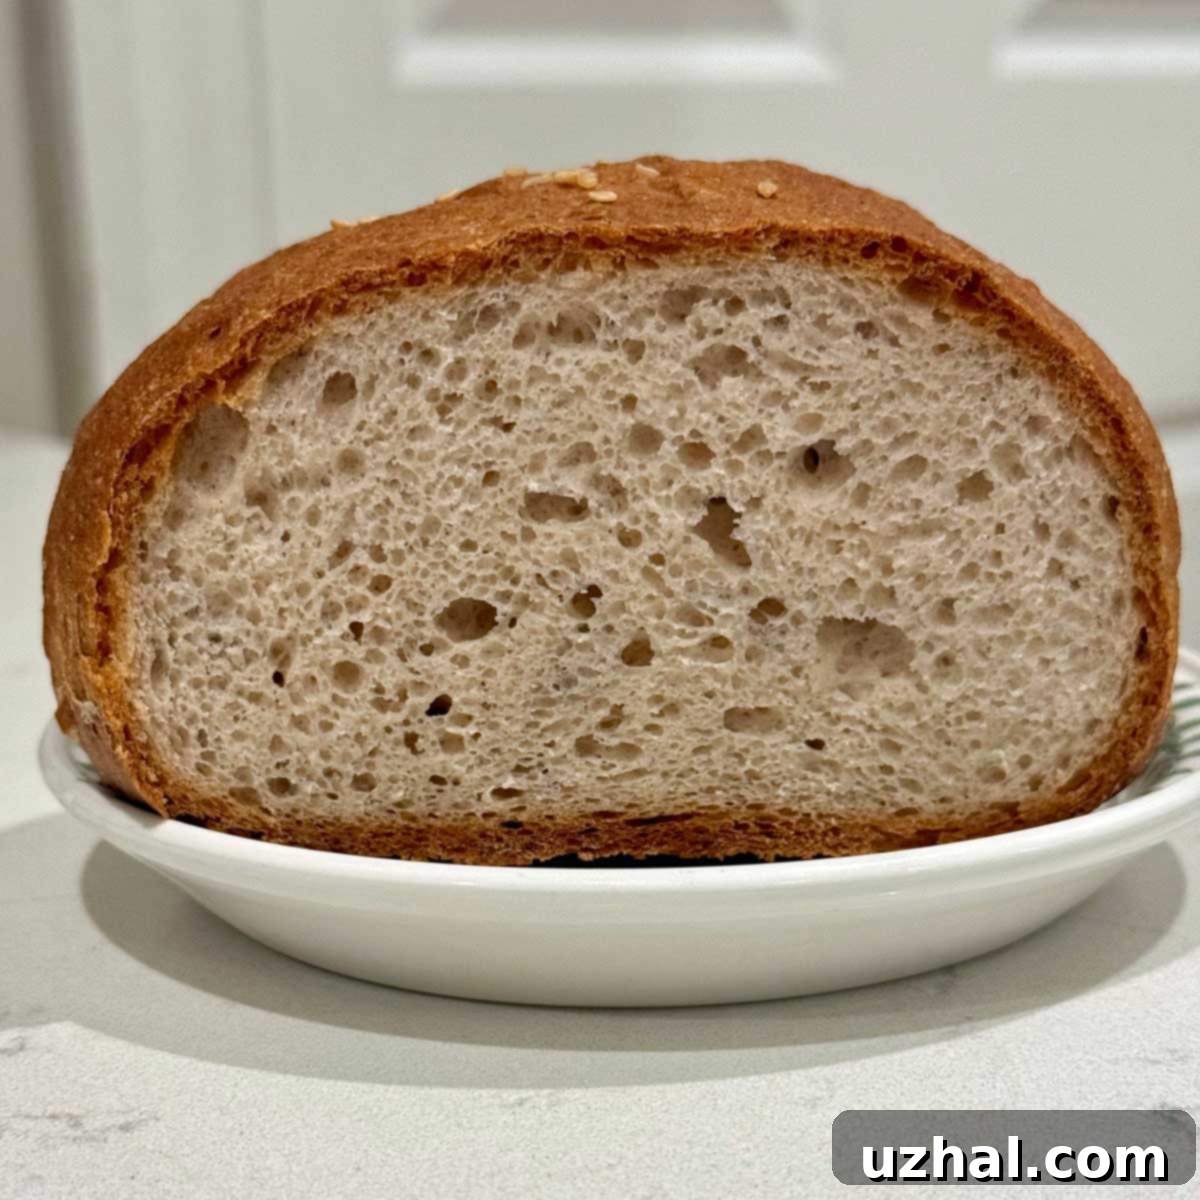
- Cup4Cup Multipurpose Gluten-Free Flour (Blue Bag): This blend, which underwent a reformulation in August to exclude milk powder, has emerged as the **top performer** in my tests. It creates a remarkably elastic dough for a gluten-free option and yields a beautiful, airy crumb with a fantastic crust. The featured image of the bread was made using this blend. Its success can be attributed to a precise combination of cornstarch, white rice flour, brown rice flour, milk powder (pre-reformulation), and xanthan gum, which collectively create a versatile and high-performing flour. The absence of milk powder in the new formulation makes it suitable for dairy-free diets without compromising its baking efficacy.
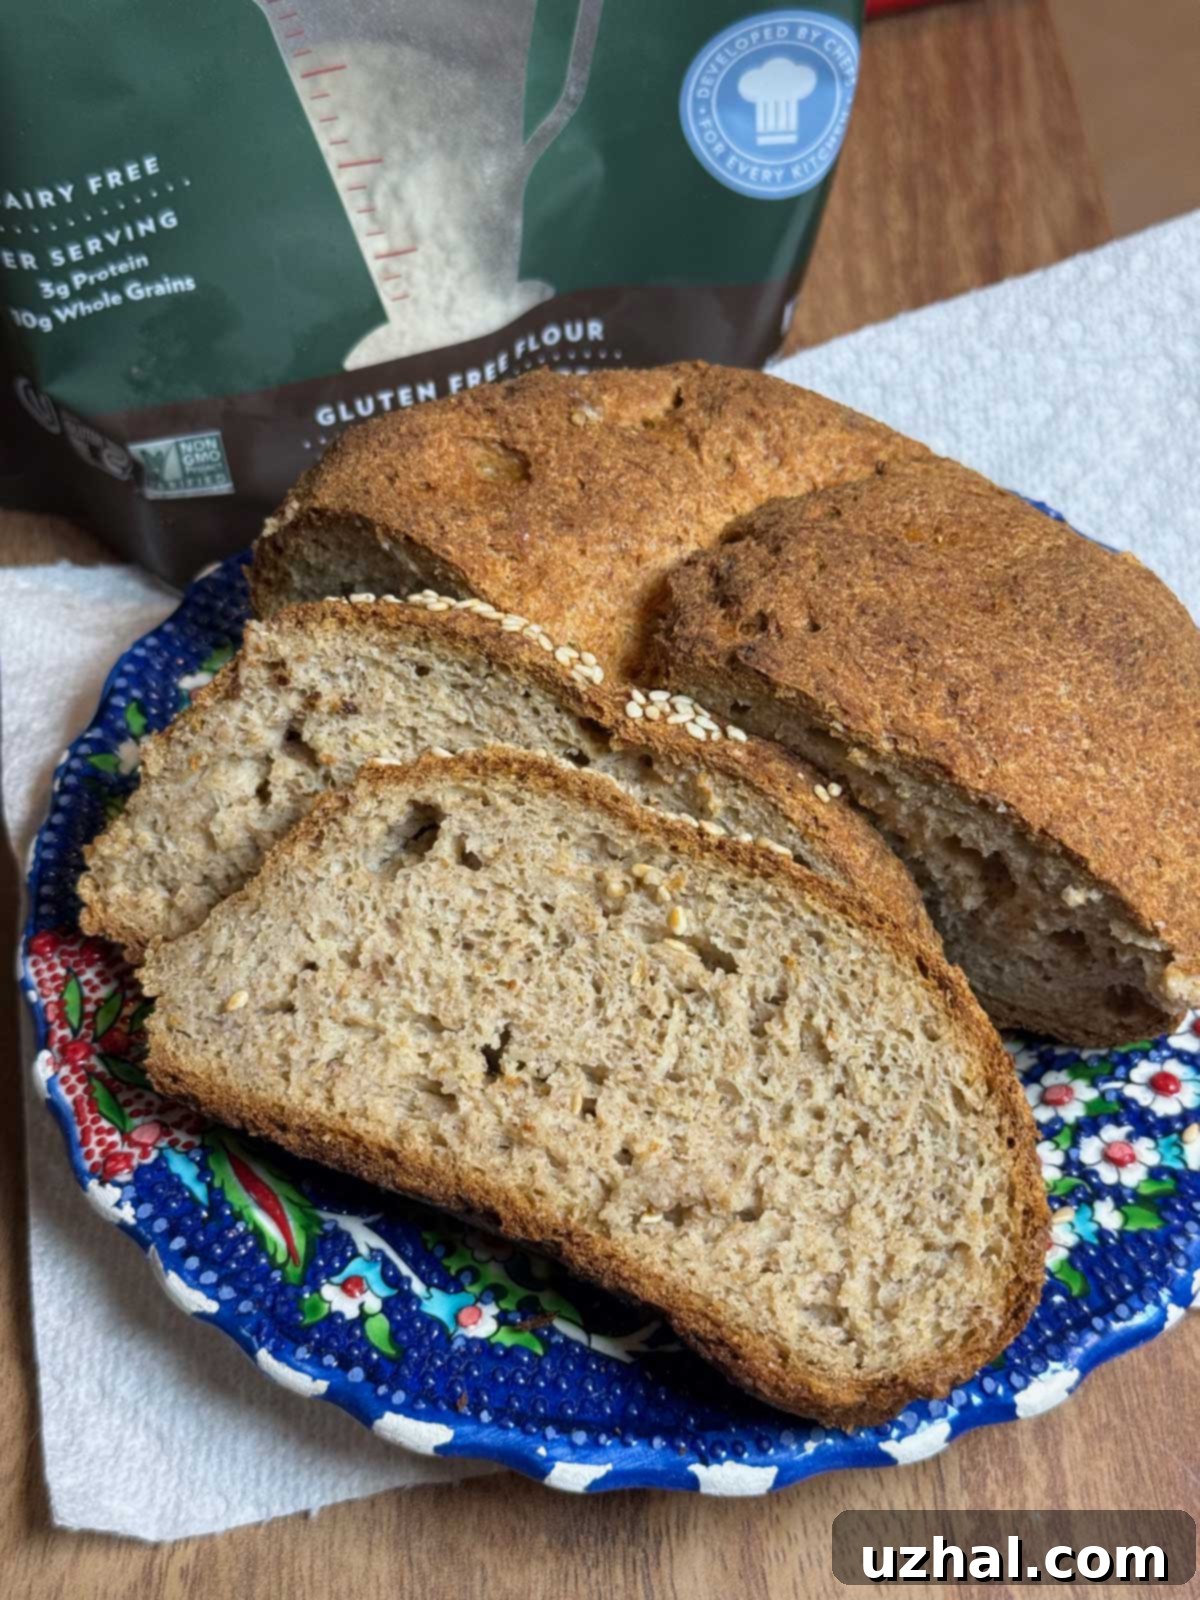
- Cup4Cup “Wholesome Blend” (Green Bag): For those seeking a bread with deeper, richer grain flavors and a slightly more rustic appearance, the Cup4Cup “Wholesome Blend” is an excellent alternative. Made with a mix of rice flours, flax, and rice bran, it results in a darker loaf with a robust flavor profile. While it tends to produce a slightly stubbier loaf compared to the multipurpose blend, its taste is exceptionally satisfying. This blend offers a good option for adding nutritional value and a hearty character to your gluten-free bread.
A common thread among all these successful blends is the inclusion of xanthan gum, which provides much-needed structure in gluten-free baking. However, for this particular recipe, the addition of psyllium husk is also crucial. I’ve found that the bread simply does not achieve the desired texture and rise without the unique binding properties of psyllium.
The Essential Role of Psyllium Husk in Gluten-Free Bread
Beyond the specialized gluten-free flour blend, psyllium husk is an indispensable ingredient in this recipe. It functions as a powerful binder, often used in gluten-free baking as a substitute for or in conjunction with xanthan gum to provide elasticity and structure that gluten would naturally offer. Psyllium husk helps to trap gases, creating a lighter, more pliable dough, and significantly improves the crumb texture of the final bread, preventing it from becoming crumbly or overly dense.
It’s important to distinguish between the two primary forms of psyllium available:
- Whole Psyllium Husks: These are light, fluffy, and have a texture akin to wheat bran. When mixed with liquid, whole psyllium husks absorb water and swell to form a gel-like substance. This form is generally preferred for this recipe because it tends to mix more easily without clumping and offers a more predictable hydration response. I specifically recommend brands like Now Foods, Sprouts, or Whole Foods. These brands have consistently produced bread without an undesirable purple hue, which can sometimes occur with other psyllium varieties due to different processing methods or natural pigments.
- Psyllium Husk Powder: This is a much finer, powdered version of the husks, similar in consistency to Metamucil. While it serves the same binding purpose, its finely ground nature means it absorbs liquid more rapidly and can sometimes be prone to clumping if not mixed carefully.
The choice between whole husks and powder can impact your mixing method and the amount of liquid needed, as detailed in the instructions. Regardless of the form, psyllium is crucial for achieving the desired chewiness and open crumb that makes this gluten-free bread so satisfying.
Using Psyllium Husk Powder for Gluten-Free Dough
While whole psyllium husks are generally my go-to for their ease of handling, psyllium husk powder can certainly be used in this recipe with equally great results, provided a slight adjustment in technique. When substituting, use the **same weight** of psyllium husk powder as whole husks. However, because the powder is much finer and denser, the **volume will be significantly less**—approximately 4 teaspoons of powder compared to 2 tablespoons of whole husks. This difference in volume is crucial to remember for accurate measurement if you’re not using a kitchen scale.
One key characteristic of psyllium husk powder is its tendency to lump and absorb liquid very quickly, which can make hand-mixing challenging. Therefore, if you opt for the powder, I highly recommend integrating it directly with the dry flour mixture first, rather than attempting to form a separate gel as you would with whole husks. Once combined with the flour, add all the liquid ingredients and use the paddle attachment of a stand mixer. The powerful action of the paddle attachment is essential for thoroughly incorporating the powder, breaking up any potential lumps, and ensuring a smooth, evenly hydrated dough. For this reason, consider the psyllium husk powder version “the stand mixer version” – it truly benefits from the mechanical kneading to achieve the right consistency without unmixed pockets of powder.
Understanding Gluten-Free Dough Consistency: Before the Rise
Working with gluten-free dough is a unique experience, quite different from handling traditional wheat-based dough. The image below showcases the dough prepared with the Pillsbury blend, which typically results in a lighter-colored dough. When properly mixed, this dough should possess a distinct consistency: stiff enough that you can lift and manipulate it, yet crucially, it should not feel dry at all. The presence of adequate moisture is vital for its characteristic bounciness and, more importantly, for enabling a successful rise.
If, as you work with the dough and attempt to fold it, you notice it creasing or breaking apart rather than stretching or maintaining its integrity, it’s a clear indication that more water is needed. Gluten-free dough lacks the elastic network that gluten provides, so it won’t stretch like conventional bread dough. Instead, it should form a cohesive, somewhat squishy ball that holds together without sticking excessively to the bowl or your hands. Achieving this slightly wet, pliable but not sticky texture is key to its ability to rise and develop a pleasant interior crumb, rather than a dense, heavy one.
Observing the Risen Gluten-Free Dough: Ready for Baking
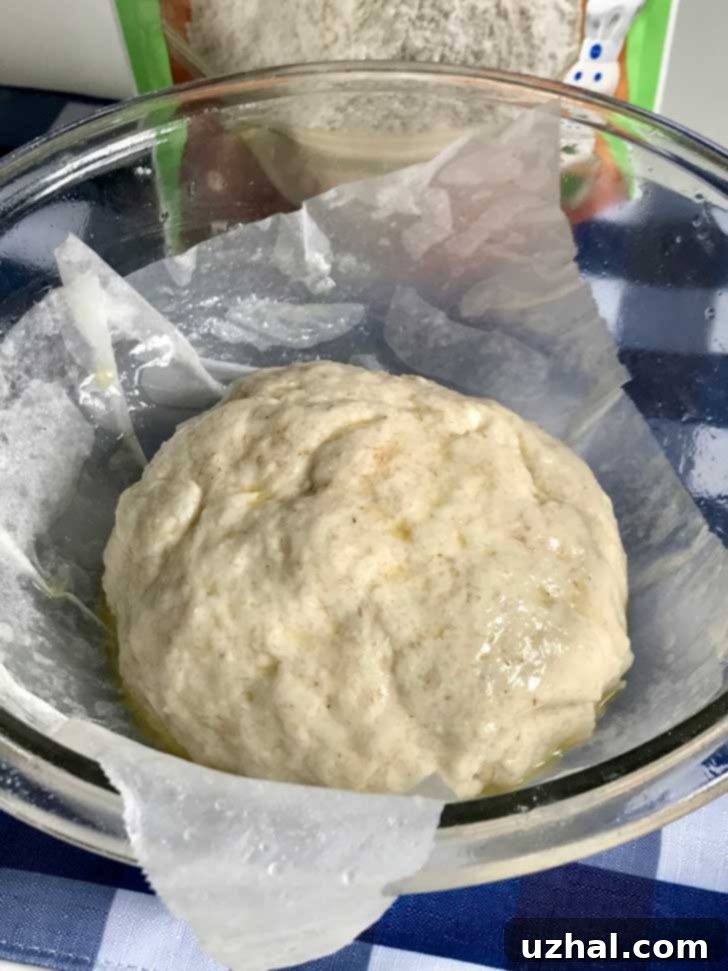
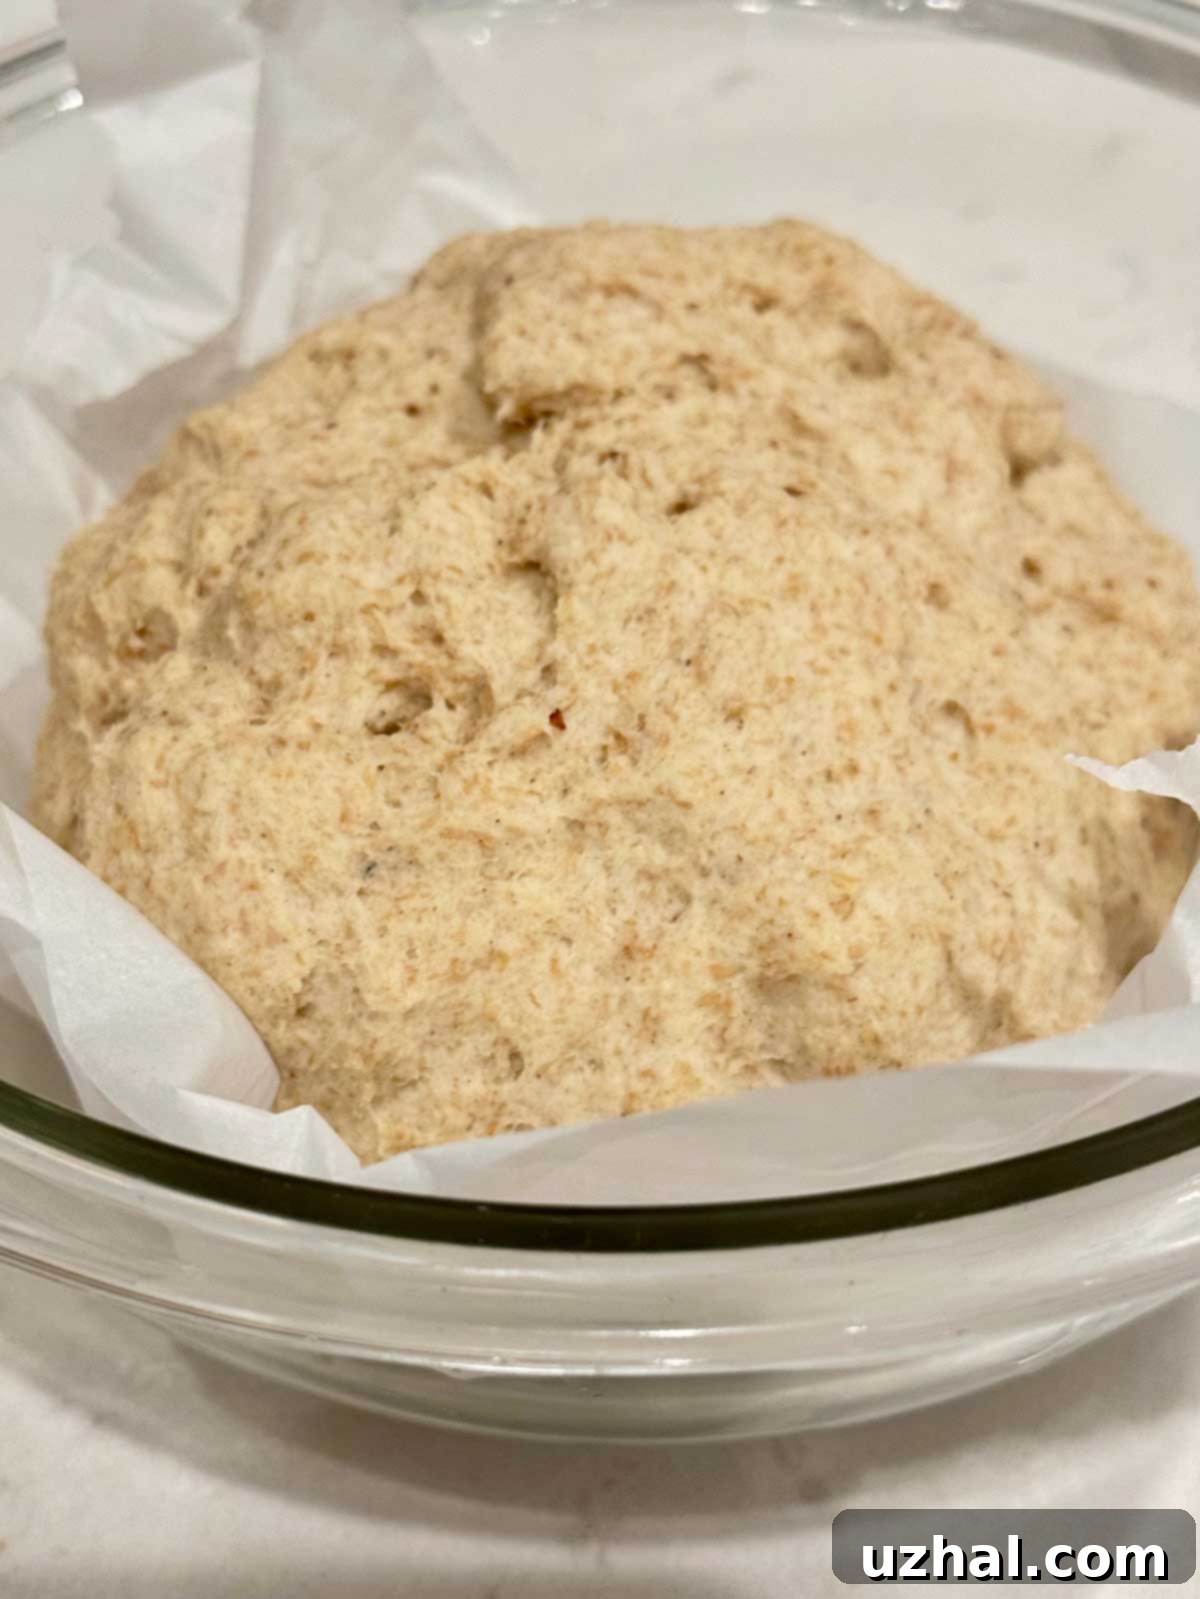
Once the dough has completed its crucial rising period, its appearance and texture will transform, signaling it’s ready for the oven. The accompanying picture illustrates a beautifully risen gluten-free dough, prepared with the Cup4Cup wholesome blend, which naturally gives it a darker hue compared to the Pillsbury blend. You’ll notice that the dough has expanded, becoming noticeably puffier and lighter in density.
It’s important to manage expectations when observing gluten-free dough rise. Unlike traditional wheat dough, which can often double or even triple in size due to the strong gluten network trapping gases, gluten-free dough typically won’t achieve such dramatic expansion. Instead, look for a significant “puff”—the dough will appear fuller, softer, and more voluminous than its initial state. This indicates that the yeast has been active, producing carbon dioxide, and the psyllium husk has successfully created enough structure to hold these gases. A well-risen gluten-free dough is softer to the touch, and you might see small air bubbles on its surface. This visual cue is your green light to proceed to the baking stage, confident that your efforts will yield a light, airy, and delicious gluten-free loaf.
A Step-by-Step Guide to Crafting Your Gluten-Free Dutch Oven Bread
Creating this delicious gluten-free Dutch oven bread is a rewarding process, made even simpler with the right techniques. I’ve captured some key moments during the preparation of the stand mixer version to provide a clear visual guide. Here’s a quick overview of the stages, illustrating the dough’s transformation from raw ingredients to a perfectly shaped boule, ready for its bake. These images will walk you through the texture and appearance you should aim for at each critical juncture, ensuring your gluten-free bread-making experience is as seamless and successful as possible.
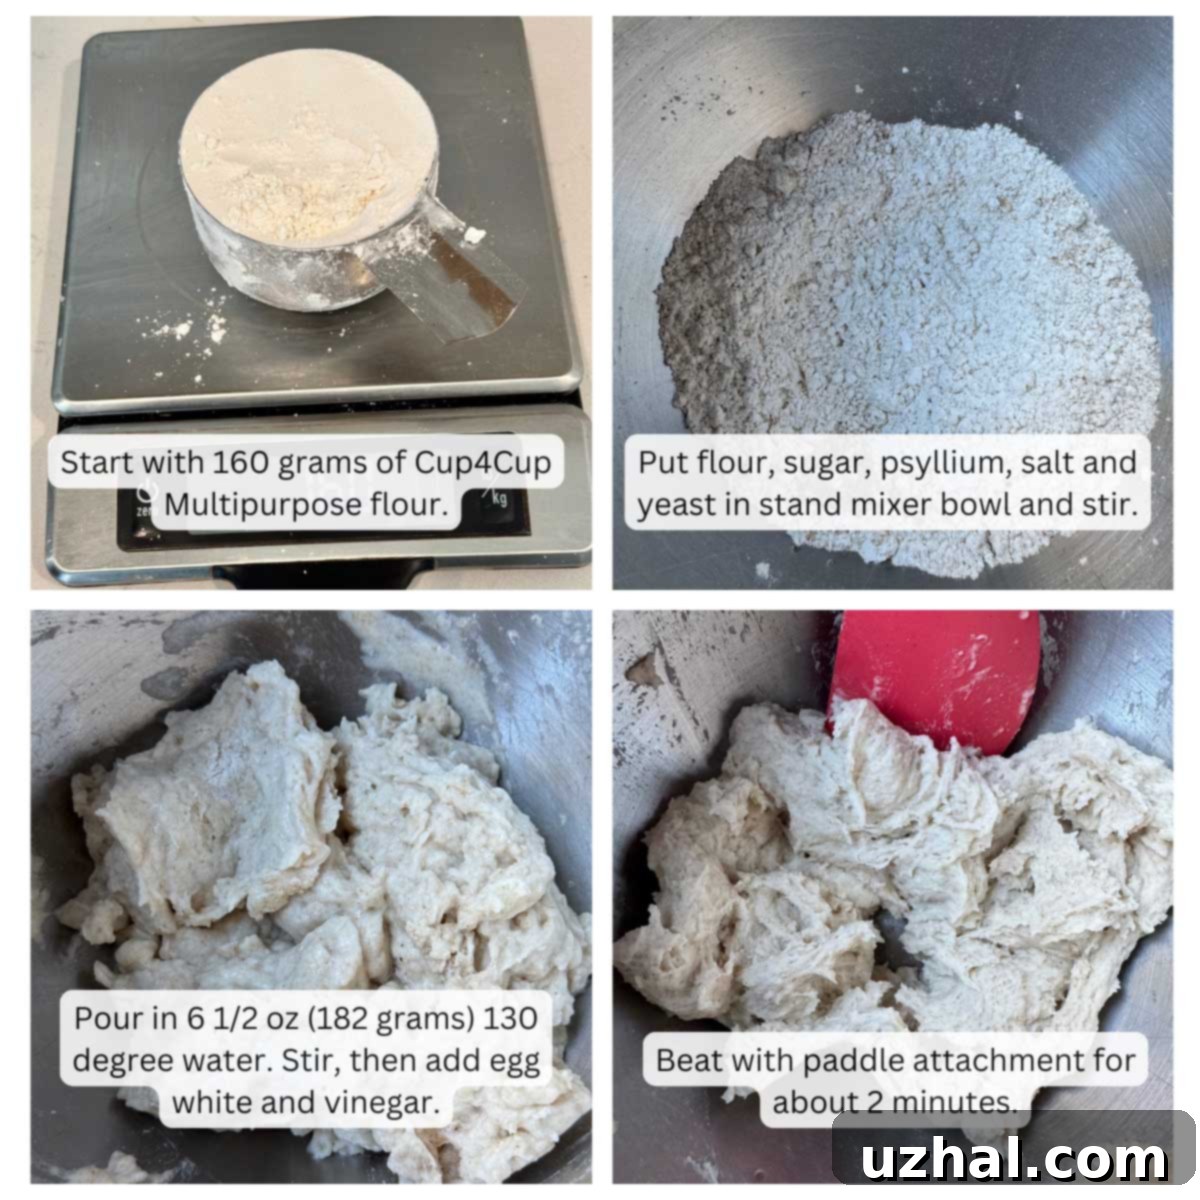
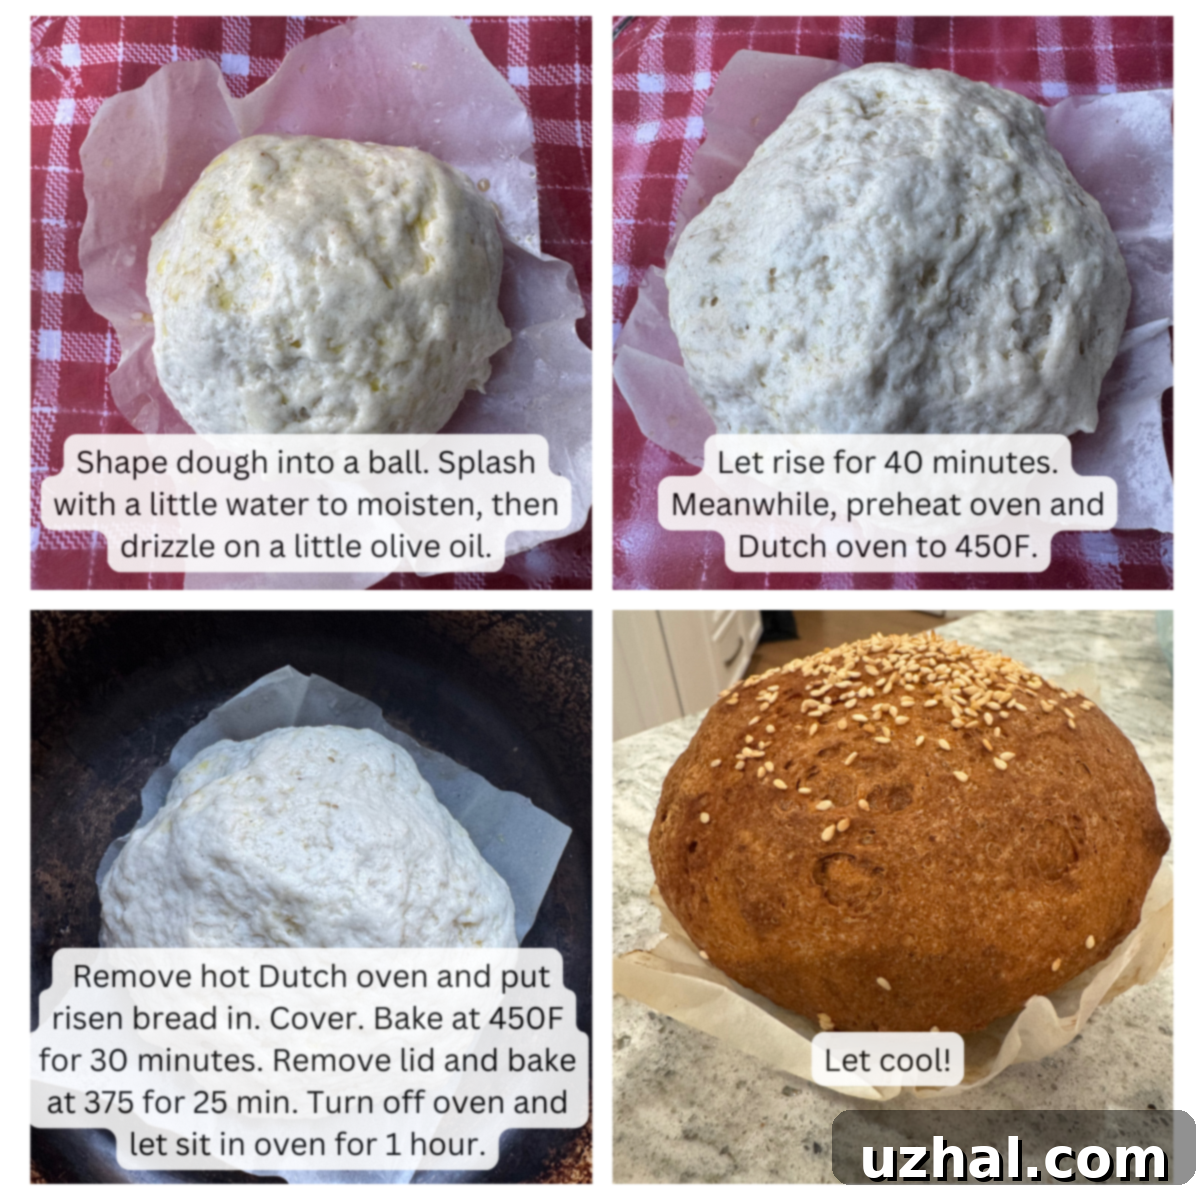
Following these visual cues, along with the detailed recipe instructions below, will help you master this delightful gluten-free boule. The beauty of this method lies in its simplicity and the forgiving nature of the Dutch oven, which creates the perfect environment for a crusty exterior and tender interior, even without traditional gluten.
- Gluten-Free Raisin Bread
- Keto Chewy Chocolate Chip Cookies
- Maple Chocolate Chip Keto Biscotti
- Pillsbury Gluten-Free Flour Chocolate Chip Cookies
- Low Carb Bread Recipe
Gluten-Free Dutch Oven Bread Recipe
Gluten-Free Dutch Oven Bread
Anna
Pin Recipe
Ingredients
- 160 grams of either Cup4Cup blue or green bag or Pillsbury multipurpose blend. Volume will vary (volume will vary, see note)
- 1 tablespoon sugar (12 grams)
- ¾ teaspoon salt
- 1 ¼ teaspoons quick rising yeast
- 1 teaspoon vinegar
- 2 tablespoons psyllium husks or 4 teaspoons powder (12 grams)
- 1 large egg white (27-33 grams)
- ¾ cup very warm water plus 1 tablespoon (will need up to 1 ½ tablespoons more if using Wholesome Blend) (182 grams to 228 grams depending on flour)
Instructions
-
In a spacious mixing bowl, thoroughly combine the gluten-free flour, sugar, salt, and quick-rising yeast, ensuring all dry ingredients are well integrated.
No Stand Mixer Method (Using Whole Psyllium Husks)
-
Warm ½ cup of the water (114 grams) in the microwave until it reaches approximately 130 degrees F. Pour this portion of the warm water into a separate small bowl and add the whole psyllium husks. Stir immediately and allow the mixture to sit for a few minutes until it forms a thick, gelatinous gel.
-
Create a well in the center of your dry flour mixture. Add the prepared psyllium gel, vinegar, and egg white into the well. Begin stirring with a sturdy rubber scraper or wooden spoon. Initially, the mixture will appear quite dry and crumbly. Gradually incorporate the remaining warm water (¼ cup plus 1 tablespoon, or up to 1 ½ tablespoons more if using the Wholesome Blend, as needed). Continue stirring and mashing the dough against the sides of the bowl with the scraper until it comes together into a cohesive, squishy ball that doesn’t stick excessively to the bowl or feel dry. This process effectively “kneads” the dough gently within the bowl. (Refer to the blog photos for the ideal dough consistency). If the dough still feels dry or resists clumping, add water in small increments until it reaches the desired pliable texture.
Stand Mixer Method (Recommended for Psyllium Husk Powder)
-
If you are using a stand mixer and psyllium husk powder, add the psyllium powder directly to the bowl with the dry flour mixture and stir briefly to combine. Then, add all of the warm water (¾ cup plus 1 tablespoon, or 182 grams) along with the vinegar and egg white. Give it a preliminary stir with a spoon, then attach the bowl to your stand mixer. Mix with the paddle attachment on medium speed for approximately 2 minutes. The dough will appear somewhat chunky at first but should gradually come together. It should feel slightly wet to the touch but cohesive enough to hold its shape. If you are using a whole grain flour blend, you will very likely need to add the additional 1 ½ ounces of water to achieve the correct hydration.
Shape the Boule and Initiate the Rise
-
Line the bottom of a bowl, approximately 1 ½ quarts or liters in size (any bowl large enough for the dough to fit comfortably while rising will suffice), with a square of damp parchment paper. Gently transfer your shaped dough ball onto the parchment. For added moisture and to prevent a dry surface, you can lightly drizzle a small amount of olive oil over the top of the dough. Loosely cover the bowl with plastic wrap, creating a humid environment for the dough. Allow it to rise in a warm spot for about 40 minutes. Keep in mind that gluten-free dough will not double in size like traditional dough; instead, it will rise and visibly puff up, indicating yeast activity.
-
While your dough is undergoing its final rise, position a Dutch oven with its lid in the lower third of your oven. Preheat the oven to a high temperature of 450 degrees F (232 degrees C). Allowing the Dutch oven to preheat thoroughly is essential for achieving the signature crispy crust.
Baking for a Perfect Gluten-Free Crust and Crumb
-
Carefully remove the intensely hot Dutch oven from the preheated oven, using reliable oven mitts or hot pads. Gently lift the lid. With the parchment paper acting as a sling, transfer the risen dough, still on its parchment, directly into the hot pot. Place the lid back on the Dutch oven, sealing in the steam, and return the covered pot to the oven.
-
Close the oven door and bake the bread with the lid on for 25 minutes at 450 degrees F (232 degrees C). This initial covered baking period creates a steamy environment, crucial for a good rise and a tender crumb, while also preventing the crust from setting too quickly. After 25 minutes, carefully remove the lid from the Dutch oven and reduce the oven temperature to 375 degrees F (190 degrees C). Continue baking the bread, now uncovered, for an additional 30 minutes. This second phase allows the crust to brown beautifully and become wonderfully crispy. Once baked, turn off the oven. Immediately remove the loaf from the Dutch oven and place it directly on the oven rack of the still-warm, but now off, oven for an extra 30 minutes. This final step is vital for gluten-free bread, as it helps to further dry out the interior, preventing any hint of gumminess. Finally, remove the bread from the oven and let it cool completely on a wire rack before slicing and serving. Cooling completely ensures the internal structure sets and achieves its optimal texture.
Notes
The subtle addition of vinegar in this recipe plays an important role. While it won’t impart a distinct sour flavor, it helps to tenderize the gluten-free dough, improving its texture and enhancing the yeast’s activity. Consider it a secret ingredient for a softer, more palatable crumb.
Don’t be afraid to customize your gluten-free Dutch oven bread! You can incorporate various add-ins to create unique flavor profiles. Try adding a tablespoon of dried herbs like rosemary or thyme for an savory loaf, or a handful of sunflower or pumpkin seeds for added crunch and nutrition. For a touch of sweetness, a tablespoon of dried cranberries or raisins can be a delightful addition, especially for a breakfast bread. Remember to mix any add-ins into the dough during the final stages of mixing, before shaping.
