Master the Art of Homemade Chocolate Sea Salt Caramels: Your Easiest & Best Recipe Guide
For years, my culinary endeavors leaned heavily into the intricate world of toffee, perfecting its glassy snap and rich buttery notes. Yet, a recent craving for something chewable, deeply satisfying, and utterly melt-in-your-mouth led me down a new path: the glorious realm of caramel. After experimenting with numerous recipes and countless hours in the kitchen, I can confidently declare that this particular version of Chocolate Sea Salt Caramels isn’t just good—it’s truly the best I’ve ever tasted! And perhaps the most delightful bonus? It’s surprisingly easy to achieve, delivering professional-grade results right in your own kitchen.
My journey to discovering this phenomenal recipe began during a quest for creative uses for European-style butter. While browsing Land O’Lakes, I stumbled upon their recipe for Chocolate Sea Salt Caramels. Interestingly, it didn’t specifically call for the fancy butter I was researching, but the sheer volume of glowing 5-star reviews immediately caught my eye. Rarely do you see a recipe, especially for something as notoriously finicky as caramel, garner such universal praise. This consistent perfection from other home cooks was a testament to its reliability and truly lured me in. Caramel often gets a bad rap for being tricky, prone to graininess, or failing to set correctly. However, the overwhelmingly positive feedback for this particular recipe suggested a departure from those common pitfalls.
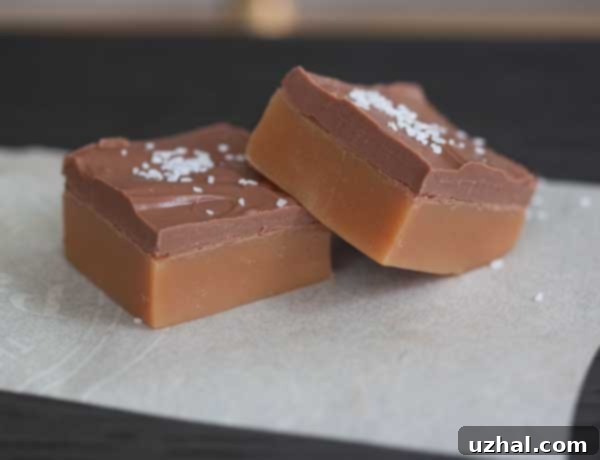
Indeed, this recipe defies the stereotypes of difficult caramel-making! I’ve now made it successfully twice, and each batch has turned out flawlessly. My first attempt saw this rich, velvety caramel poured over a crisp shortbread base, creating what can only be described as divine Millionaire Bars – a truly luxurious treat. The combination of the buttery shortbread, the deep caramel, and a smooth chocolate topping was an instant hit. The second time, I opted for a more classic approach, simply pouring the freshly cooked caramel into a prepared pan, topping it with a generous layer of melted chocolate, and then cutting it into perfect, bite-sized squares once set. Both methods yielded spectacular results, showcasing the versatility of this incredible caramel base.
What sets this caramel apart is its distinct, darker hue and an astonishing depth of flavor that many lighter caramels simply can’t achieve. It’s complex, with notes of toasted sugar and a profound buttery richness that lingers beautifully. While the original Land O’Lakes recipe provides instructions for a full batch, it’s also incredibly adaptable if you prefer a smaller quantity. If you’re comfortable with using half a can of condensed milk (I find weighing out 7 oz works perfectly), the recipe halves wonderfully. When opting for a half batch, I recommend pouring it into a 9×5 inch non-stick foil-lined loaf pan. Be sure to keep a close eye on the temperature, as a smaller batch will naturally reach the soft ball stage much faster, requiring less cooking time. This flexibility makes it ideal for both large gatherings and smaller, more intimate indulgences.

Crafting Irresistible Chocolate Turtles with Homemade Caramel
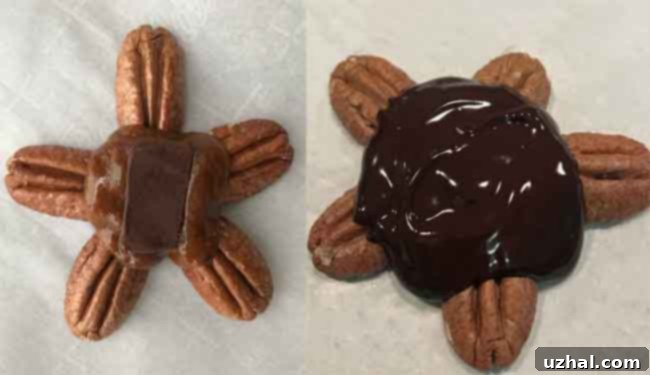
Beyond simply cutting them into squares or topping shortbread, these luscious Chocolate Sea Salt Caramels are absolutely perfect for making decadent homemade Chocolate Turtles. Imagine rich, buttery caramel enveloping crunchy pecans, all enrobed in a layer of smooth chocolate – a truly classic confectionery treat. There are a couple of fantastic ways to approach making these. The traditional method involves arranging pecan halves in a turtle-like formation on parchment paper, then carefully spooning warm caramel over them to create the “shell.” This method allows for precise shaping and a visually appealing final product.
However, if you’re like me and appreciate a slightly more relaxed, yet equally delicious, approach, I highly recommend my “easy method.” Simply prepare the caramel as written in the recipe below and let it cool just enough to be pliable. Then, take a square of the prepared caramel and gently squish it over five pecan halves. Arrange the pecans to form one “head” and four “legs,” creating that iconic turtle silhouette. Once you’ve assembled your caramel-pecan clusters, simply pour melted chocolate over the entire thing. This method is not only quicker but also allows for a more rustic, homey charm, and in my opinion, makes the process of creating these delightful turtles feel much more leisurely and enjoyable.
Whether you choose the meticulous or the relaxed path, the resulting Chocolate Turtles, made with this exceptional caramel recipe, will be far superior to any store-bought version. The depth of flavor from the homemade caramel truly shines through, making these a standout treat for gifting, entertaining, or simply enjoying as a personal indulgence. Don’t be afraid to experiment with different types of chocolate for the coating – dark chocolate provides a wonderful counterpoint to the sweet caramel, while milk chocolate offers a more traditional, sweeter profile.
Why Homemade Caramels Trump Store-Bought
There’s a distinct difference between a mass-produced caramel and one crafted with love in your own kitchen. Homemade caramels, especially this recipe, boast a freshness and depth of flavor that packaged varieties simply cannot replicate. The quality of ingredients shines through, and the absence of artificial additives means a purer, more authentic taste experience. The texture is also unparalleled – a soft, yet chewy consistency that melts slowly in your mouth, leaving behind a lingering sweetness perfectly balanced by the kiss of sea salt. This recipe uses readily available ingredients but combines them in a way that elevates the humble caramel to an extraordinary confection.
Tips for Caramel Success: Achieving the Perfect Soft Ball Stage
Caramel making is often intimidating, but with a few key tips, you’ll be a master in no time. The most crucial tool for success is a reliable candy thermometer. This is non-negotiable for achieving the correct consistency. For these chocolate sea salt caramels, we’re aiming for the “soft ball stage,” which occurs at 240°F (115°C). Here’s what that means and how to get there:
- Soft Ball Stage Explained: When you drop a small amount of caramel syrup into cold water, it should form a soft, pliable ball that holds its shape but is still squishy and easy to flatten. If it’s too hard, you’ve overcooked it; if it dissolves, it needs more time.
- Slow and Steady Wins the Race: Don’t rush the cooking process. Medium heat, with occasional stirring, ensures even cooking and prevents scorching. A slow, steady temperature rise is key to a smooth, uniform caramel.
- Avoid Crystallization: Be gentle! Only stir when necessary. Excessive stirring, especially after the sugar has dissolved, can encourage sugar crystals to form on the sides of the pan. If you see crystals forming, you can gently wash them down with a pastry brush dipped in water. Using a non-stick saucepan also helps immensely.
- Pan Choice Matters: A heavy-bottomed, 3-quart non-stick saucepan is ideal. Heavy bottoms distribute heat more evenly, preventing hot spots that can burn the sugar. The non-stick surface helps prevent sticking and makes cleanup easier.
- Vanilla Timing: Stir in the vanilla extract *after* removing the caramel from the heat. Vanilla is delicate, and adding it while the mixture is actively boiling can cause its flavor to evaporate, diminishing its aromatic contribution.
Storing Your Homemade Caramels
Once your chocolate sea salt caramels are set and cut, proper storage will keep them fresh and delicious for longer. Store them in an airtight container at room temperature for up to two weeks, or in the refrigerator for up to a month. If refrigerating, allow them to come to room temperature for about 10-15 minutes before serving for the best texture and flavor. For longer storage, you can freeze them for up to 3 months. Just be sure to wrap them individually in wax paper or parchment paper before placing them in an airtight container to prevent them from sticking together.
Gifting These Delicious Caramels
Homemade caramels make for truly thoughtful and appreciated gifts. Once cut into squares, wrap each caramel in a small piece of wax paper or parchment paper, twisting the ends like old-fashioned candies. Arrange them in a decorative tin or a small box lined with tissue paper. Add a festive ribbon and a handwritten tag, and you have a beautiful, edible present that will delight anyone lucky enough to receive it. From holiday treats to hostess gifts, these caramels are always a winner.
- Sea Turtle Brownies
- Cranberry Turtle Bars
- Turtle Brownies Caramel Topping
- Chocolate Caramel Turtle Cookies
- Reese’s Thins Sea Salt Peanut Butter Cookies
Chocolate Sea Salt Caramels Recipe

Chocolate Sea Salt Caramels
Anna
Pin Recipe
Ingredients
- 2 sticks salted butter softened (228 grams)** – Using high-quality butter will significantly enhance the flavor and texture of your caramels.
- 2 cups firmly packed light brown sugar 392 grams – This gives the caramel its signature rich, deep flavor.
- ¾ light corn syrup Essential for preventing crystallization and achieving a smooth, chewy texture.
- 1 14 oz can Eagle Brand condensed milk (392 grams) The secret to its creamy, luscious consistency and ease of preparation.
- 2 teaspoons vanilla extract Adds a wonderful aromatic depth.
- 1 bag 10-12 oz milk or dark chocolate chips – Use your favorite quality chocolate for the best topping.
- 2 teaspoons coconut oil Or shortening, to make the chocolate smooth and easy to spread.
- Sea salt or Kosher salt For sprinkling on top, adding a crucial salty contrast.
Instructions
-
Prepare your pan by lining a 9-inch square pan with nonstick foil, extending the foil over the edges to create “handles” for easy removal later. Lightly grease the foil for extra non-stick insurance.
-
In a heavy-bottomed 3-quart nonstick saucepan, combine the softened butter, light brown sugar, light corn syrup, and condensed milk. Stir these ingredients thoroughly with a wooden spoon or a heat-proof scraper until they are completely blended and smooth. Turn the heat to medium. Continue to cook, stirring gently but consistently to prevent sticking and ensure even heating, until the mixture comes to a full boil (this usually takes about 6 minutes). This initial boil is important for proper sugar dissolution.
-
Reduce the heat slightly to maintain a very soft boil, just a little more vigorous than a simmer. Carefully insert a candy thermometer into the mixture, ensuring it doesn’t touch the bottom of the pan. Continue to heat to 240°F (115°C), which is the soft ball stage. Stir often, ensuring the mixture heats slowly and steadily without scorching. This critical phase should take approximately 20 minutes, during which you’ll observe the caramel gradually darkening to a beautiful rich amber color, indicating a deeper flavor development. Once the mixture reaches 240°F, immediately remove the saucepan from the heat and stir in the vanilla extract. Promptly pour the hot caramel into your prepared pan. Allow the caramel to cool undisturbed at room temperature for at least 2 hours, or until it is firm to the touch.
-
While the caramel cools, prepare the chocolate topping. In a microwave-safe bowl, combine the chocolate chips and coconut oil (or shortening). Heat at 50% power, stirring diligently every 30 seconds, until the chocolate is completely smooth and appears shiny. The coconut oil helps to create a glossy, snappable chocolate layer.
-
Once the caramel has cooled and firmed up, pour the melted chocolate evenly over the entire surface of the caramel in the pan. Gently tilt the pan to ensure full coverage.
-
Place the pan in the refrigerator until the chocolate layer is completely set and firm, typically 30-60 minutes. Once chilled and firm, use the foil handles to lift the entire block of caramel and chocolate from the pan. Place it on a cutting board and cut it into desired squares using a sharp, warm knife for clean edges.
-
For the perfect finish, sprinkle each square generously with flaky sea salt or coarse kosher salt just before serving. This final touch provides a beautiful visual and a crucial flavor contrast that elevates the chocolate sea salt caramels to pure perfection.
Notes
