Unlock the Goodness of Flax: Your Guide to Baking Irresistible Whole Wheat & Flaxseed Bread
There’s a quiet satisfaction in baking your own bread, and it’s even more rewarding when that bread is packed with beneficial ingredients. A few weeks ago, I found myself with a bag of ground flaxseed, a superfood renowned for its omega-3 fatty acids, fiber, and lignans. While incredibly healthy, ground flaxseed has a notoriously short shelf life when stored at room temperature, prone to oxidizing and losing its potency. Even in the freezer, which is where mine immediately went, I felt a sense of urgency to use it up before its freshness waned. This led me on a quest for “breads with flax” recipes, searching for a delicious and efficient way to incorporate this nutritional powerhouse into our diet.
The journey brought me to a recipe that, initially, might not sound “exciting” in the conventional sense, but the resulting loaf proved to be an absolute game-changer. This Wheat and Flax Bread recipe has not only exceeded my expectations but has permanently replaced my old go-to whole wheat bread. It’s a testament to how simple, wholesome ingredients can come together to create something truly extraordinary, offering a perfect blend of taste, texture, and exceptional health benefits.

Flax Bread Notes: Customizing for Perfection
The foundation of this incredible recipe comes from Betty Crocker, a trusted name in home baking. However, over time and with multiple iterations, I’ve introduced several modifications that I believe enhance the bread’s flavor, texture, and overall appeal, making it truly my own. These adjustments were carefully made to optimize both the baking process and the final product, addressing common desires for speed, balanced sweetness, and maximum nutritional impact.
One significant change was the incorporation of quick-rising yeast. This choice fundamentally alters the mixing technique, as fast-acting yeast can often be mixed directly with the dry ingredients without prior proofing in warm liquid. This not only streamlines the initial steps but also shaves valuable time off the overall preparation, making fresh homemade bread a more accessible weeknight possibility. The quicker activation means less waiting, allowing the dough to rise efficiently and consistently.
Another modification involved the sweetener. Instead of the original all-honey version, I opted for a mixture of honey and maple syrup. This blend yields a bread that is slightly less sweet, offering a more nuanced and complex flavor profile that appeals to a broader palate. The subtle earthy notes of maple syrup complement the richness of honey, creating a balanced sweetness that doesn’t overpower the wholesome flavors of the wheat and flax. This delicate balance ensures the bread remains versatile, suitable for both sweet and savory accompaniments.
Finally, and perhaps most importantly, I increased the amount of ground flaxseed. Flaxseed is a nutritional powerhouse, celebrated for its high content of alpha-linolenic acid (ALA), a plant-based omega-3 fatty acid, dietary fiber, and lignans, which have antioxidant properties. By adding more flax, I not only boosted the bread’s nutritional value but also contributed to a unique texture. Flaxseed absorbs moisture, which can influence the dough’s consistency, often requiring slight adjustments to flour quantity. This increased amount helps create a moist, tender crumb while ensuring you get a generous dose of health benefits with every slice. This adjustment turns a good bread into a truly great one, maximizing its healthy potential without sacrificing taste.

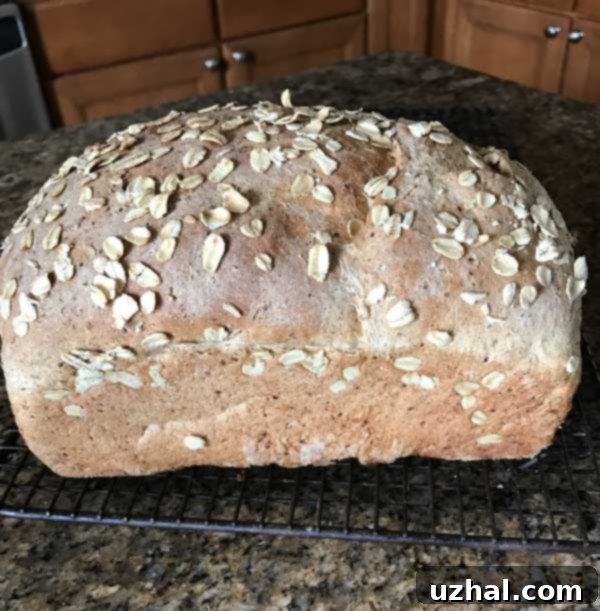
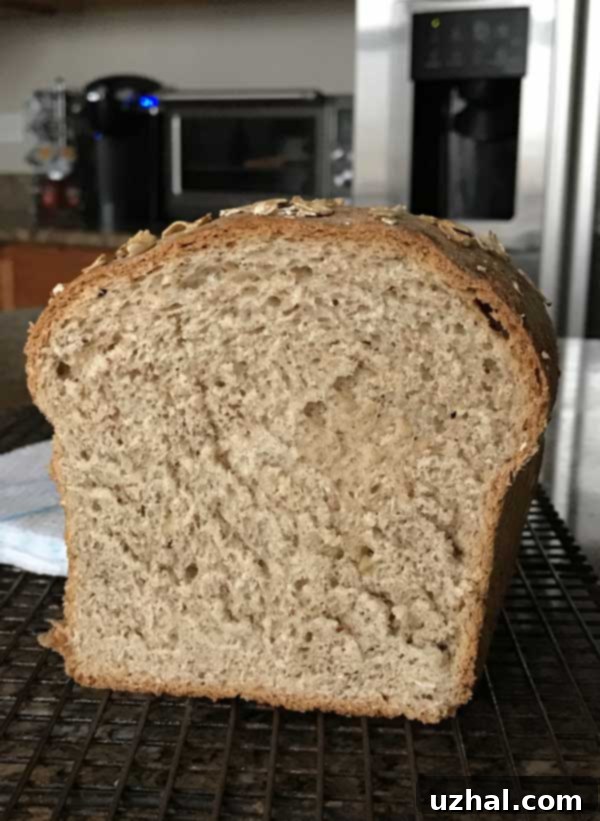
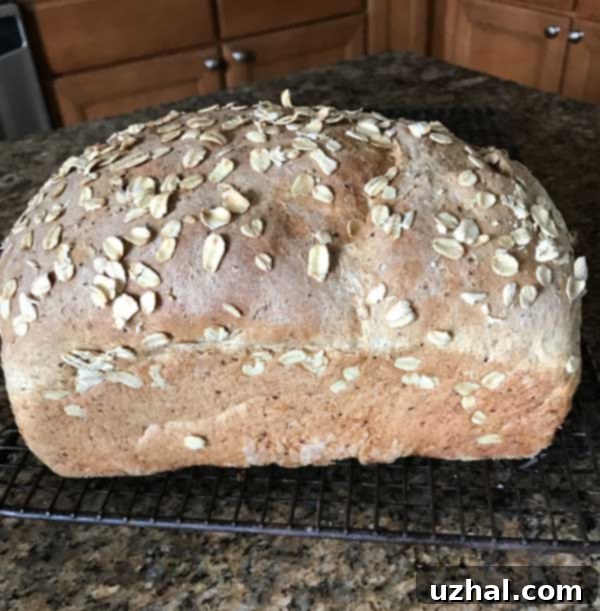
This recipe consistently produces a high-rising loaf of flax bread, boasting a beautiful, impressive shape that’s sure to impress. Beyond its visual appeal, the bread offers a remarkable flavor experience. It possesses a subtle hint of sweetness, a gentle undertone that makes it delightful on its own, but crucially, it’s versatile enough to serve as the perfect canvas for a wide array of toppings. Imagine a slice slathered with creamy peanut butter for a nutritious breakfast, or toasted and rubbed with garlic for a savory accompaniment to dinner. Its robust yet tender crumb holds up beautifully to spreads, making it an ideal choice for sandwiches, whether piled high with deli meats and fresh vegetables or simply adorned with a dollop of homemade jam. The interplay of whole wheat and flaxseed creates a wholesome, earthy flavor that distinguishes it from ordinary white bread, inviting you to explore its many uses in your kitchen.
Update: Understanding Flour Types for Your Perfect Loaf
The original recipe and my adapted version call for a thoughtful combination of bread flour and whole wheat flour. This pairing is intentional, aiming to strike a balance between texture, flavor, and nutritional content. Bread flour, with its higher protein content (typically 12-14%), is excellent for developing strong gluten strands. These strong gluten networks are what give bread its chewy texture and allow it to rise significantly, creating a well-structured loaf.
Whole wheat flour, on the other hand, contributes a nutty, earthy flavor and a significant boost of fiber and other nutrients because it includes the bran, germ, and endosperm of the wheat kernel. However, the bran in whole wheat flour can interfere with gluten development, leading to a denser, sometimes heavier loaf compared to those made solely with white flour. The combination in this recipe leverages the best of both worlds: the strength of bread flour for a good rise and open crumb, and the nutritional value and distinct flavor of whole wheat.
If your preference leans towards an even fluffier, softer bread with a lighter texture, a simple but effective modification can be made: try omitting the whole wheat flour entirely. Instead, use only bread flour or a good quality all-purpose flour. All-purpose flour has a slightly lower protein content than bread flour (around 10-12%), which will result in a softer crumb, though it might not have the same chewy resilience as a purely bread flour loaf. When making this substitution, you might notice the dough feeling a bit different, potentially requiring minor adjustments to the liquid content, as different flours absorb water at varying rates. This flexibility allows you to customize your homemade flax bread to precisely match your desired texture, ensuring every slice is exactly what you crave.
Recipe

Nutrient-Rich Wheat and Flax Bread
Anna
Pin Recipe
Ingredients
- 1 ½ to 2 cups bread flour for excellent structure and chewiness; all-purpose flour is an acceptable alternative for a softer loaf (approximately 210 to 250 grams)
- 1 cup whole wheat flour adds a rich, nutty flavor and a significant boost of fiber (125 grams)
- 1 teaspoon salt essential for flavor balance and regulating yeast activity
- 2 ¼ teaspoons fast rising or SAF yeast allows for quicker rise times and can be mixed directly with dry ingredients
- ¼ cup old-fashioned or quick-cooking oats contributes to the bread’s hearty texture and subtle flavor
- ¼ cup ground flaxseed a vital source of omega-3s and fiber; ensure it’s ground for maximum nutrient absorption (30 grams)
- ½ cup milk adds richness and helps create a tender crumb
- ½ cup water for hydration of the dough
- 1 tablespoon butter enhances flavor and contributes to a soft texture
- 3 tablespoons honey or maple syrup or a balanced mixture of both for a subtle, wholesome sweetness
Instructions
-
In the large bowl of your stand mixer, begin by combining 1 ½ cups of the bread flour (or all-purpose, if using), the full amount of whole wheat flour, salt, quick-rising yeast, old-fashioned oats, and the ground flaxseed. Use a spoon or a whisk to thoroughly stir these dry ingredients together, ensuring they are evenly distributed. This step is crucial for consistent rising and flavor throughout the loaf.
-
Next, prepare your liquids. In a 2-cup microwave-safe glass measuring cup or a small saucepan, combine the milk and water. Heat this mixture until it reaches a temperature of approximately 120-130 degrees F (49-54 degrees C). This temperature is ideal for activating quick-rising yeast without killing it. Once hot, add the butter to the liquid mixture and stir until it has softened considerably (it doesn’t need to be completely melted, just very soft). Pour the warm liquid mixture along with the honey and/or maple syrup into the bowl containing your dry ingredients. Begin to stir by hand with a sturdy spoon until a soft, shaggy dough forms. At this point, gradually add just enough of the remaining ½ cup of bread flour, a tablespoon at a time, until the dough comes together and is neither excessively sticky nor too dry. You’re looking for a dough that is slightly tacky to the touch but pulls away from the sides of the bowl.
-
Once your dough has reached the right consistency, attach the bowl to your stand mixer and fit it with the dough hook. Knead the dough on medium-low speed for approximately 8 minutes. During this time, the dough will transform from a rough mass into a smooth, elastic, and supple ball. Proper kneading develops the gluten, which is essential for the bread’s structure and characteristic chewiness. You’ll know it’s adequately kneaded when it passes the “windowpane test” – if you can stretch a small piece thin enough to see light through it without tearing.
-
Lightly grease a large bowl with a little oil. Transfer the kneaded dough to this greased bowl, turning it once to ensure all sides are coated. This prevents the dough from sticking as it rises. Cover the bowl loosely with plastic wrap or a clean kitchen towel and let it rise in a warm, draft-free place for about 1 hour, or until it has visibly doubled in size. Once risen, gently punch down the dough to release the accumulated gases. This redistributes the yeast and helps create an even texture. Shape the dough into a neat loaf and place it into a greased 8 ½ by 4 ½ inch or 9×5 inch loaf pan. Cover the loaf pan loosely again and allow it to undergo a second rise for another 45 minutes to 1 hour, or until it has nearly doubled in size again and looks puffy.
-
While the dough is on its second rise, preheat your oven to 375 degrees F (190 degrees C). A properly preheated oven is crucial for a good oven spring and even baking. If you desire a glossy, golden-brown crust and better adhesion for toppings, you can lightly brush the top of the loaf with an egg white wash (one egg white lightly beaten with a tablespoon of water) and sprinkle with additional oats or flax seeds. In my experience, skipping the egg white meant the oats tended to fall off during handling and baking, so it’s a worthwhile extra step if you want that appealing crunchy topping!
-
Bake the loaf for 30 to 35 minutes. You’ll know it’s done when the crust is deeply golden brown and, if you tap the bottom of the loaf, it sounds hollow. For absolute certainty, an instant-read thermometer inserted into the center of the loaf should register between 200-210 degrees F (93-99 degrees C). Once baked, remove the loaf from the oven and immediately turn it out onto a wire rack to cool completely. This cooling process is vital – it allows the internal moisture to redistribute and sets the crumb, preventing a gummy texture. Resist the urge to slice into it too soon; let it cool completely for at least 2 hours before enjoying your perfectly baked, nutrient-rich homemade bread!
- Vegan Oatmeal Chocolate Chip Cookies
- Flax and Garlic Crackers
- Flax Pecan Granola
- Gluten-Free Vegan Chocolate Chunk Cookies
- Vegan Double Chocolate Chip Cookies
