The Ultimate Three-Layer Peppermint Bark: A Step-by-Step Guide to Holiday Perfection
The festive season heralds the return of cherished holiday treats, and for many, that means the delightful crunch and cool minty burst of peppermint bark. But if you’re seeking a peppermint bark recipe that transcends the ordinary – far beyond a simple slab of melted white chocolate with a few peppermints sprinkled on top – then your search ends here. This truly special peppermint bark, originally inspired by the renowned Atkinson Candy Company in Lufkin, Texas, offers an unparalleled depth of flavor and a captivating textural experience that will make it the star of your holiday dessert table or a highly coveted homemade gift.
Jump to Recipe
The Best Three-Layer Peppermint Bark Explained
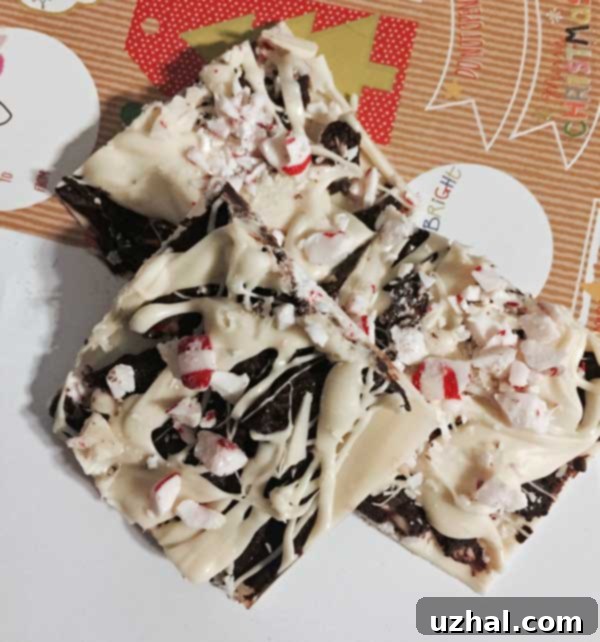
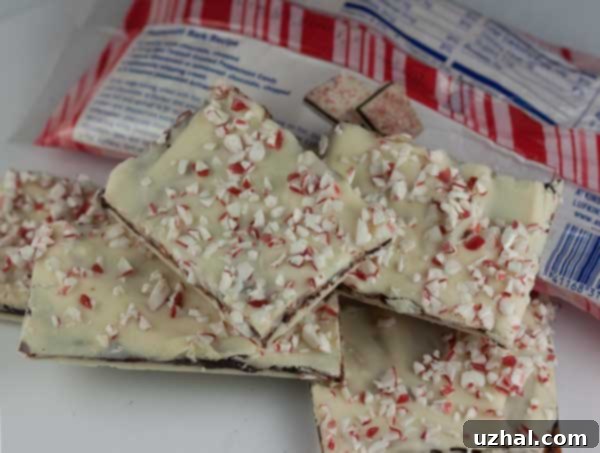
What sets this peppermint bark apart from conventional recipes is its ingenious construction: two vibrant layers of crisp white chocolate, generously infused and sprinkled with crushed peppermints, artfully sandwiching a decadent, thin layer of rich, mint-flavored dark chocolate ganache. This innovative design creates a symphony of textures and flavors. The outer layers deliver a satisfyingly stiff, crunchy bite, characteristic of traditional bark, while the hidden ganache layer introduces an unexpected element of creamy, melt-in-your-mouth indulgence. The cool, refreshing mint from the peppermints and the optional extract beautifully complements the sweet white chocolate and the intense, slightly bitter notes of the dark chocolate, resulting in a perfectly balanced and truly unforgettable holiday confection.
Unlike simpler versions that can feel one-dimensional, this multi-layered approach elevates peppermint bark to a gourmet experience. The visual appeal is also undeniable, with distinct strata of white, dark, and white chocolate, speckled with bright red and white peppermint pieces. This elegant presentation makes it ideal for gifting or showcasing at holiday gatherings, promising a delightful surprise with every piece. The contrast between the rigid, snappy chocolate and the smooth, yielding ganache provides a complex mouthfeel that will have everyone reaching for a second, and perhaps even a third, piece.
Choosing the Right White Chocolate for Exquisite Peppermint Bark
The quality of your white chocolate significantly impacts the final taste and texture of your peppermint bark, even though its flavor will be beautifully infused with peppermint. When selecting white chocolate, it’s not always about opting for the absolute most expensive brand, as the mint will be a dominant flavor. However, using a good quality white chocolate that melts smoothly and sets firmly is crucial for achieving that desirable crisp outer layer.
Brands vary widely in their composition and melting properties. Some white chocolates contain more cocoa butter, leading to a richer, smoother melt, while others might contain more sugar or vegetable oils, which can affect both taste and texture. I’ve found that some brands tend to have a more pronounced yellowish hue compared to others, which might or might not be a concern for you depending on your aesthetic preferences. While the photograph here might give a slightly yellowish cast, in person, the white chocolate I used achieved a lovely, appealing off-white shade, perfectly contrasting with the dark ganache.
Initially, I had good results using Baker’s white chocolate for its reliable melting and setting. However, in subsequent batches, I experimented with Ghirardelli white chocolate, and the results have been fantastic. Ghirardelli offers a creamy texture and a delightful, authentic white chocolate flavor that holds up wonderfully against the strong peppermint. Ultimately, feel free to experiment with your favorite high-quality white chocolate bars or wafers. Avoid “candy melts” or white chocolate flavored coatings, as these often contain very little cocoa butter and can result in a waxy texture and artificial taste that detracts from the overall quality of this gourmet bark.
Crafting the Perfect Mint Flavored Chocolate Ganache Layer
The secret to this peppermint bark’s exceptional character lies in its creamy, mint-infused dark chocolate ganache center. Mastering this layer, particularly preventing it from smearing into the pristine white chocolate above and below, requires a bit of precision and attention to temperature. The key is to ensure your bottom white chocolate peppermint layer is not just cold, but *super cold* – ideally, straight from the freezer. This rapid chilling helps it set firmly and prevents it from melting when the warm ganache is spread over it.
Equally important is the temperature of your ganache. While it needs to be warm enough to be spreadable, it should absolutely *not* be piping hot. Allowing the ganache to cool slightly to a warm-but-not-hot temperature (around room temperature or just slightly above) before spreading is critical. Once the ganache is spread, immediately return the baking sheet to the freezer. This quick chill will help the ganache set quickly and prevent any melting or mixing of the layers, ensuring crisp, distinct lines that are visually appealing and texturally perfect.
Regarding the peppermint extract in the ganache, it is an optional but highly recommended addition if you are truly passionate about mint. A small amount, typically an eighth to a quarter of a teaspoon, can significantly enhance the minty punch of the dark chocolate, creating a more intense flavor profile that complements the crushed peppermints. If you prefer a milder mint flavor, or if your peppermints are particularly potent, you can omit the extract and let the crushed candy do all the work. Remember, a little peppermint extract goes a long way, so start with a smaller amount and add more to taste if desired.
Essential Recipe Tips for Peppermint Bark Success
Achieving the perfect peppermint bark involves more than just following steps; it’s about understanding the nuances of the ingredients and techniques. Here are some additional notes to ensure your homemade peppermint bark turns out flawlessly:
- **White Chocolate Quantity:** The specified amount of 12 ounces of white chocolate is a good starting point and generally works well for a standard 12×9 inch rectangle. However, the exact amount can be somewhat variable depending on how thick you prefer your white chocolate layers, or if you’re using a slightly different sized baking sheet. Feel free to use a little more or less as needed to achieve your desired thickness and coverage for both the bottom and top layers. Having a bit of extra on hand is always a good idea, especially for the top layer in case of any streaking issues (see notes below).
- **Mastering the Melt: Double Boiler vs. Microwave:**
- **Double Boiler Method:** This is often considered the safest and most gentle way to melt chocolate, as it provides indirect heat, significantly reducing the risk of scorching or seizing. If you’re using a double boiler, you can typically melt all the white chocolate at once. Ensure the water in the bottom pot is simmering gently, not boiling vigorously, and that the top bowl doesn’t touch the water. Stir frequently until smooth.
- **Microwave Method:** If using a microwave, it’s crucial to melt the white chocolate in smaller batches – ideally, about half at a time. Microwave on a low power setting (e.g., 50% power) and stir every 30 to 60 seconds. White chocolate can seize or burn quickly in a microwave, so constant attention and gentle heating are key. Always err on the side of caution; it’s better to have a few unmelted lumps that can be stirred smooth with residual heat than scorched, unusable chocolate.
- **Peppermint Power: Choosing Your Crush:** The type of crushed peppermint you use will significantly influence both the flavor and texture of your bark.
- **Atkins Mint Twists:** These are highly recommended for their authentic flavor and ideal texture once crushed. They provide a satisfying crunch without being excessively hard or sticky.
- **Starlight Mints:** A common and readily available alternative. While they work, be aware that crushed Starlight Mints can be a bit stickier than other options. This might make them slightly harder to sprinkle evenly or adhere to the chocolate.
- **Soft Peppermints:** If you prefer a less crunchy texture, soft peppermints (like those often found individually wrapped) would be a better choice. When crushed, they offer a more subtle, chewy consistency that can be quite pleasant.
- **Andes Peppermint Crunch Thins:** This is a fantastic and highly recommended alternative we discovered at Target. These are distinct from the usual Andes mints; they are crunchier, and their charming pink and white colors add an extra festive visual appeal to the bark. They offer a delightful minty crunch that pairs perfectly with the chocolate.
- **Candy Canes:** A classic choice, candy canes can also be crushed and used. They provide a crisp texture and vibrant red and white flecks. Ensure they are crushed to a consistent size for even distribution.
- **Crushing Technique:** For best results, whether using a food processor or a sturdy plastic bag and a rolling pin, aim for a mix of fine dust and small, chunky pieces. The fine dust helps infuse the chocolate with mint flavor, while the larger pieces provide that satisfying crunch and visual appeal.

- Tortilla Soup Thickened With Tortillas
- Chocolate Bourbon Cake
- Cooking Light Mexican Chocolate Cream Pie
- Peanut Butter Pinwheels
- Butterscotch Brickle Bars
Recipe: Decadent Three-Layer Peppermint Bark with Ganache

Peppermint Bark
Anna
Pin Recipe
Ingredients
- 12 ounces high-quality white chocolate chopped into small pieces, plus extra if desired for touch-ups or thicker layers**
- 7 ounces dark or semisweet chocolate chopped finely for ganache
- 6 tablespoons heavy cream
- ⅛ to ¼ teaspoon pure peppermint extract optional, for enhanced mint flavor in ganache
- ½ cup crushed peppermints or as much as you need, preferably Atkins Mint Twists or Andes Peppermint Crunch Thins for best texture
Instructions
-
**Prepare the First White Chocolate Layer:** Begin by melting the white chocolate. You can do this in the top of a double boiler over gently simmering water, stirring until smooth and completely melted. Alternatively, if using a microwave, melt only about half of the white chocolate at a time. Heat on a low setting (50% power) and stir every 30 to 60 seconds to prevent scorching, until it’s smooth and lump-free.
-
**Form the Base Layer:** While the white chocolate melts, line a large baking sheet (approximately 12×18 inches) with parchment paper. If you prefer a precise shape, draw a 12×9 inch rectangle on the parchment paper as a guide (or simply visualize the dimensions). Carefully spoon the melted white chocolate onto the parchment paper within your designated rectangle and spread it evenly with an offset spatula or the back of a spoon to form the bottom layer. Immediately sprinkle about 2 tablespoons of the crushed peppermints evenly over the melted white chocolate. Transfer the baking sheet with the peppermint-sprinkled white chocolate to the freezer to set completely while you prepare the ganache. This step is crucial for firming up the base.
-
**Make the Dark Chocolate Ganache:** In a small saucepan, gently heat the heavy cream over medium-low heat until it just begins to simmer around the edges. Remove the saucepan from the heat immediately, add the finely chopped dark or semisweet chocolate, and let it sit for about 2-3 minutes to soften. Then, stir vigorously until the chocolate is completely melted and smooth, forming a rich ganache. If any chocolate pieces remain, you can return the pan to very low heat for a few seconds, stirring continuously. If desired, stir in the peppermint extract (⅛ to ¼ teaspoon, to taste). Allow the ganache to cool slightly to a warm-but-not-hot temperature; it should be spreadable but not so warm that it melts the white chocolate layer.
-
**Add the Ganache Layer:** Retrieve the baking sheet from the freezer, ensuring the white chocolate base is thoroughly chilled and firm. Carefully spread the slightly cooled dark chocolate ganache over the frozen white chocolate/peppermint slab, ensuring an even, thin layer across the entire surface. Work swiftly to maintain the temperature difference between the layers.
-
**Create the Top White Chocolate Layer:** Once the ganache layer is complete, return the baking sheet to the freezer immediately to allow the ganache to set firmly. While it chills, melt the remaining white chocolate using either the double boiler or microwave method as described in Step 1. Ensure this second batch of white chocolate is melted gently and is not overly hot, to avoid melting the ganache layer. Pour the smoothly melted white chocolate over the fully set and very cold ganache layer and carefully spread it to cover the entire surface. Alternatively, for a more artistic look, you can drizzle the white chocolate over the top, allowing some of the dark ganache to show through for a marbled effect.
-
**Final Touches & Setting:** Generously sprinkle the remaining crushed peppermints over the top white chocolate layer. Press them gently to ensure they adhere. Return the baking sheet to the freezer one last time to allow all layers to set completely. This may take at least 30 minutes to an hour. When the bark is almost fully set but still slightly pliable, you can score it into squares or rectangles using a pizza cutter. This makes for cleaner breaks later. Once fully set in the freezer or refrigerator, remove the bark and break it into desired pieces along the scored lines, or simply break it into free-form, rustic shards.
Notes
**Storage:** To maintain its freshness, crispness, and vibrant mint flavor, I highly recommend storing this peppermint bark in an airtight container in the freezer. It will keep well for several weeks, making it an excellent make-ahead treat for the holidays. You can also store it in the refrigerator for up to a week.
