Easy Chocolate Lasagna Recipe (8-inch Pan) – The Perfect Layered Chocolate Dessert
Prepare to fall in love with one of the most irresistible and effortless desserts you’ll ever make: **Chocolate Lasagna!** While I’ve always cherished this sweet treat as “Layered Chocolate Dessert,” the name “Chocolate Lasagna” perfectly captures its charming, multi-layered construction and playful appeal. This no-bake wonder is a dream come true for chocolate lovers and busy home cooks alike, offering a rich, creamy, and deeply satisfying experience with minimal fuss. Our rendition, perfectly sized for an 8-inch square pan, makes it an ideal choice for smaller gatherings, family dinners, or simply ensuring you have just enough to satisfy your sweet cravings without overwhelming leftovers.
Why an 8-inch Pan is Perfect for This Layered Chocolate Dessert
Many recipes for Chocolate Lasagna are designed for a larger 9×13 inch casserole dish, yielding a substantial dessert that can serve a crowd. However, for our family – and perhaps yours – a smaller batch makes much more sense. This specific recipe is tailored for an **8-inch square pan**, producing approximately six generous servings. This size is ideal for managing portions, preventing excessive indulgence, and reducing waste. It also means you can easily enjoy a fresh batch without committing to a massive dessert. The best part? This smaller quantity still leaves plenty for freezing, allowing you to save individual portions for later enjoyment. To achieve perfect, clean squares, a helpful trick is to freeze the entire dessert, then cut it while frozen. Once sliced, simply plate your frozen squares and let them thaw gently in the refrigerator for a few hours before serving. This method ensures neat presentation and makes meal prep a breeze.
The Irresistible Layers of Chocolate Lasagna
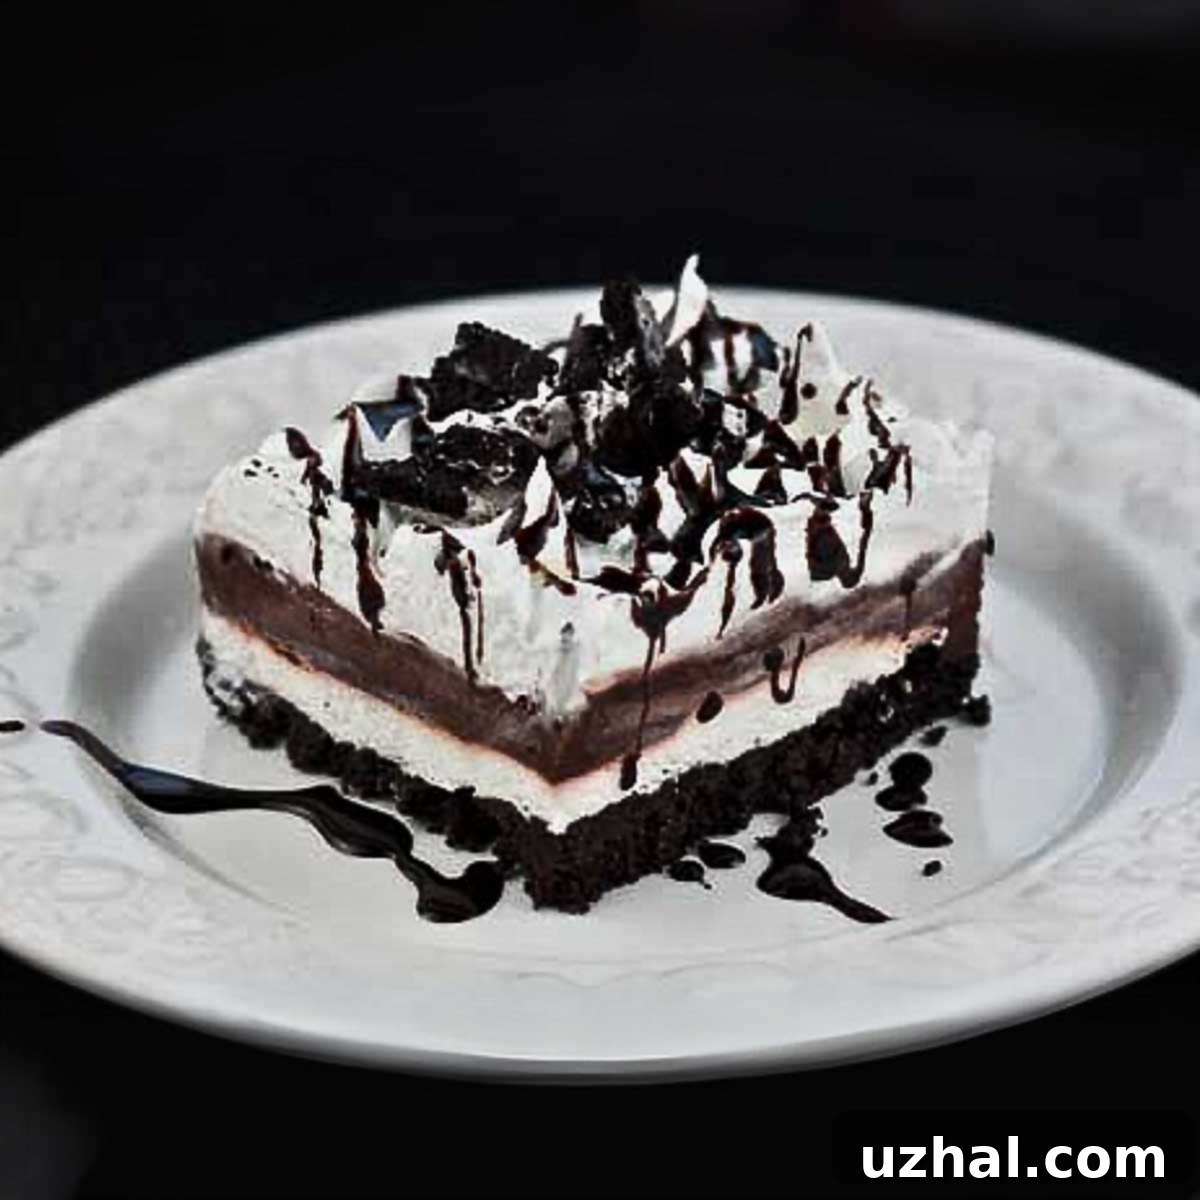
The magic of Chocolate Lasagna lies in its four distinct, harmonious layers, each contributing to an unforgettable texture and flavor profile. Let’s break down what makes this dessert so special:
1. The Crunchy Oreo Crust
Every great dessert needs a solid foundation, and for our Chocolate Lasagna, it’s an incredibly satisfying Oreo crust. Made from crushed Oreo cookies blended with melted butter, this crust provides a rich, chocolatey base with a delightful crunch that contrasts beautifully with the softer layers above. The process is simple: pulverize your Oreos into fine crumbs (a food processor makes this quick work, but a zip-top bag and a rolling pin work just as well!), mix with melted butter, and press firmly into your greased 8-inch pan. Chilling this layer briefly helps it set, creating a sturdy foundation for the layers to come.
2. The Creamy Dream Cheese Layer
Next up is the luscious cream cheese layer. This isn’t just any cream cheese mixture; it’s a perfectly balanced blend of softened cream cheese, granulated sugar, a splash of whole milk, and a hint of vanilla extract, folded together with light, sweetened whipped topping. The result is a smooth, tangy, and subtly sweet filling that cuts through the richness of the chocolate, adding a delightful complexity. Ensure your cream cheese is properly softened to avoid lumps and achieve that silky-smooth consistency that makes this layer so decadent.
3. The Rich Chocolate Pudding Layer
The heart of our Chocolate Lasagna is, of course, the chocolate pudding. For convenience and speed, this recipe calls for an instant chocolate fudge pudding mix. This ensures a quick preparation time while still delivering a deep, satisfying chocolate flavor. When mixed with milk and beaten until thick, it forms a velvety, intensely chocolatey layer that is simply irresistible. This layer adds a cool, smooth texture that melts in your mouth, making it a favorite for all ages. For those who prefer a more artisanal touch, a homemade chocolate pudding can also be used, though it will add to the preparation time.
4. The Fluffy Whipped Topping and Garnish
Crowning this masterpiece is a generous layer of sweetened whipped cream or whipped topping. This light and airy layer provides a refreshing contrast to the dense, rich layers beneath, adding a cloud-like finish. You can pipe it elegantly for a more refined look or simply spread it evenly with a spatula for a rustic charm. The final touch involves a sprinkle of broken Oreos and a drizzle of chocolate syrup, not only adding visual appeal but also reinforcing the chocolate theme and providing an extra textural element. This dessert is not just delicious; it’s a feast for the eyes!
Creative Variations for Your Layered Chocolate Dessert
Cookies and Cream Pie: A Delicious Twist
If you’re looking for an even quicker preparation or a different presentation, consider transforming your Chocolate Lasagna into a **Cookies and Cream Pie**. For this variation, you can completely skip making the Oreo crust from scratch. Instead, opt for a small (6 oz) pre-made Oreo pie shell or Keebler Ready-Crust. Simply build your layered chocolate pudding dessert directly into the small pie shell. Once assembled, top it generously with chopped Oreo cookies instead of just broken pieces. This creates a delightful “Cookies and Cream Pie” that’s perfect for individual servings or when you need a dessert in a pinch. It’s a fantastic way to enjoy all the flavors of Chocolate Lasagna with minimal effort!
Ghosts in the Graveyard: A Fun Halloween Treat
While I haven’t personally tried this creative idea yet, this Layered Chocolate Dessert would make an absolutely excellent base for a festive **Ghosts in the Graveyard** Halloween dessert. Imagine using the dark Oreo crust and rich chocolate pudding as the “earth,” then topping it with “grass” (tinted green whipped cream or coconut) and adding ghost-shaped meringue cookies or marshmallow ghosts. You could even add “tombstones” made from chocolate graham crackers or cookie wafers. The solid, layered structure of the Chocolate Lasagna makes it perfect for such a decorative and fun project, sure to be a hit at any Halloween party!
Tips for a Perfect Chocolate Lasagna Every Time
- **Soften Cream Cheese:** Always ensure your cream cheese is at room temperature before beating it. This prevents lumps and ensures a smooth, creamy layer.
- **Chill Properly:** Adequate chilling time is crucial for the layers to set firmly. Don’t rush this step, especially after the crust and pudding layers.
- **Even Layers:** Spread each layer evenly for a visually appealing and balanced dessert.
- **Clean Cuts:** For neat slices, use a sharp knife warmed under hot water and wiped clean between each cut. Freezing the dessert briefly before cutting (as mentioned above) is also a fantastic technique.
- **Make Ahead:** This is a perfect make-ahead dessert! It needs time to chill anyway, so preparing it the day before an event is highly recommended.
- **Storage:** Store any leftovers covered in the refrigerator for up to 3-4 days. For longer storage, individual slices can be wrapped and frozen for up to 1 month.
- Scratch Chocolate Lasagna with Oreos
- Giada’s Butternut Squash Lasagna
- Layered Cream Cheese Brownies
- Small Batch Chocolate Éclair Cake
- Layered Strawberry Dessert
Recipe

Layered Chocolate Dessert (Chocolate Lasagna)
Anna
Pin Recipe
Ingredients
- 20 whole Oreos, ground or pulverized into fine crumbs
- 3 tablespoons melted butter (42 grams)
- 4 ounces softened cream cheese (114 grams)
- 2 tablespoons granulated sugar (24 grams)
- 1 tablespoon whole milk (14 grams)
- ¼ teaspoon vanilla extract
- ⅔ cup sweetened whipped cream or whipped topping
- 1 package chocolate fudge instant pudding mix (4 serving size)
- 1 ¾ cup cold milk
For Topping & Garnish:
- 2 cups sweetened whipped cream or whipped topping
- Broken Oreos and chocolate syrup for garnish
Instructions
-
Lightly grease an 8-inch square glass dish to prevent sticking.
-
In a medium bowl, combine the finely ground Oreo cookie crumbs and the melted butter. Mix well until the crumbs are thoroughly moistened. Press this mixture firmly and evenly into the bottom of the prepared 8-inch square dish. Place the dish in the refrigerator to chill for about 10 minutes while you prepare the next layer.
-
In a clean mixing bowl, beat the softened cream cheese and granulated sugar together with an electric mixer until the mixture is completely smooth and creamy. Stir in the whole milk and vanilla extract until just combined. Gently fold in the ⅔ cup of sweetened whipped cream or topping until no streaks remain. Carefully spread this cream cheese mixture evenly over the chilled Oreo crust.
-
Rinse out the mixing bowl (or use a fresh one) and add the chocolate fudge instant pudding mix along with 1 ¾ cups of cold milk. Beat or stir with a whisk until the pudding thickens, about 2-3 minutes. Once thickened, pour the chocolate pudding mixture carefully over the cream cheese layer, spreading it gently to cover completely.
-
Place the dessert back into the refrigerator to chill for at least one hour, or until thoroughly set. Before serving, pipe or spread the remaining 2 cups of sweetened whipped cream over the top layer. Garnish with broken Oreo pieces and a drizzle of chocolate syrup, if desired, for extra visual appeal and flavor. Slice, serve, and enjoy your delicious Chocolate Lasagna!
Frequently Asked Questions About Chocolate Lasagna
Can I make Chocolate Lasagna ahead of time?
Absolutely! Chocolate Lasagna is an ideal make-ahead dessert. In fact, it tastes even better when the flavors have had time to meld and the layers have fully set. You can prepare it a day or even two days in advance and keep it covered in the refrigerator until you’re ready to serve. Just add the final whipped cream topping and garnishes right before serving for the freshest look.
What if I don’t have Oreos for the crust?
While Oreos are traditional for this recipe, you can certainly substitute them with other chocolate sandwich cookies, chocolate graham crackers, or even plain graham crackers with a tablespoon of cocoa powder added to the crumbs. The goal is a firm, flavorful base, so adjust melted butter as needed to get the right consistency for pressing.
Can I use homemade whipped cream instead of store-bought topping?
Yes, absolutely! Freshly whipped cream will elevate this dessert to another level. For 2 ⅔ cups of sweetened whipped cream (as needed for both the cream cheese layer and topping), you’ll typically need about 1 ⅓ cups of heavy cream, whipped with 2-3 tablespoons of powdered sugar and a splash of vanilla extract until stiff peaks form. Ensure it’s sweetened to your preference.
How long does Chocolate Lasagna last in the refrigerator?
When properly covered, Chocolate Lasagna can be stored in the refrigerator for up to 3-4 days. For optimal freshness and texture, it’s best enjoyed within the first 2-3 days.
Can I freeze Chocolate Lasagna?
Yes, this dessert freezes beautifully! For best results, cut the lasagna into individual squares first. Place them on a baking sheet to freeze solid, then wrap each piece tightly in plastic wrap and store in an airtight container or freezer-safe bag. Thaw individual pieces in the refrigerator for a few hours before serving. It can be frozen for up to 1 month.
Conclusion: A Simple Dessert That Delivers Big Flavor
Whether you call it Layered Chocolate Dessert or Chocolate Lasagna, this easy, no-bake recipe is a true crowd-pleaser. With its delightful combination of a crunchy Oreo crust, a creamy cream cheese layer, rich chocolate pudding, and a light whipped topping, it offers a symphony of textures and flavors that will leave everyone asking for more. Perfect for any occasion, from weeknight treats to special gatherings, this 8-inch pan version ensures you get all the indulgence without the overwhelming leftovers. So, gather your ingredients, follow these simple steps, and prepare to enjoy a truly decadent dessert that’s as fun to make as it is to eat!
