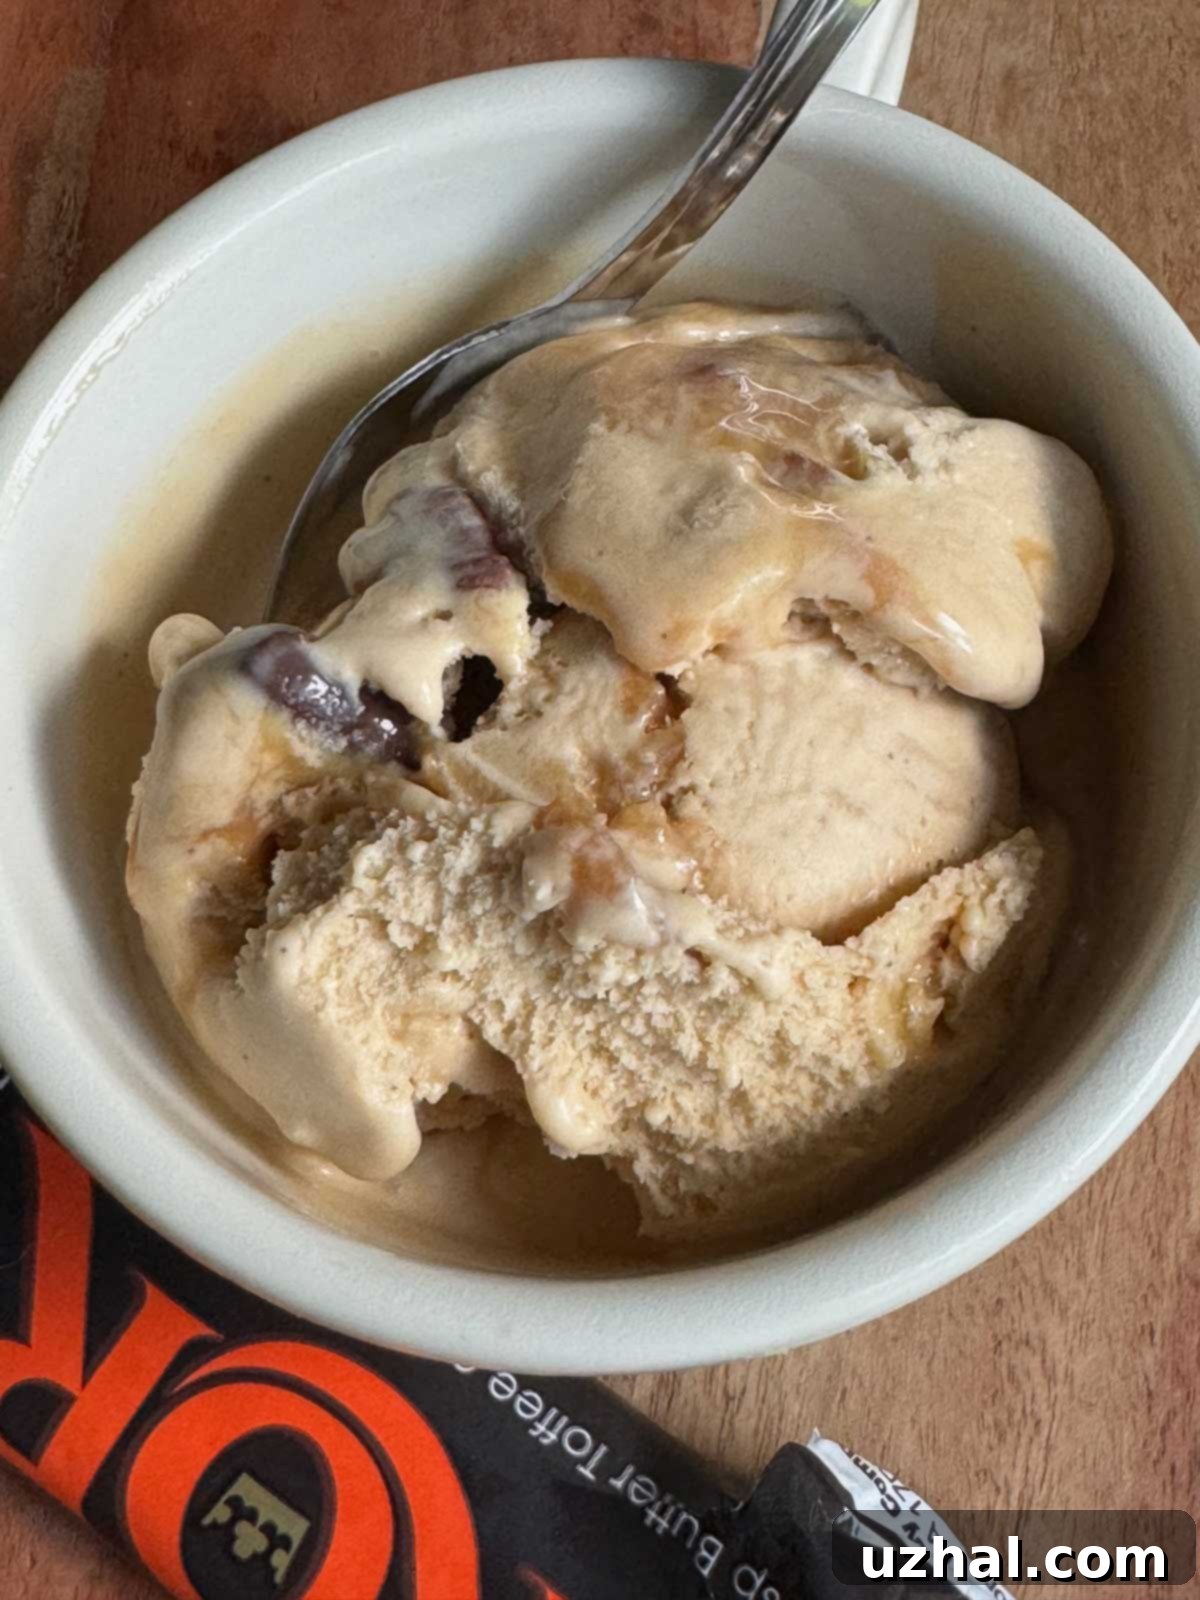
Indulge in Homemade Salted Caramel Skor Bar Ice Cream: The Ultimate Recipe & Guide
Prepare yourself for an extraordinary frozen dessert experience where the buttery crunch of Skor Bars perfectly marries the rich, nuanced flavor of homemade salted caramel ice cream. This isn’t just a recipe; it’s a journey into crafting a truly unforgettable treat that will impress every palate. If you’ve ever savored the combination of sweet, salty, and crunchy, then this decadent ice cream is your next must-try project.
My inspiration for this delightful creation came from a fortunate surplus of Skor Bars leftover from a previous ice cream sandwich cake. Instead of letting them go to waste, I decided to elevate my favorite salted caramel ice cream recipe by incorporating these delicious toffee bits. The result? A symphony of flavors and textures that transformed a classic into something truly spectacular.
While making this ice cream does involve a few more steps than a simple ice cream sandwich cake – primarily the art of making homemade caramel – I promise you, the effort is incredibly rewarding. The depth of flavor from scratch-made caramel is unparalleled, creating a creamy base that’s miles ahead of any store-bought alternative. If I can master it, so can you! I’ve gone into considerable detail here, providing all the tips and tricks I’ve learned along the way to ensure your success.

The Essence of Perfection: How to Make Salted Caramel Ice Cream
At its heart, this recipe delivers a classic custard-based ice cream, renowned for its incredibly rich, smooth, and creamy texture. The magic begins with a homemade caramel, which forms the foundational flavor, followed by the careful preparation of a traditional egg yolk and sugar custard base. Here’s a breakdown of the process and why each step is crucial:
- Crafting the Caramel: This is where the most significant flavor development occurs. We’ll transform simple sugar and cream into a deep, complex caramel that will infuse our ice cream with an unmatched richness.
- Preparing the Custard Base: Hot milk and cream are slowly whisked into a mixture of eggs and sugar, a technique known as tempering. This ensures the eggs cook gently without scrambling, creating a silky-smooth base.
- Combining Flavors: The freshly made caramel is then folded into the warm custard base, along with a hint of vanilla and a pinch of salt to amplify all the flavors.
- Chilling for Optimal Texture: The entire mixture must be thoroughly chilled for several hours, ideally overnight. This step is non-negotiable for achieving a perfectly churned, creamy ice cream. A cold base churns better, resulting in smaller ice crystals and a smoother final product.
- Churning to Creamy Perfection: Once cold, a splash of alcohol (like vodka) is added. This isn’t just for flavor; it helps prevent the formation of large ice crystals, ensuring your ice cream remains wonderfully scoopable. The mixture is then churned in an ice cream maker until it reaches a soft-serve consistency.
- The Fun Part: Layering in the Goodies: As you transfer the churned ice cream into storage containers, you’ll layer in generous amounts of chopped toffee (Skor Bars, of course!), luscious caramel sauce, and your favorite nuts. This creates delightful pockets of crunch and gooey sweetness throughout.
Each step contributes to the ultimate indulgence. While it requires a bit of attention and care, the resulting homemade salted caramel Skor Bar ice cream is a testament to the rewards of patient culinary artistry.

Mastering the Art of Homemade Caramel: A Guide for Every Cook
Let’s be honest, making caramel can sound a bit daunting. I used to feel the same way! But after several successful attempts, I’ve gathered some invaluable tips that transform it from an intimidating task into an enjoyable process. While you could technically use melted store-bought caramel bits (like Kraft) in a pinch, the unparalleled depth and complexity of flavor that homemade caramel brings to this ice cream truly makes it worth the effort. Plus, you likely already have the main ingredients – sugar and cream – right in your pantry. Consider this an opportunity to master a fundamental, yet incredibly rewarding, culinary skill.
Essential Tips for Perfect Caramel
- Choose the Right Pan: A heavy-bottomed sauté pan with high sides is your best friend. The high sides are crucial for containing the cream when it bubbles up vigorously, preventing messy overflows. A heavy bottom ensures even heat distribution, which is vital for preventing the sugar from burning in spots while other areas remain unmelted. I personally use a T-Fal lidded pan, which I find easy to handle due to its lighter weight and even heat conduction. While a high-quality stainless steel (like All-Clad) can cook sugar faster, anodized pans offer a forgiving evenness that’s great for caramel. A lid is also incredibly useful: if sugar crystals start forming on the sides of your pan, briefly covering it will condense steam, washing those crystals back into the melting sugar, preventing graininess.
- Dry Method vs. Wet Method: I advocate for the “dry method” in this recipe, meaning no water is added to the sugar. Many find this method yields a more intense caramel flavor as the sugar directly caramelizes. However, some prefer the “wet method” (adding a small amount of water to the sugar), which can be more forgiving as the water helps dissolve the sugar evenly. The best method can vary based on your specific kitchen environment, sugar type (cane vs. beet sugar), and pan material. I recommend trying the dry method first, as specified in the recipe. If you encounter consistent issues with melting, then experiment with a small amount of water (about 2 tablespoons per cup of sugar).
- To Scrape or Not to Scrape: When making caramel, it’s generally advised *not* to scrape the sides of the pan, as this can introduce undissolved sugar crystals back into the molten sugar, leading to a grainy texture. However, for this specific caramel preparation, it’s perfectly fine to gently scrape the bottom as needed with a heat-resistant silicone scraper. This helps keep the melting sugar moving and encourages any stubborn clumps at the bottom to dissolve more uniformly.
- Stay Present and Attentive: Caramel making is not a set-it-and-forget-it task. It requires your full attention. Be prepared to stand over the pan, constantly monitoring the sugar’s transformation. Tilting the pan frequently helps distribute the heat and ensures even caramelization, preventing hot spots from burning the sugar. Think of it like a delicate dance – hands-on and focused.
- Warm the Cream: Ensure your heavy cream is slightly warmed before you add it to the melted sugar. Adding cold cream to hot caramel can cause an explosive reaction and make the sugar seize up even more dramatically. Warming it slightly reduces the temperature shock and helps the sugar dissolve more smoothly.
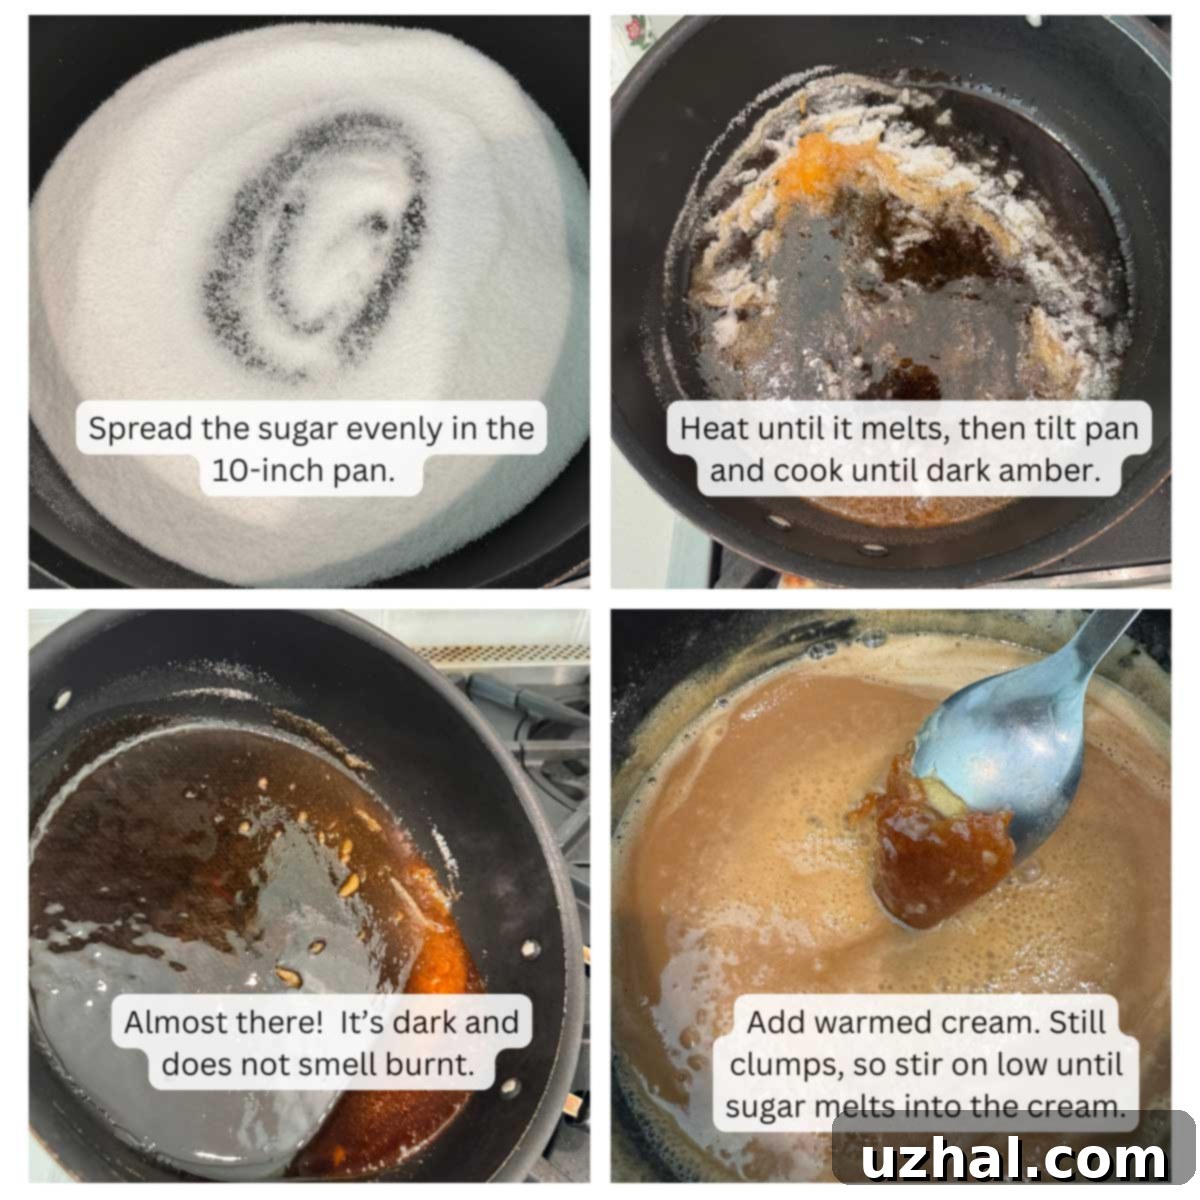
- Don’t Panic When it Seizes: When you pour the warm cream into the bubbling hot sugar, it will seize up, bubble vigorously, and the sugar will likely turn into hard, rock-like gobs. This is completely normal and can be alarming the first few times you experience it! Simply lower the heat, keep stirring patiently, and encourage the sugar clumps to submerge in the warm cream. The residual heat and gentle stirring will eventually dissolve these hardened sugar pieces back into the cream, forming a smooth caramel. Using the lid briefly can also help by trapping steam and promoting dissolution.
- Use Pure Cane Sugar: This is a critical note often overlooked! Some sugars that don’t explicitly state “cane” on the label might be derived from beets. Beet sugar behaves differently when heated and doesn’t always caramelize correctly, often leading to crystallization or burning before achieving the desired color. Always opt for a brand that clearly labels its product as “pure cane sugar” for reliable caramel results.

Optimizing Your Caramel: Yield and Usage for Ice Cream and Beyond
The total yield of your perfectly cooked homemade caramel should fall between 11 and 13 ounces by weight. This amount is ideal for a full batch of this incredible salted caramel ice cream base. However, if you’re looking to make a smaller quantity, say half a batch of the ice cream custard, you don’t necessarily need to halve the caramel recipe. It’s often easier to make the full amount of caramel and use only what you need. For instance, if making a half batch of custard, incorporate about 6 ounces of the caramel into your base. This ingenious approach leaves you with a delicious surplus of caramel, perfect for creating an exquisite caramel sauce.
To transform your remaining caramel into a luscious sauce, simply return the leftover ~6 ounces to a saucepan over very low heat. Stir in about 1 ½ tablespoons of unsalted butter until fully melted and combined. Add a generous pinch of salt (or more, to taste, for that essential ‘salted caramel’ kick) and a splash of pure vanilla extract. Continue to gently warm and stir until the sauce reaches your desired consistency – smooth, pourable, and utterly irresistible. This extra sauce can then be beautifully swirled through your finished ice cream, drizzled over individual servings, or even saved for other desserts like sundaes, apple pie, or brownies. It’s a fantastic bonus that adds versatility and minimizes waste!
Elevate Your Scoop: The Irresistible Optional Caramel Swirl
While the base of this ice cream is deeply infused with caramel, I’ve always felt that salted caramel ice cream truly shines with visible, gooey swirls of caramel running through it. The original version of this recipe didn’t specifically call for a swirl, but I consider it a game-changer. It adds another layer of texture and an intense burst of caramel flavor with every spoonful, making the experience even more decadent.
For the perfect caramel swirl, I highly recommend using a dedicated caramel sauce recipe that’s designed to stay soft and pliable even when frozen. My go-to is this fantastic easy caramel sauce recipe. The technique is quite similar to making the caramel base for the ice cream, but it’s typically done on a smaller scale and often in a saucepan, resulting in a slightly different consistency optimized for drizzling and freezing without becoming rock-hard. Alternatively, you could adapt the skillet method from our main caramel recipe: after removing from the heat, simply stir in 3 tablespoons of butter, a dash of salt, and a little vanilla extract into a portion of your cooked caramel. This will create a softer, more pourable sauce suitable for swirling. Don’t be afraid to experiment with store-bought high-quality caramel sauces as well; just ensure they are labeled as “soft-set” or “ice cream topping” to guarantee they won’t freeze too hard.
The Perfect Crunch: Skor Bars, Toffee, and Nuts for Unforgettable Texture
The magic of this ice cream isn’t just in its creamy texture and rich caramel flavor, but also in the delightful crunch and chew provided by the mix-ins. Skor Bars are the star here, offering that signature buttery, crisp English toffee texture that’s simply irresistible. You can often find Skor Bars at major pharmacies like Walgreens or well-stocked grocery stores. However, if Skor Bars prove elusive in your area, fear not! Many excellent alternatives will work beautifully.
Toffee Alternatives:
- Heath Bars: These are probably the most common and readily available substitute for Skor Bars. Heath bars provide a very similar English toffee flavor and crunch, making them an excellent choice.
- Other English Toffee Bars: Look for any brand of good quality English toffee. The key is that it should be hard, buttery, and shatter when chopped, offering a satisfying textural contrast to the smooth ice cream.
- Homemade Toffee: If you’re feeling ambitious, making your own simple English toffee can also be a fantastic option, allowing you to control the sweetness and thickness.
Nut Choices:
When it comes to nuts, almost any variety will complement the salted caramel and toffee. However, some choices truly elevate the experience:
- Salted Honey Roasted Peanuts: These are exceptionally good. The sweetness from the honey roast, combined with the saltiness, creates a harmonious flavor profile that pairs wonderfully with caramel. Their robust crunch adds a fantastic textural element.
- Salted Cashews: The creamy texture and mild, buttery flavor of cashews, especially when salted, provide a sophisticated contrast. They offer a softer crunch than peanuts, which can be a lovely variation.
- Roasted Brazil Nuts: With their unique, earthy flavor and firm texture, roasted Brazil nuts are another excellent, albeit less common, choice. Roasting them enhances their natural taste.
- Almonds or Mixed Nuts: Classic roasted almonds offer a subtle nuttiness, while a mix of your favorite nuts can provide a more complex flavor and varied texture. Ensure any nuts you choose are either pre-roasted or lightly toasted yourself to bring out their best flavor. Chopping them into bite-sized pieces ensures they are evenly distributed and easy to eat.
The combination of crunchy toffee and savory nuts against the backdrop of creamy, sweet, and salty ice cream is what makes this dessert a true showstopper. Don’t hesitate to mix and match to find your perfect blend!
The Final Touches: Assembling and Storing Your Decadent Ice Cream
Once your ice cream has churned to a soft-serve consistency, the last step before freezing is arguably the most fun: incorporating all those delicious mix-ins! This is where you truly personalize your creation and ensure every scoop is bursting with flavor and texture.
Assembling Instructions:
- Prepare Your Containers: Have your airtight freezer-safe containers ready. Rectangular loaf pans or specialized ice cream containers work best, as they allow for easy layering.
- Layering Technique: Start by spooning a layer of soft-churned ice cream into the bottom of your container.
- Add Mix-ins: Generously sprinkle a portion of your chopped Skor Bars (or other toffee), chopped nuts, and drizzle some of your optional caramel sauce over the ice cream layer.
- Repeat: Continue alternating layers of ice cream and mix-ins until your container is full, ending with a final sprinkle of goodies on top for visual appeal. This layering technique ensures an even distribution of all the delicious elements throughout the entire batch.
- Gentle Swirl (Optional): If you like, use a knife or a skewer to gently swirl the caramel sauce through the layers. Be careful not to overmix, as you want distinct pockets and ribbons of caramel.
Storage Tips for Longevity and Freshness:
Proper storage is key to maintaining the creamy texture and fresh flavor of your homemade ice cream:
- Airtight Containers: Always transfer your ice cream into airtight, freezer-safe containers immediately after mixing in your additions. Exposure to air is the primary cause of ice crystal formation and freezer burn.
- Press Plastic Wrap: For an extra layer of protection, press a piece of plastic wrap directly onto the surface of the ice cream before sealing the container with its lid. This further minimizes air contact.
- Deep Freeze: Place the sealed container in the coldest part of your freezer. The faster the ice cream freezes (or “hardens”), the smaller the ice crystals will be, resulting in a smoother, creamier texture. Allow at least 4-6 hours for it to firm up completely, though overnight is ideal.
- Shelf Life: Homemade ice cream, especially with fresh dairy and eggs, is best enjoyed within 1-2 weeks. While it can last longer, its quality and texture will gradually diminish.
By following these steps, you’ll ensure that your magnificent creation remains as delightful and delicious as possible, ready to be enjoyed whenever a craving strikes!
Recipe

Salted Caramel Skor Ice Cream
Anna
Pin Recipe
Ingredients
Caramel for Base
- 1 ¼ cups heavy cream (280 grams)
- 1 cup pure can sugar (200 grams)
Custard Base
- 1 cup heavy cream (220 grams)
- 1 cup whole milk (240 grams)
- ¼ cup sugar (50 grams)
- 3 large whole eggs
- ¼ teaspoon salt, kosher (Morton)
- ½ teaspoon vanilla
- 1 tablespoon vodka
- 2 regular Skor Bars or any other toffee
- ⅓ cup salted cashews, almonds or mixed nuts
- ⅓ cup homemade or store bought caramel sauce
Instructions
Caramel For Base
-
Gently warm 1 ¼ cup of cream in a saucepan. Turn off heat and keep nearby.
-
In a heavy 10-inch saute pan, heat 1 cup of the pure cane sugar, spreading it evenly over the dry skillet, until it starts to melt. It will look like it’s drying out at first. As it warms and changes, stir it a little to break it up, but don’t scrape the sides of the pan. Control heat to keep it from burning. If you need to speed things up, put the lid on the pan for a minute. Once you see that sugar melting you’re good. If it refused to melt at all (could be brand of sugar or beet sugar issue), start over and use 2 tablespoons of water with the sugar.
-
Once the sugar has melted, stop and allow it to start turning amber, watching carefully, and tilting the pan, raising from the heat as necessary, so that the sugar doesn’t burn. Do not scrape the sides of the pan. Just continue tilting the pan and lifting up off the burner if you need to until amber and all of the sugar has melted.
-
Once the sugar is a deep amber, remove from heat briefly, stand back and add the 1 ¼ cup of warmed cream. It’s going to bubble up. The sugar will seize and clump and the cream will boil. Return pan to a low heat and push any sugar clumps under the cream so they’ll get hot and melt faster. Use the lid if you need to build wet heat. Stir low and slow until hard sugar lumps dissolve. Set aside to cool while you make the custard.
Custard Base
-
In the same saucepan you used to warm the cream, combine another 1 cup of cream, 1 cup of milk and ¼ cup sugar. Begin heating until it reaches a simmer.
-
Meanwhile, whisk the eggs together in a medium size bowl. Have ready a second bowl with a sieve set over it to strain your custard. You could use the same bowl you used for the eggs, but then you’re risking food safety because the bowl had raw eggs in it. So be safe and use a second bowl for the custard.
-
Gradually whisk the hot cream mixture into the eggs, then pour it all back into the saucepan. Whisk over low to medium low heat for about 3-4 minutes or until mixture is about 175 degrees F. Remove from heat and pour through the sieve into the clean bowl.
-
Pour the (still warm) caramel into the warm custard and stir in the salt and vanilla. Let cool somewhat at room temperature (about 30 minutes), then cover bowl loosely and transfer to the refrigerator to chill for several hours or until very cold. An overnight chill is optimal, but as long as the custard is cold you should be able to churn it.
-
Before you churn, whisk 1 tablespoon of vodka into the custard. This will help keep it soft.
-
Pour into your ice cream maker and churn as the manufacturer directs.
-
As you pack the ice cream into containers, drizzle in your favorite caramel sauce, salted mixed nuts and a chopped up Skor bars.
Notes
Why Homemade Ice Cream is Always Worth the Effort
In a world brimming with convenient store-bought options, you might wonder if the effort of making ice cream from scratch is truly justified. The answer, unequivocally, is yes! Homemade ice cream, especially a rich, custard-based one like this Salted Caramel Skor Bar creation, offers an experience that mass-produced varieties simply cannot replicate.
- Unmatched Flavor Depth: When you craft your own caramel, you control the nuances of its flavor – from a light, buttery sweetness to a deep, smoky complexity. This homemade foundation, combined with fresh dairy and quality ingredients, creates a depth of flavor that is far superior.
- Superior Texture: A properly made custard base, chilled and churned, results in an incredibly smooth, dense, and creamy texture that melts exquisitely on your tongue without any iciness. The addition of a small amount of alcohol also contributes to this desirable softness.
- Customization at Your Fingertips: This recipe is a fantastic starting point, but it also empowers you to experiment. Love more salt? Add it! Prefer different nuts? Swap them out! Want extra caramel swirl? Go for it! Homemade allows for endless personalization.
- The Joy of Creation: There’s immense satisfaction in creating something truly delicious from basic ingredients. The process, from melting sugar to churning the final product, is a rewarding culinary adventure that culminates in a dessert you’ll be proud to share.
- No Unnecessary Additives: You know exactly what goes into your ice cream – pure, wholesome ingredients, free from stabilizers, artificial flavors, and preservatives often found in commercial ice creams.
So, take the plunge. Embrace the rewarding challenge of making this Salted Caramel Skor Bar Ice Cream. It’s more than just a dessert; it’s an indulgence, a passion project, and a guarantee of pure, unadulterated deliciousness. Your taste buds (and your lucky recipients) will thank you!
- Chocolate Skor Bar Cookies
- Skor Bar Oatmeal Cookies
- Oven Ready Bran Muffins
- Caramel Pecan Pie with Melted Caramels
- Caramel Filled Oatmeal Chocolate Chip Bars (Small Batch)
