Effortless Pain au Chocolat: The Ultimate Frozen Bread Dough Hack for Homemade Flaky Pastries
Imagine biting into a warm, flaky, buttery Pain au Chocolat, its rich chocolate center perfectly melted. Now imagine making it at home without spending an entire day preparing the dough from scratch. Sounds like a dream, right? Well, it’s a delicious reality, and the secret weapon is surprisingly simple: frozen bread dough.

My journey into the world of shortcut laminated pastries began when I discovered how wonderfully frozen bread dough performed for a Breton Butter Cake. The dough, with its inherent elasticity and yeast activity, proved to be an ideal base for absorbing butter and developing those coveted layers. It was a revelation, sparking the idea that if it could handle the richness of a Breton Butter Cake, it could certainly elevate a homemade Pain au Chocolat from complex to convenient. And indeed, it did!
The Magic of Rhodes Frozen Bread Dough: Your Shortcut to French Pastries
For those eager to recreate the delightful experience of Pain au Chocolat but hesitant to tackle traditional dough-making, this recipe is a game-changer. We’re focusing on Rhodes frozen bread dough, a brand I’ve tested extensively and found consistently reliable. It’s readily available in many grocery stores, typically sold in a 3-pound bag containing three individually frozen loaves. For this particular recipe, you’ll only need one 1-pound loaf, leaving the others for future baking adventures or more Pain au Chocolat! If Rhodes isn’t available in your area, any good quality frozen yeast bread dough should work, just ensure it’s unbaked and unrisen.
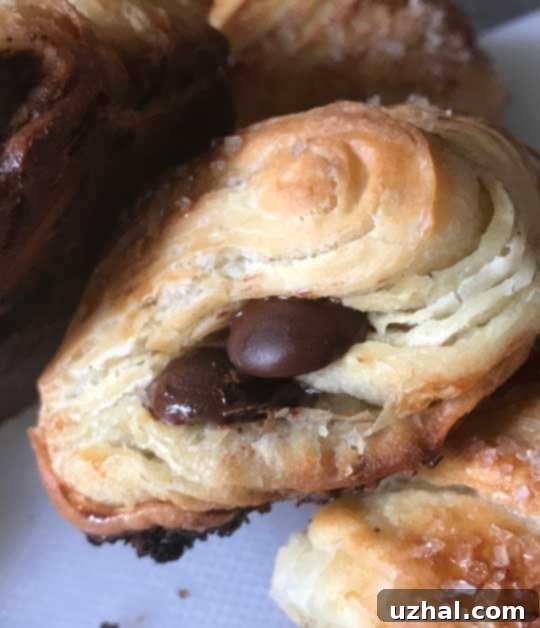
Before you begin, ensure your frozen dough is completely thawed, preferably overnight in the refrigerator, or at room temperature for a few hours until soft and pliable but still cool. You’ll also need a spacious work surface. While you can manage without one, a pastry mat significantly simplifies the process, providing a non-stick surface with helpful measurements. A good quality rolling pin is also essential for even rolling and achieving those delicate layers.

Mastering Lamination with Frozen Bread Dough: The Key to Flaky Perfection
The magic of Pain au Chocolat lies in its countless flaky layers, achieved through a process called lamination. This involves repeatedly folding butter into dough, creating distinct, thin sheets. While traditional lamination is incredibly labor-intensive, using frozen bread dough streamlines the process by providing a ready-made, consistent dough base. Our goal here is to transform that simple bread dough into a beautifully laminated pastry canvas.
Preparing Your Butter for Seamless Integration
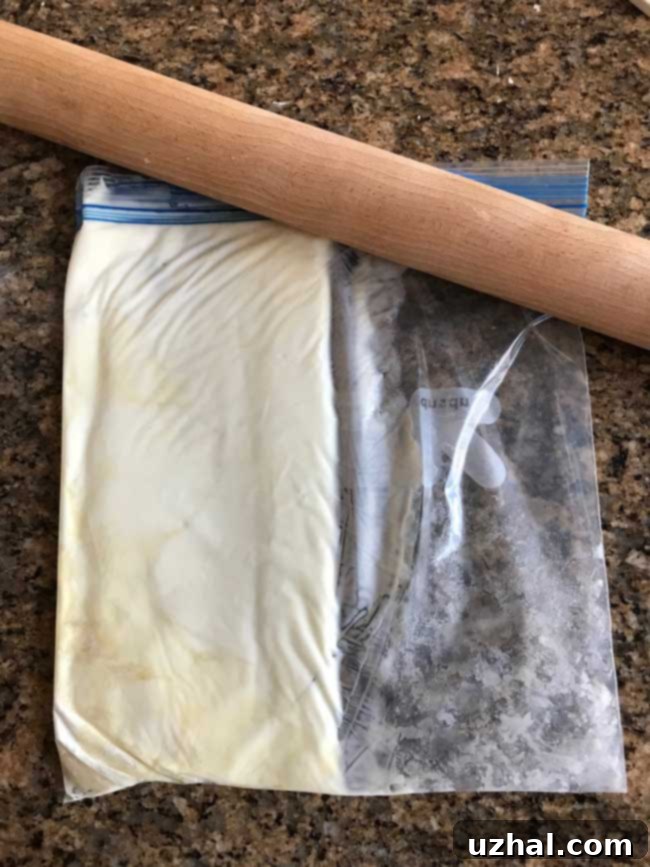
The first crucial step is preparing the butter. You’ll need 10 tablespoons of cold, high-quality butter. My preferred method for shaping the butter is to place the chunks into a gallon-sized freezer bag. Sprinkle about 2 teaspoons of flour over the butter – this helps prevent the butter from becoming too sticky and integrates better with the dough. Then, using a rolling pin or your hands, pound and roll the butter within the bag until it forms a uniform rectangle, approximately 5 ½ by 11 inches. This precise shape ensures an even spread when folded into the dough. Once shaped, lay the butter flat in the bag and refrigerate it for about 20 minutes, allowing it to firm up just enough to be handled without melting.
The First Fold: Encasing the Butter
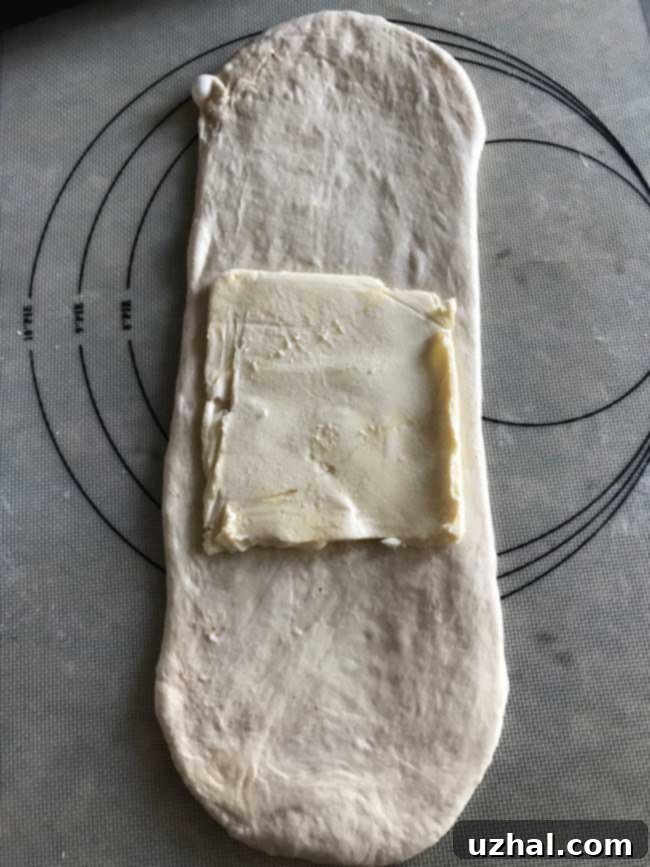
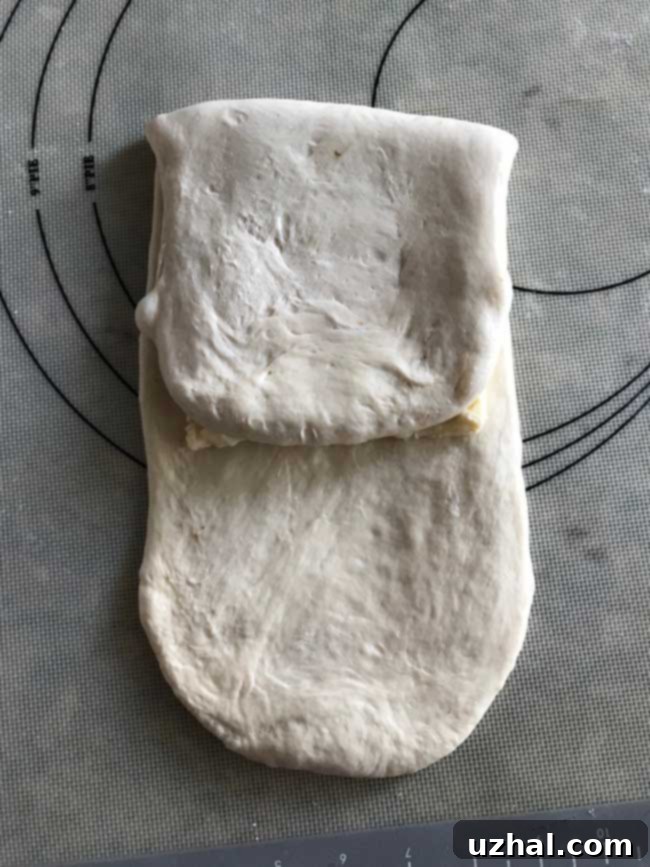
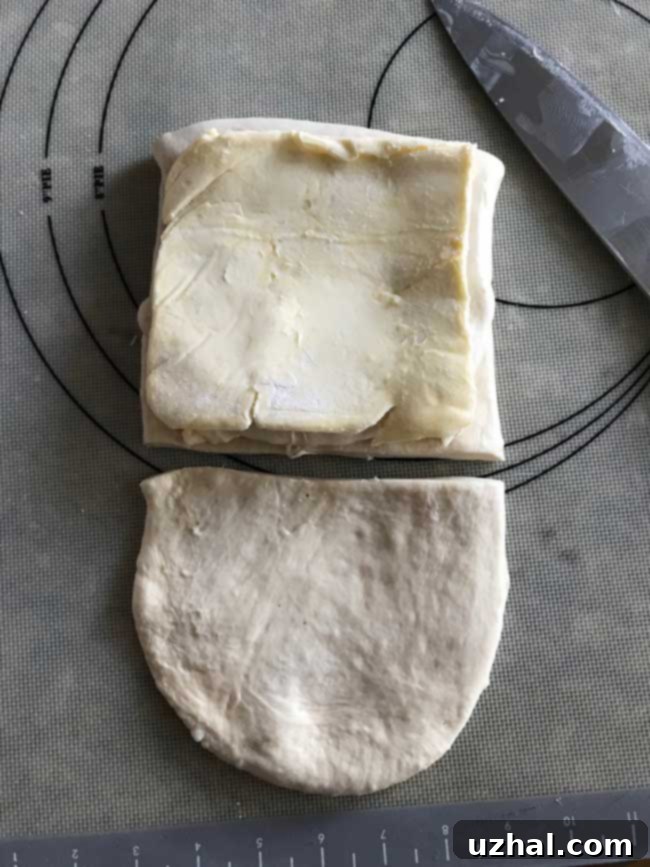
Next, lightly flour your work surface and roll your thawed 1-pound bread dough into a large, even rectangle, roughly 5 ½ x 16 inches. Position the shorter side of the dough rectangle closest to you. Retrieve your chilled butter. Carefully cut open the freezer bag, peel away the plastic from the butter, and slice the butter rectangle in half widthwise. Place one half of the butter in the center of the dough rectangle. Fold the top third of the exposed dough down over the butter. Now, place the second half of the butter on top of this folded dough. Finally, cut off the bottom exposed third of the dough and stack it on top of the second butter layer. You should now have a “sandwich” of two butter layers between three dough layers. Gently pinch the edges of the dough together to completely seal in the butter, ensuring no butter is exposed. This forms a neat dough packet. Wrap this packet loosely in the same greasy plastic bag you used for the butter (it’s still useful!) and refrigerate for 20 minutes to allow the butter to firm up and the dough to relax.
The “Turns”: Building Flaky Layers
Now comes the repetitive, but crucial, part: the “turns.” A turn involves rolling out the dough and folding it in a specific way to create multiple layers of butter and dough. For this recipe, you’ll perform three turns, with a 20-minute chilling period between each. This chilling is vital; it prevents the butter from melting and being absorbed by the dough, which would result in a tough, bread-like texture rather than the desired flakiness. While this step adds time, it’s mostly passive, allowing you to attend to other tasks.
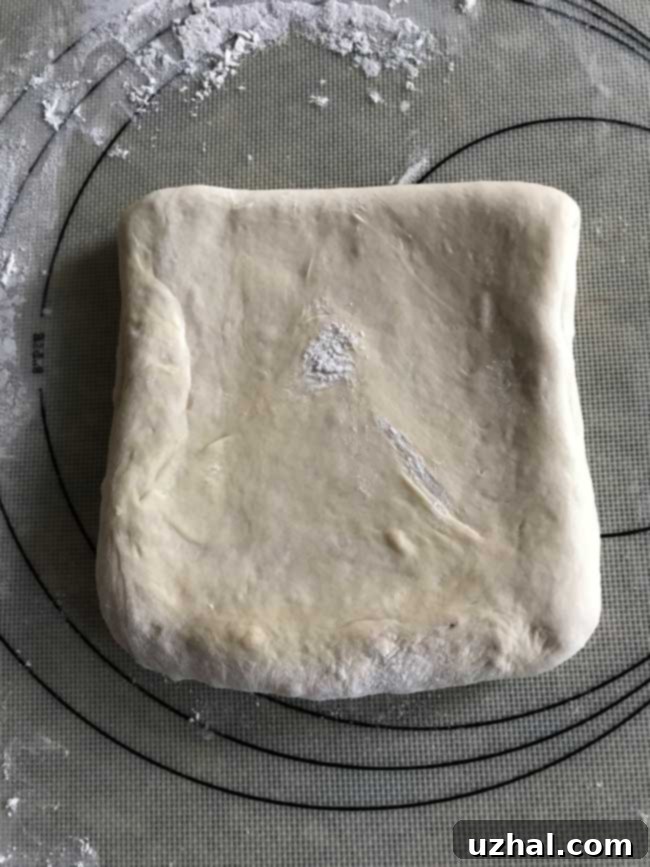
- First Turn: Remove the dough from the refrigerator and place it on a lightly floured surface. Roll it into a long rectangle, aiming for approximately 6×16 inches. As you roll, you’ll feel the butter spreading within the dough. Once rolled, perform a “letter fold” or “book fold”: fold one-third of the dough down towards the center, then fold the remaining third up over that, creating a compact, brick-like shape. Return the dough to the plastic bag and chill for another 20 minutes.
- Second Turn: Repeat the process. Take the dough out, place it on the floured surface, and roll it into a rectangle of similar dimensions (around 6×16 inches). Ensure you maintain the brick shape when rolling, usually by turning the dough 90 degrees before rolling to ensure even expansion. Fold it into a letter shape again. Chill for 20 minutes.
- Third Turn: For the final turn, repeat the rolling and folding as you did in the first two turns. Again, aim for a rectangle of about 16 inches in length, with its width naturally expanding. After this third fold, chill the dough for at least 20 minutes, or until you’re ready to shape your Pain au Chocolat. This relaxation period is key for easy handling.
Shaping and Filling Your Pain au Chocolat
Once your dough has completed its turns and has been adequately chilled, it’s time for the rewarding part: shaping! Lightly flour your work surface and gently pat the dough into as large a rectangle as you can manage, approximately 10×16 inches. You can use a rolling pin if needed, but often patting is sufficient to achieve an even thickness. The goal is to create a rectangle from which you can cut 12 to 16 equal pieces. I typically opt for 16 pieces, resulting in slightly smaller pastries but a higher, more satisfying ratio of chocolate to pastry. If you prefer larger croissants, aim for 12 pieces.
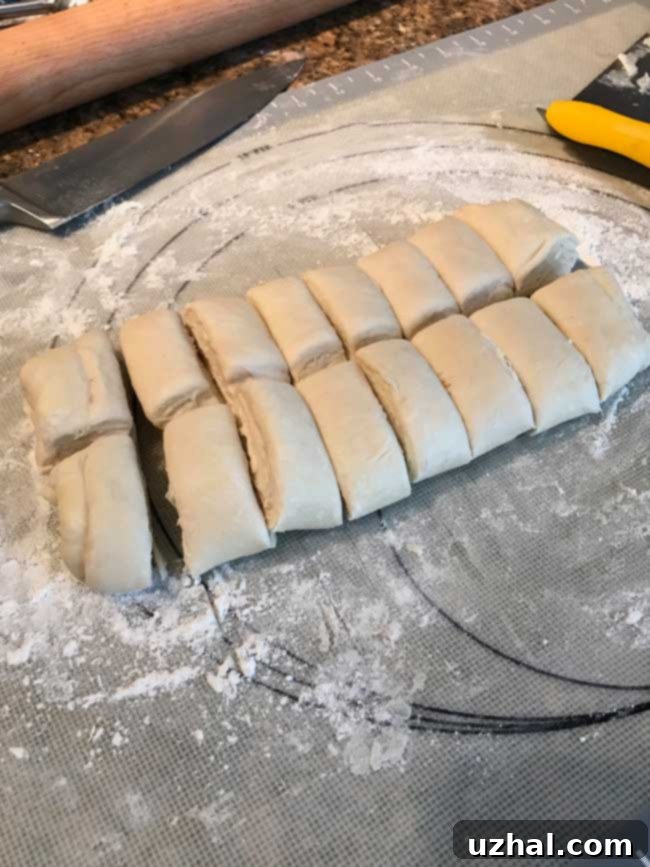
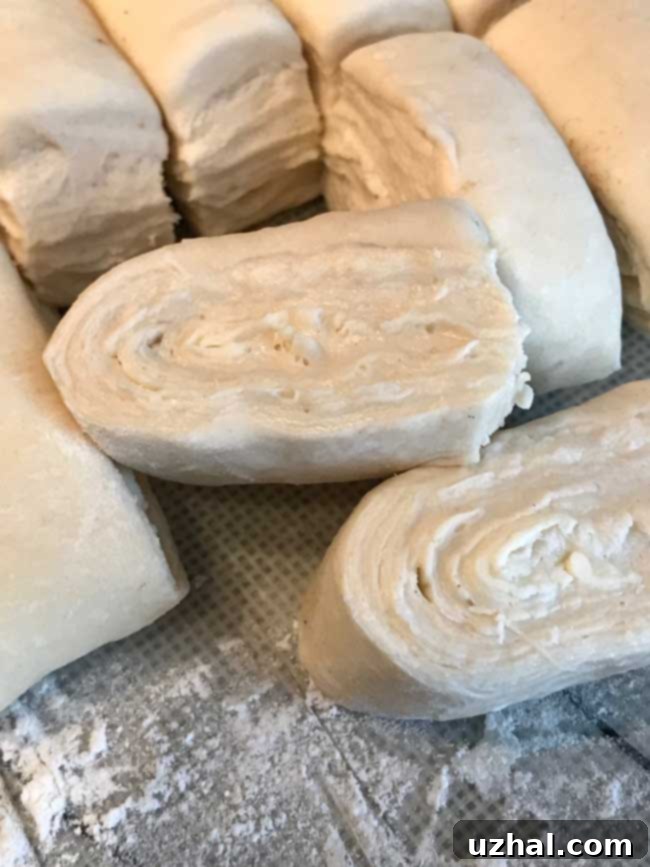
Using a sharp chef’s knife, score and then cut the dough into your desired number of chunks. To prevent the dough from warming up too quickly, gather all but 4 chunks and return them to the refrigerator while you work on the first batch. This keeps the butter firm and the layers distinct. When you work with each individual chunk, orient it so that the exposed, cut layers are on the sides. Gently press the chunk into a rectangular shape, ensuring the top smooth part is lengthwise. Place your chosen chocolate filling at one end of the rectangle. Press down slightly and then carefully roll the dough up, encasing the chocolate much like an enchilada. Seal the edges as best as you can to create a neat bundle. Place each shaped pastry seam-side down on a large, parchment-lined baking sheet. (A rimmed baking sheet is highly recommended, as butter leakage can occur during baking.)
Chocolate Batons and Creative Substitutes: Filling Your Pastries
Traditionally, French Pain au Chocolat are filled with specific chocolate batons (often called “bâtons de chocolat” or “chocolate sticks”). Our local European grocery store sometimes carries them, and they are excellent. However, you don’t need to hunt for them to make fantastic Pain au Chocolat. I frequently fill mine with high-quality bittersweet chocolate chips, or whatever suitable chocolate I have on hand. Dove Squares, for instance, melt beautifully, and I’ve even experimented with hazelnut-flavored dark chocolate for an extra layer of flavor. The key is to use chocolate that you enjoy eating on its own, as its flavor will shine through in the finished pastry.
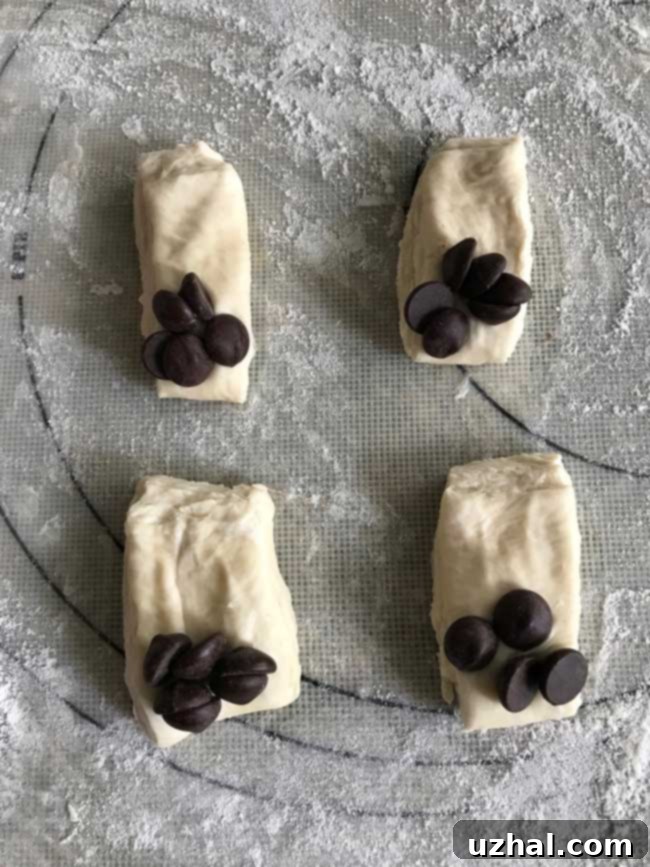
Once all your pastries are shaped and filled, arrange them on the prepared baking sheet. Cover them loosely with greased plastic wrap (the greasy bag from the butter works perfectly here!) or a clean kitchen towel and let them rise in a warm, draft-free place for about 40-45 minutes. This “proofing” stage allows the yeast in the dough to activate again, creating a light and airy texture. While the pastries rise, preheat your oven to 400 degrees Fahrenheit (200 degrees Celsius).
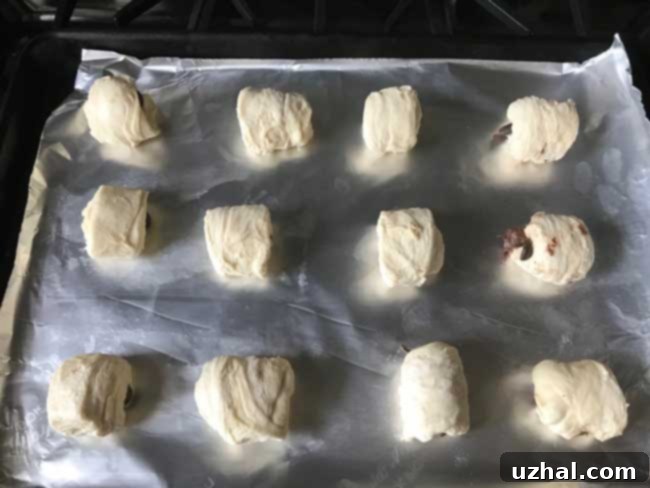
Just before baking, gently brush the tops of each pastry with a beaten egg (an egg wash) for a beautiful golden sheen and a slightly crisp crust. If you like, you can also sprinkle a little coarse sugar on top for added texture and sparkle. Bake for approximately 20 minutes, or until deeply golden brown and puffed. Don’t be alarmed if some butter or chocolate leaks out onto the parchment paper; this is quite normal for laminated pastries, especially with smaller sizes. As soon as they come out of the oven, carefully transfer them to a wire rack to cool. If you notice any chocolate leakage, a little trick is to have some extra chocolate chips or chunks nearby. While the pastries are still hot, gently poke extra chocolate into any gaps or openings between the layers. The residual heat will melt the new chocolate, ensuring a full, gooey center.
The Freezing Experiment and Storage Tips: Enjoying Pain au Chocolat Anytime
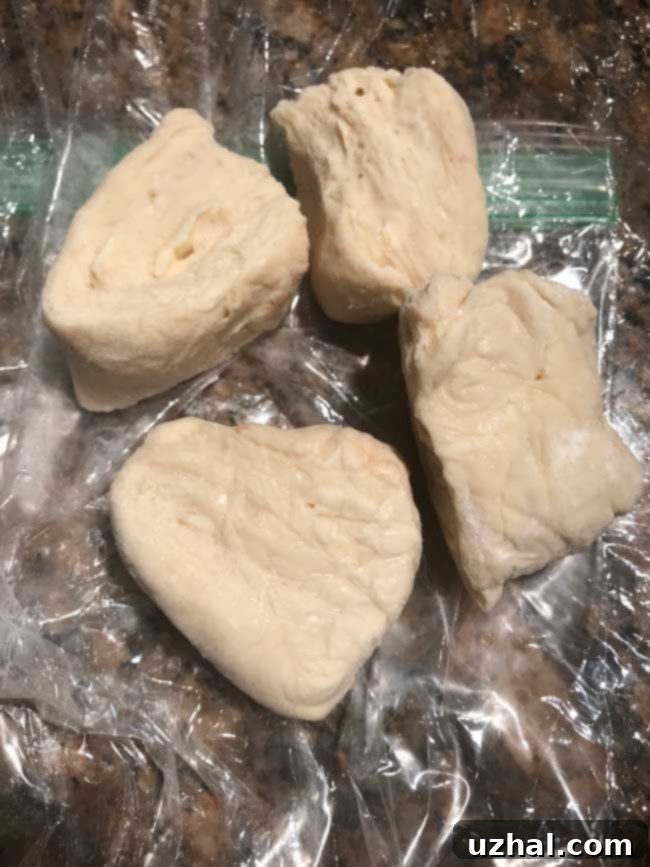
Remember those four chunks of dough I set aside and froze? This was my little experiment, and the results were excellent! I thawed them out the next morning in the refrigerator for about an hour, rolled them with different chocolate fillings, and baked them fresh for breakfast. The ability to make fresh Pain au Chocolat on demand is a fantastic benefit of this shortcut method. Even better, all 16 pastries can be frozen after baking. Once they’ve cooled completely, simply place them in a freezer-safe bag or airtight container and store them in the freezer. When a craving strikes, reheat them in a toaster oven at 350°F (175°C) for about 5 minutes, or in a regular oven until warmed through and flaky again. They emerge tasting just as delicious as when they were freshly baked, making homemade Pain au Chocolat an accessible luxury any day of the week.
This method truly demystifies the art of making laminated pastries. By leveraging the convenience of frozen bread dough, you can enjoy the exquisite taste and texture of homemade Pain au Chocolat without the traditional time commitment. It’s a perfect blend of a culinary shortcut and a gourmet result, sure to impress your family and friends. Give it a try, and prepare to be delighted by your new favorite breakfast or brunch treat!
Recipe: Shortcut Frozen Bread Dough Pain Au Chocolat

Frozen Bread Dough Pain Au Chocolat
Anna
Pin Recipe
Ingredients
- 1 pound frozen bread dough thawed, such as Rhodes
- 10 tablespoons unsalted butter (5 oz), cut into 8 to 10 chunks, cold
- 2 teaspoons all-purpose flour
- 1 large egg beaten, for egg wash
- Semisweet or bittersweet chocolate for filling (chocolate chips, batons, or chopped bar)
- Optional: coarse sugar for sprinkling
Instructions
-
Prepare the Butter Rectangle: Place the cold butter chunks in a gallon-sized zipper freezer bag. Sprinkle with 2 teaspoons of flour and shake the bag to coat the butter. Using your hands or a rolling pin, pound and press the butter inside the bag into a flat, even rectangle measuring approximately 5 ½ inches by 11 inches. Ensure it takes up about half of the bag. Lay it flat and refrigerate for about 20 minutes, or until it is firm but still pliable.
-
Roll the Dough: On a lightly floured surface (a pastry mat is ideal here), roll the thawed bread dough into a long rectangle, roughly 5 ½ x 16 inches. Position the shorter side closest to you.
-
Prepare Butter for Folding: Retrieve the butter from the refrigerator. Open the freezer bag and carefully cut away the sides or one side and the bottom to peel the plastic away from the butter, leaving you with a rectangle of butter attached to the plastic sheet. Cut the butter rectangle in half widthwise. Keep this greasy plastic sheet handy; it will be useful later.
-
First Butter Layering: Place one half of the butter in the center of the dough rectangle. Fold the top exposed portion of the dough rectangle down over this butter. Place the second half of the butter on top of the folded dough. Cut off the bottom exposed part of the dough rectangle and stack it on top, creating a “sandwich” of two butter layers between three dough layers. Pinch the edges of the dough firmly to seal in the butter completely. Wrap the dough loosely in the greasy plastic bag and chill in the refrigerator for 20 minutes.
-
First Turn: Remove the dough from the refrigerator and place it on your lightly floured work surface. Roll the dough into a long rectangle, approximately 6×16 inches, ensuring the butter spreads evenly within as you roll. Fold one-third of the dough down towards the center, then fold the other third up, creating a neat brick-like shape (a “letter fold”). Return the dough to the plastic bag and chill for another 20 minutes.
-
Second Turn: Repeat the rolling and folding process. Take the dough out, turn it 90 degrees, and roll it into a rectangular shape, aiming for about 16 inches in length and at least 6 inches wide. Perform the letter fold again (fold the top third down, then the bottom third up and over). Return the dough to the refrigerator for another 20 minutes.
-
Third Turn: Repeat the rolling and folding as you did in the first and second turns. Roll the dough into a rectangular shape that is roughly 16 inches long, with the width determined by the rolling. Perform the final letter fold.
-
Final Chill: Chill the dough for another 20 minutes, or until you are ready to shape the Pain au Chocolat. This chill helps relax the gluten and firms the butter, making shaping easier.
-
Prepare Baking Sheet: When you’re ready to shape, line a large, rimmed baking sheet with parchment paper or nonstick foil. A rimmed sheet is important as butter may leak during baking.
-
Cut the Dough: Place the chilled dough on a lightly floured surface and gently pat or roll it into a large rectangle (approximately 10×16 inches). The goal is to create a shape that allows you to cut 12 to 16 equal chunks.
-
Shape the Pastries: Using a sharp chef’s knife, cut the dough into 12 to 16 equal chunks. Place all but 4 chunks back into the refrigerator to keep them cool while you work on the first batch. Take one chunk of dough and orient it so the exposed layers (cut sides) are along the longer edges. Press the chunk into a rectangular shape. Lay your chosen chocolate filling (batons, chips, or chopped chocolate) at one end. Gently press down and roll the dough up and around the chocolate, sealing it in as best you can to form a small bundle. Place it seam-side down on the prepared baking sheet. Repeat with the remaining dough.
-
Proof the Pastries: Cover the shaped pastries loosely with greased plastic wrap (or the cleaned greasy bag from the butter) and let them rise in a warm, draft-free place for about 40-45 minutes, or until visibly puffed. Meanwhile, preheat your oven to 400°F (200°C).
-
Bake: Lightly brush the tops of the proofed pastries with the beaten egg wash and sprinkle with coarse sugar, if desired. Bake in the preheated oven for about 20 minutes, or until deeply golden brown and flaky.
-
Cool and Serve: Remove the pastries from the oven. Carefully transfer the hot pastries to a wire rack to cool. Note: Some butter or chocolate leakage is normal. If chocolate has leaked, while the pastries are still hot, you can carefully poke extra chocolate chips or chunks into any openings between the layers; the residual heat will melt them beautifully. Serve warm and enjoy!
-
Storage and Reheating: These pastries freeze exceptionally well. Once completely cooled, store them in a freezer-safe bag or airtight container in the freezer for up to a month. To reheat, place frozen pastries in a toaster oven or conventional oven at 350°F (175°C) for about 5-10 minutes, or until warmed through and flaky.
