Indulge in Irresistible Creaminess: The Best Homemade Milk Chocolate Fudge Recipe
When it comes to sweet treats, fudge holds a special place in many hearts. But I must admit, I initially approached a milk chocolate fudge recipe with a touch of skepticism. My mind immediately jumped to the question: Wouldn’t milk chocolate make it overpoweringly sweet? This concern is common, as milk chocolate is inherently sweeter than its dark counterparts. However, my doubts were quickly put to rest thanks to a trusted source. When my friend Sue, whose culinary judgment I rely on implicitly, declared this specific milk chocolate fudge her absolute favorite, I knew I had to give it a try. And oh, how glad I am that I did!
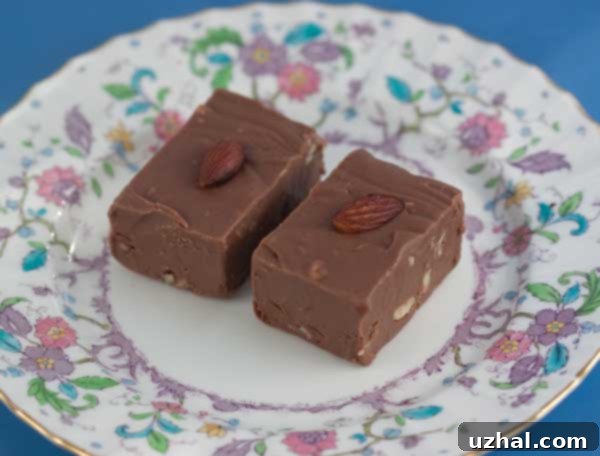
To my pleasant surprise, this recipe yields a fudge that is truly magnificent. It’s not overly sweet, striking a delightful balance that allows the rich, creamy, and distinct dairy flavor of the milk chocolate to shine through beautifully. This isn’t just another fudge recipe; it might very well be my new favorite too! The subtle nuances of good quality milk chocolate are truly elevated here, creating a smooth, melt-in-your-mouth texture that is simply irresistible.
Why This Milk Chocolate Fudge is a Must-Try
What sets this milk chocolate fudge apart? It’s the meticulous balance of ingredients and precise technique that transforms simple components into a luxurious confection. Many associate fudge with intense sweetness, but this recipe skillfully tempers that, allowing the inherent creaminess and delicate dairy notes of milk chocolate to take center stage. The result is a fudge that’s deeply satisfying without being cloying, making it appealing to a wider range of palates.
I originally considered holding onto this gem of a recipe until closer to Valentine’s Day, envisioning it as the perfect sweet treat for lovers and friends. After all, a homemade fudge recipe is always a hit during holidays and special occasions. However, the sheer deliciousness and relative ease of preparation made it impossible to keep under wraps for that long. Plus, by sharing it now, you’ll have ample time to practice and perfect your technique, ensuring you’re ready to impress by February 14th – or any day you crave something truly special.
The Secret to Perfect Fudge: Precision and Patience
While the process itself isn’t difficult, the true “trick” to achieving this fudge’s signature creamy texture is to follow the directions exactly as written. This isn’t a recipe where improvisation is encouraged, especially for first-timers. Fudge making is a precise art, heavily relying on temperature control and specific steps to prevent crystallization and ensure a smooth, soft set. Unless you live at a high altitude (which we’ll address below), resist the urge to “monkey around” with the instructions. Every step, from greasing the pan to the exact temperature, plays a crucial role in the final outcome.
Another fantastic aspect of this milk chocolate fudge, like most good fudge recipes, is its freezer-friendliness. You can easily make a batch ahead of time, wrap it tightly in parchment paper followed by foil, and freeze it. Then, whenever a craving strikes or an unexpected guest arrives, simply pull it out, let it thaw slightly, and enjoy. It retains its perfect texture and flavor beautifully. A heartfelt thank you goes to Sue for sharing this incredible recipe with me, and now, with all of you.
Ingredient Spotlight: The Importance of Quality Chocolate
Update: For the chocolate component, I cannot stress enough the importance of using good quality ingredients. When it comes to the milk chocolate, I consistently rely on Lindt milk chocolate. Its superior flavor profile and smooth melting characteristics contribute significantly to the fudge’s luxurious texture and taste. For the unsweetened chocolate, which balances the sweetness without adding extra sugar, the Lindt 95% cacao bar works exceptionally well if you can find it. Its deep, intense chocolate flavor complements the milk chocolate beautifully. Using high-quality chocolate makes a noticeable difference in the final product, so don’t skimp here!
High Altitude Adjustments for Fudge
If you reside in a high-altitude area, you’ll need to make a slight adjustment to the candy thermometer reading. Water boils at a lower temperature at higher altitudes, which means your candy will reach its desired consistency at a lower temperature than specified in recipes written for sea level. For every 500 feet above 1,000 feet elevation, decrease the target temperature by 1 degree Fahrenheit. For example, if you’re at 3,000 feet, you’d subtract 4 degrees (3000-1000 = 2000; 2000/500 = 4), aiming for 226°F instead of 230°F. This small adjustment is crucial for fudge to set properly and avoid a sticky or grainy texture.
- Peanut Butter Fudge Brownies
- Chocolate Fudge Pie
- Frosted Fudge Brownies – The Only Recipe You Need
- Top 10 Recipes 2014
- Walnut Fudge Brownies
Recipe: Creamy Milk Chocolate Fudge

Milk Chocolate Fudge
Cookie Madness
Pin Recipe
Ingredients
- 1 ounce unsweetened chocolate chopped
- 6 ounces good quality milk chocolate chopped — I used Lindt
- 1 teaspoon vanilla extract
- 1 ½ cups granulated white sugar
- ⅔ cup sweetened condensed milk
- ⅔ cup water
- ½ cup heavy cream
- ⅛ teaspoon salt optional
- 4 tablespoons unsalted butter cut into pieces
- ½ cup toasted almonds chopped plus more for garnish if desired
Instructions
-
Line the inside of a 9×5 inch loaf pan with nonstick foil. This makes for easy removal and cleanup, ensuring your fudge comes out perfectly.
-
Place unsweetened chocolate, milk chocolate and vanilla in a metal bowl; set aside. Having these ready to go is key for quick melting later.
-
Combine sugar, condensed milk, water, cream, salt (if using) and butter in heavy 3 to 3 ½ quart saucepan. I like to grease the sides of the saucepan to help prevent sugar crystals from forming and ensure a smooth, creamy fudge.
-
Stir over medium-low heat (without scraping sides) until butter is melted and sugar dissolves. This gentle heating ensures the sugar fully melts before boiling, preventing a grainy texture. Brush down the sides of the pan with a damp pastry brush to keep sugar crystals from forming on the sides.
-
Increase heat to high and bring mixture to rolling boil. Don’t let it boil over! It will foam and rise quite a bit, so lift it from the heat if this starts to happen. A rolling boil is essential for reaching the correct temperature quickly and consistently.
-
Reduce heat to medium-high and cook, stirring slowly, until a candy thermometer registers 230F. Time will vary due to humidity levels, stoves, pots, etc., but keep the mixture at a steady boil and a slowly rising temp. It might hover around 220 for a while. When it hits 230 it should be fragrant and just slightly off white. This specific temperature is critical for the fudge’s setting point.
-
Without scraping the brown residue that forms on the bottom of the saucepan (which can cause graininess), pour the boiling mixture over the chocolate and stir, stir, stir until the chocolate melts completely. The residual heat will melt the chocolate beautifully. Mix in the almonds (if using) and transfer to the loaf pan, smoothing the top quickly.
-
Transfer fudge to prepared pan and smooth top. Sprinkle with reserved nuts for an appealing finish, if desired. Refrigerate uncovered until firm enough to cut, about 2 hours. Allowing it to chill uncovered prevents condensation.
-
Lift fudge from pan using the nonstick foil and cut into desired pieces. Store in an airtight container at room temperature or in the refrigerator.
Notes
Tips for Fudge-Making Success
- Use a Reliable Candy Thermometer: This is arguably the most crucial tool for perfect fudge. An accurate thermometer ensures you hit the precise temperature for the correct sugar crystallization, leading to a smooth, non-grainy texture.
- Prevent Sugar Crystals: As mentioned in the recipe, greasing the sides of the saucepan and brushing them down with a damp pastry brush during the initial heating phases helps prevent stray sugar crystals from contaminating your mixture. These crystals can cause the entire batch to become grainy.
- Do Not Scrape the Bottom: When pouring the hot mixture over the chocolate, be very careful not to scrape any browned sugar residue from the bottom of the saucepan. This residue can also introduce unwanted crystals and affect the fudge’s texture.
- Be Patient During Boiling: The temperature might seem to stall around 220°F (104°C) before quickly rising to 230°F (110°C). Maintain a steady boil and trust your thermometer. Rushing this stage can lead to undercooked or overcooked fudge.
- Proper Cooling is Key: While it’s tempting to dig in immediately, allowing the fudge to firm up completely in the refrigerator is essential for clean cuts and the best texture.
- Storage: Store the cut fudge in an airtight container at room temperature for up to a week, or in the refrigerator for up to two weeks. For longer storage, freeze it as described above.
Fudge Variations and Serving Suggestions
While this milk chocolate fudge is divine on its own, here are a few ideas to customize it or serve it:
- Nutty Additions: Beyond toasted almonds, consider adding chopped walnuts, pecans, or even a mix of your favorite nuts for extra crunch and flavor.
- Extract Enhancements: A touch of almond extract (in addition to or in place of some vanilla) can provide a lovely flavor dimension. Peppermint extract would make it a festive holiday treat.
- Swirls and Toppings: Drizzle with melted white chocolate or dark chocolate for an elegant visual appeal. A sprinkle of sea salt flakes just before it sets can create a delicious sweet and salty contrast.
- Gifting: Fudge makes a wonderful homemade gift. Package squares in decorative boxes or cello bags, tied with a ribbon. It’s perfect for hostess gifts, holiday baskets, or a special treat for Valentine’s Day.
- Dessert Platter: Serve alongside other mini desserts like cookies, brownies, or fresh berries for a beautiful and varied dessert spread.
Troubleshooting Common Fudge Problems
Even with the best intentions, fudge can sometimes be tricky. Here are solutions to common issues:
- Grainy Fudge: This is often caused by sugar crystals. Ensure all sugar is dissolved before boiling, avoid scraping the sides of the pan, and don’t stir while it’s boiling (only slow, gentle stirring once temperature is reduced).
- Fudge That Won’t Set: The most common culprit here is not reaching the correct temperature (230°F or adjusted for altitude). An inaccurate candy thermometer can also be to blame. Unfortunately, once it’s cooled, it’s hard to rectify. Ensure your thermometer is calibrated.
- Crumbly Fudge: This usually means it was cooked to too high a temperature, resulting in too much moisture being evaporated. Again, thermometer accuracy is key.
- Sticky Fudge: If your fudge is too sticky, it likely didn’t reach a high enough temperature. It still might be delicious, but won’t hold its shape well.
Final Thoughts on This Irresistible Milk Chocolate Fudge
This Milk Chocolate Fudge recipe truly stands out as a testament to how simple ingredients, combined with careful technique, can create something extraordinary. It’s a delightful journey from initial skepticism to absolute adoration. The creamy texture, perfectly balanced sweetness, and rich dairy notes of the milk chocolate make every bite a moment of pure bliss. Whether you’re an experienced candy maker or a novice venturing into the world of fudge for the first time, this recipe provides clear, precise instructions for a successful outcome. So, gather your ingredients, trust the process, and prepare to fall in love with what might just become your new go-to treat. Enjoy the process of creating this delectable homemade fudge, and savor every single decadent piece!
