Indulge in Homemade Perfection: The Ultimate Scratch Chocolate Lasagna Recipe
There’s nothing quite like the satisfaction of a well-stocked freezer, especially when it’s brimming with homemade treats. While my own freezer might be nearing its limit with an assortment of cookies, frozen cheesecake, and persimmon bread, it serves as a wonderful reminder of the joy of baking and sharing. Among these delightful treasures lies a true crowd-pleaser, a dessert so decadent and surprisingly easy, it deserves a spotlight: our Scratch Chocolate Lasagna. This recipe is a testament to how simple, fresh ingredients can elevate a classic “convenience” dessert into something truly extraordinary.

What is Chocolate Lasagna? A Homemade Twist on a Classic
For those unfamiliar with the delightfully whimsical “Chocolate Lasagna” – or its more formally titled cousin, the Layered Chocolate Dessert – it’s typically a no-bake confection celebrated for its ease of assembly. The traditional version often relies on a pre-made Oreo crust, layers of whipped topping, cream cheese, and instant pudding mix. It’s a fantastic shortcut for a quick dessert, but if you’re like me and appreciate the superior taste of fresh ingredients, then my Scratch Chocolate Lasagna is your next go-to recipe.
My “less convenient,” yet infinitely more delicious, rendition substitutes the instant pudding and artificial whipped topping with a silky, easy-to-make homemade chocolate pie filling and luscious fresh whipped cream. Don’t worry, the beloved packaged Oreos still form the crunchy, chocolatey base because, let’s be honest, some things are just perfect as they are! Despite the “scratch” label, this layered chocolate dessert remains remarkably easy to put together. The secret to its simplicity lies in a smart prep strategy: make the chocolate filling first, allow it to cool completely (which can take an hour or so), and then return to assemble the layers later. This approach breaks down the process, making it feel less daunting and more enjoyable.
Why Choose Scratch Over Store-Bought? The Taste Difference
The beauty of making Chocolate Lasagna from scratch truly shines in its flavor and texture. While instant pudding mixes offer convenience, a homemade chocolate filling brings an unparalleled depth of rich, authentic chocolate taste. It’s smoother, creamier, and lacks the sometimes artificial aftertaste of boxed mixes. Similarly, fresh whipped cream, lightly sweetened with powdered sugar and a hint of vanilla, is infinitely superior to canned or frozen whipped toppings. It’s lighter, airier, and melts delicately in your mouth, providing a perfect counterpoint to the rich chocolate and tangy cream cheese.
By opting for a scratch-made approach, you gain control over the quality of your ingredients and the overall flavor profile. This not only results in a more gourmet-tasting dessert but also offers the satisfaction of crafting something truly special with your own hands. It’s a dessert that tastes like it took hours, but in reality, much of the time is hands-off chilling.
The Layers of Perfection: Deconstructing Scratch Chocolate Lasagna
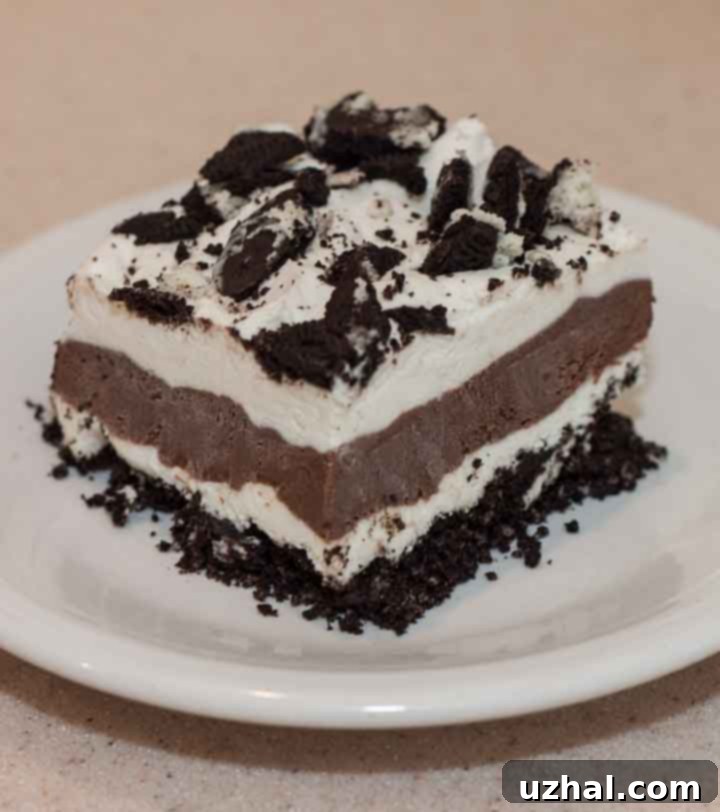
Each component of this Chocolate Lasagna plays a crucial role in creating a harmonious blend of textures and flavors. Let’s break down the layers that make this dessert a masterpiece:
1. The Irresistible Oreo Crust
The foundation of our Chocolate Lasagna is a classic Oreo crust. Crushed Oreos (regular or gluten-free work perfectly!) mixed with melted butter create a rich, dark, and slightly salty base that perfectly complements the sweet layers above. The key is to crush the cookies finely and press them firmly into the pan to ensure a stable crust that won’t crumble when cut. A quick chill in the freezer helps set it while you prepare the other components.
2. The Creamy Dreamy Cream Cheese Layer
Next up is a luscious, slightly tangy cream cheese layer. This is where the magic happens, balancing the sweetness of the chocolate and whipped cream. Softened cream cheese is beaten with a touch of sugar and a splash of milk, then gently folded with some of the sweetened whipped cream. This creates a light, airy, yet rich and creamy filling that spreads beautifully over the Oreo crust. It adds a delightful cheesecake-like dimension to the dessert.
3. The Star: Homemade Chocolate Filling
This is where our “scratch” version truly shines. Forget the instant packets; our homemade chocolate filling is a smooth, glossy, intensely chocolatey custard. Made with sugar, cornstarch, salt, whole milk, egg yolks, butter, and unsweetened chocolate, it cooks on the stovetop until thick and luxurious. A splash of vanilla at the end enhances the chocolate flavor. The crucial step here is to let it cool completely, covered to prevent a skin, ensuring it sets properly and provides a firm, decadent layer.
4. Light-as-Air Fresh Whipped Cream
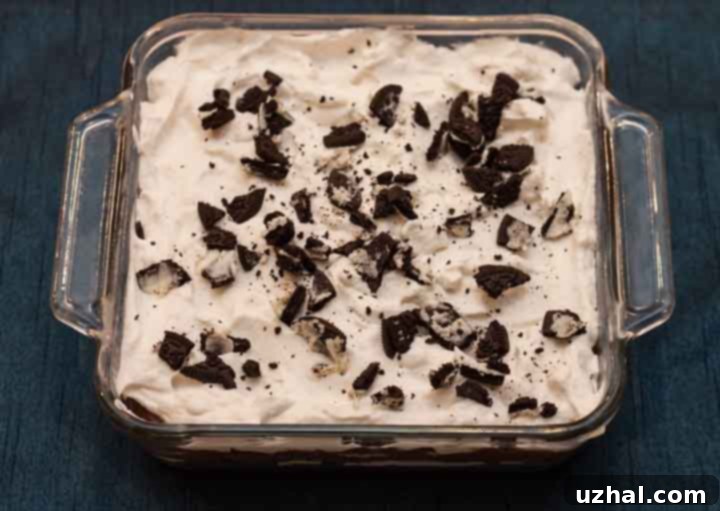
The top layer, and a portion folded into the cream cheese layer, is made from freshly whipped heavy cream. Whipped until stiff peaks form and sweetened with powdered sugar and vanilla extract, this layer is incredibly light and fluffy. It provides a beautiful contrast to the denser chocolate and cream cheese, creating a melt-in-your-mouth experience. A final sprinkle of crushed Oreos on top adds visual appeal and an extra crunch.
Freezing Scratch Chocolate Lasagna for Later Enjoyment
One of the many fantastic features of this dessert is its freezer-friendly nature, making it ideal for meal prepping desserts or for smaller households that want to enjoy it over time. As mentioned earlier, you can absolutely freeze Chocolate Lasagna, and it thaws beautifully. This is a game-changer for entertaining or simply having a delicious treat on hand whenever a craving strikes.
Here’s how to freeze your Scratch Chocolate Lasagna to preserve its deliciousness:
- **Initial Freeze (Whole Pan):** After cutting and serving a few slices from the freshly made lasagna, simply cover the remainder of the uncut dessert directly in its pan. Place the entire pan into the freezer overnight, or until it’s completely solid. This initial freeze helps the layers set firmly before portioning.
- **Portioning and Individual Freezing:** On day two, take the solid dessert out of the freezer. For easier removal, you can place the frozen pan into a larger roasting pan or rimmed baking sheet filled with about an inch of hot water for a minute or two. This helps loosen the dessert from the edges of the pan without thawing it too much. Carefully use a knife or spatula to pry the solid mass from the dish and transfer it to a cutting board.
- **Cutting and Wrapping:** Once on the cutting board, you can easily slice the solid chocolate lasagna into individual squares of your desired size. Each individual serving, when properly thawed, will look just as perfect and enticing as the first. Wrap each square tightly in plastic wrap, then place the wrapped portions into a freezer-safe bag or an airtight container. This double-layer protection helps prevent freezer burn and keeps the dessert fresh.
- **Thawing:** When you’re ready to enjoy a piece, simply remove an individual serving from the freezer and let it thaw in the refrigerator for a few hours, or on the counter for about 30-60 minutes, depending on your room temperature. The layers will remain distinct, and the texture will be just as creamy and satisfying.

So, whether you’re scrambling for a dessert that involves the delightful combination of Oreos, fresh whipping cream, and rich chocolate filling, or you’re just not in the mood to make a traditional chocolate pie, this Scratch Chocolate Lasagna recipe is a fun, rewarding, and undeniably delicious choice that’s sure to impress!
Tips for the Perfect Scratch Chocolate Lasagna
- **Chill Time is Your Friend:** Don’t rush the cooling and chilling phases. The chocolate layer needs to be completely cool to set properly, and the assembled lasagna needs at least 3 hours (preferably longer) in the fridge to firm up, making clean slices easier.
- **Room Temperature Cream Cheese:** Ensure your cream cheese is softened to room temperature. This will help it whip up smoothly without lumps, resulting in a perfectly creamy layer.
- **Whisk Constantly for Chocolate Filling:** When cooking the chocolate layer, continuous whisking is key to prevent scorching and ensure a smooth, lump-free custard. Scrape the bottom and sides of the saucepan frequently.
- **Cover the Chocolate Filling Directly:** To prevent a “skin” from forming on your cooling chocolate filling, press a piece of plastic wrap or parchment paper directly onto the surface.
- **Don’t Over-Whip the Cream:** Keep an eye on your whipped cream. You want stiff peaks, but over-whipping can turn it grainy.
- **Even Layers:** For the prettiest presentation and balanced flavor in every bite, try to spread each layer evenly across the pan.
- Layered Chocolate Dessert
- Giada’s Butternut Squash Lasagna
- Chocolate Chip Cheesecake Bars
- Chocolate Chip Oreo Brownie Bars
- Pumpkin Cupcakes with Pudding
Recipe

Scratch Chocolate Lasagna
Anna
Pin Recipe
Ingredients
Chocolate Layer
- ¼ cup plus 2 tablespoons granulated sugar
- 1 ¾ tablespoons cornstarch
- ⅛ teaspoon salt
- 1 ¼ cups whole milk plus a tablespoon divided use
- 2 large egg yolks
- 1 tablespoon unsalted butter at room temperature
- 1 ½ oz unsweetened chocolate chopped
- ½ teaspoon vanilla
Oreo Crust
- 20 regular or gluten-free Oreos plus a few extra for garnishing
- 3 tablespoon melted butter
Whipped Cream Topping
- 1 ½ cups heavy whipping cream
- ⅓ cup powdered sugar
- 1 teaspoon vanilla extract
- 4 oz softened cream cheese
- 2 tablespoons sugar
Instructions
-
Make the chocolate layer first so that it has plenty of time to cool.
-
Chocolate Layer: In a medium size saucepan, whisk the sugar, cornstarch, and salt together. Gradually whisk in 1 ¼ cups of the milk (reserve the 1 tablespoon), then whisk in the egg yolk. Place the mixture over medium heat, constantly whisking and scraping the sides of the pan until the mixture begins to bubble and thicken.
-
After the filling has thickened, continue whisking for one minute, then whisk in the 1 tablespoon of butter and the unsweetened chocolate. Remove from heat and whisk until smooth. Whisk in the vanilla. Cover with wax paper or parchment to prevent a skin from forming and let cool at room temperature. This should take an hour or so.
-
Crush Oreos in a food processor. Mix with melted butter and press into the bottom of a greased 8 inch square pan. Put in the freezer while you make the filling.
-
Whip 1 ½ cups of cream until stiff peaks start to form, then add the confectioners’ sugar and vanilla. Set aside.
-
In another bowl, beat the softened cream cheese and sugar together. Beat in the reserved tablespoon of milk, then fold in about ⅔ cup of the sweetened whipped cream. Spread this over the Oreo crust.
-
Spread the cooled chocolate mixture over the cream cheese mixture, then spread sweetened whipped cream over the chocolate mixture. Crumble some Oreos and sprinkle over the top.
-
Chill for at least 3 hours.
Notes
On day 2, set the frozen dessert in a roasting pan or rimmed baking sheet and the surrounding pan with hot water so that it comes about an inch up around the dish. This helps loosen the frozen dessert from the dish. Using a knife or a spatula, pry the frozen dessert from the dish and set on a cutting board. Cut into small or large squares, wrap individually and store in a freezer bag.
Conclusion: A Dessert Worth Making From Scratch
In a world full of quick fixes, taking a little extra time to create something truly special can be incredibly rewarding. Our Scratch Chocolate Lasagna is more than just a dessert; it’s a labor of love that results in a taste experience far superior to its convenience counterparts. The layers of crunchy Oreo, tangy cream cheese, rich homemade chocolate filling, and airy fresh whipped cream come together to create a symphony of flavors and textures that will delight anyone lucky enough to take a bite.
Whether you’re preparing it for a special gathering, a family dinner, or simply to stock your freezer with delightful treats, this homemade chocolate lasagna is guaranteed to be a hit. It’s a testament to the fact that sometimes, the “less convenient” path leads to the most delicious destination. So, roll up your sleeves, gather your ingredients, and get ready to create a truly unforgettable dessert!
