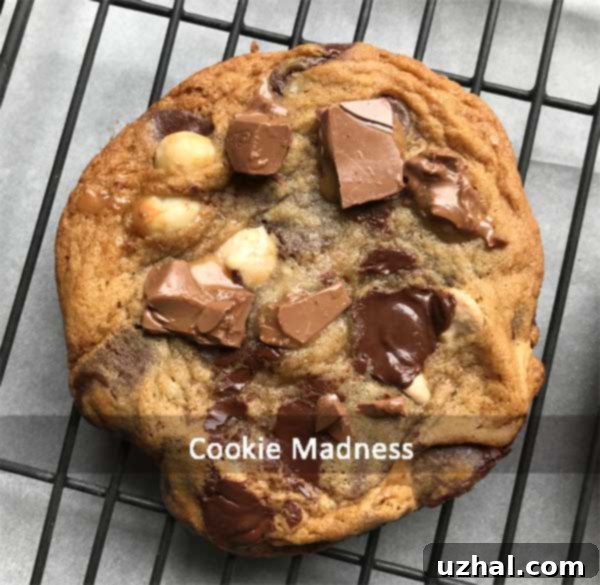
Master the Art of Big, Flat, and Perfectly Chewy Chocolate Chunk Cookies
There’s something uniquely satisfying about a truly exceptional chocolate chunk cookie. Not just any cookie, but one that’s generously sized, wonderfully flat, and boasts an irresistibly chewy texture. This particular recipe for big, flat chocolate chunk cookies is a personal favorite, born from a quest to recreate a nostalgic treat. I vividly recall the giant, gloriously floppy, chocolate-filled cookies I used to indulge in during my time in Chicago. While an exact replication proved elusive, the journey led me to develop this recipe, which captures the essence and delivers on all fronts: flavor, size, and that signature chew. It’s a recipe that has evolved over time, refined to ensure a consistent, bakery-quality result right in your home kitchen.

Crafting Your Big Flat Chocolate Chunk Cookies: A Detailed Process
The beauty of this recipe lies in its straightforward approach, yielding impressive results. The journey begins with melting butter, a technique that significantly contributes to the cookies’ flat and chewy texture by inhibiting gluten development and promoting spread. Once melted, the butter needs to cool slightly to avoid scrambling the eggs when added. This cooled, melted butter is then combined with both light brown and granulated sugars, and beaten until light and fluffy. This aeration process creates pockets that help the cookies rise slightly before flattening, contributing to their signature structure.
Next, the wet ingredients come together. A precise measure of egg and a generous splash of vanilla extract are beaten into the butter-sugar mixture. The egg provides structure and richness, while vanilla enhances the overall flavor profile, making the chocolate truly shine. Following this, a meticulously measured blend of flour, baking soda, and salt is incorporated. The baking soda is crucial for the cookies’ spread and chew, reacting with the acidic brown sugar to create carbon dioxide, which gives them a soft, tender interior. The resulting dough should be noticeably light in texture and soft to the touch – a hallmark of a good cookie dough destined for chewiness.
For optimal results and easier handling, a brief chill period is highly recommended. This firms up the dough, making it much simpler to scoop into uniform balls. While you can certainly scoop and bake immediately, I’ve found that chilling the scooped dough balls for at least two hours, or even better, overnight, profoundly improves the cookies’ flavor and texture. This extended chill time allows the ingredients to meld together, deepening the flavors, and helps prevent excessive spreading in the oven, ensuring your cookies achieve that desired big, flat, and chewy characteristic without turning into a thin, crispy mess.

The Flour Factor: Understanding Cake, Pastry, and All-Purpose in Your Cookies
Since initially sharing this recipe, I’ve made thoughtful modifications regarding the type of flour used, aiming for both flexibility and consistent excellence. While the original recipe specifically called for cake flour, known for its lower protein content and ability to create a tender, soft crumb, I’ve adapted it to be versatile enough for cake flour, pastry flour, or even standard all-purpose flour. The key to success, regardless of your choice, lies in the weight: use precisely 180 grams of flour.
The importance of weighing your flour cannot be overstated, especially in baking. Volume measurements (cups) can vary wildly depending on how you scoop and pack the flour. A cup of flour can weigh anywhere from 120 to 150 grams, leading to inconsistent results. By weighing your flour, you ensure the exact amount of protein and starch in your dough every single time, guaranteeing the desired texture and spread. A simple kitchen scale is an invaluable tool for any baker serious about consistent results.
The type of flour you choose will subtly influence the final texture of your cookies. As shown in the image above, cookies made with cake flour will have a distinctly soft and tender crumb. If you opt for pastry flour, which also has a lower protein content than all-purpose, you’ll still achieve a wonderfully tender cookie, perhaps with a slightly chewier edge. When using all-purpose flour, your cookies might have a slightly firmer, chewier bite throughout, as it contains more gluten-forming proteins. Interestingly, the image below features cookies made with Bob’s Red Mill whole wheat pastry flour, demonstrating that even alternative flours can work beautifully, often imparting a subtle nutty flavor and a heartier texture. Experimentation is encouraged, but always remember to weigh!
Expert Tips for Unforgettable Big Flat Chocolate Chunk Cookies
Achieving cookie perfection often comes down to mastering a few key techniques and understanding your ingredients. Here are some essential tips to ensure your big, flat chocolate chunk cookies turn out absolutely perfect every time:
- Invest in a Kitchen Scale: For this recipe, a digital kitchen scale is truly indispensable. While you might “get by” without one, the precise measurements I’ve provided are by weight, which is the only way to guarantee the exact flour-to-fat ratio necessary for these cookies’ signature flat and chewy texture. Volumetric measurements can lead to too much or too little flour, drastically altering the outcome.
- Flour Flexibility and Precision: As mentioned, you can use 180 grams of cake flour, pastry flour, or all-purpose flour. Cake flour will yield a super tender crumb, pastry flour a lovely balance of soft and chewy, and all-purpose flour a slightly chewier cookie. If you’re using a blend of two types, ensure the total weight is still 180 grams. This precision is vital for the desired spread and chew.
- Mastering the Egg Measurement: The recipe calls for 1 ½ eggs, or 1 large egg plus 2 tablespoons. The easiest and most accurate way to achieve this is to beat two large eggs together, then weigh out 70 grams of the beaten egg mixture. This ensures you have the exact amount for moisture and binding. You’ll likely have about 25 grams (roughly half an egg) leftover, which can be saved for another recipe. Alternatively, you can use 1 large egg plus 1 egg yolk, which will increase the richness and contribute to an even chewier texture, though it will subtly change the overall cookie.
- Generous Chocolate Chunks: I’ve increased the amount of chocolate to 1 ⅓ cups because who doesn’t love more chocolate? Feel free to adjust this to your liking, using anywhere from 4 to 6 ounces of chopped dark chocolate or your favorite bittersweet chocolate chips. Large chunks are preferred over standard chips as they create those irresistible pools of melted chocolate throughout the cookie. You can even mix different types of chocolate for added complexity.
- Accelerating Butter Melting & Cooling: To save time, melt about ¾ of a stick of butter (6 tablespoons) until liquid. Then, immediately add the remaining 2 tablespoons of cold butter to the hot melted butter. The cold butter will quickly melt, and the overall temperature of the mixture will drop significantly, speeding up the cooling process. Alternatively, use a lower setting on your microwave to melt the butter slowly, allowing it to cool a bit as it melts. Ensure the butter is cool enough not to cook the eggs when added.
- The Importance of Chilling: While mentioned in the recipe steps, it’s worth reiterating: chilling the dough is paramount. It prevents excessive spreading, allowing the flavors to deepen, and results in a more consistently chewy texture. For the absolute best results, aim for an overnight chill. If you’re short on time, at least two hours will make a significant difference.
- Even Baking: Always preheat your oven thoroughly and use parchment paper-lined baking sheets. Parchment paper prevents sticking and promotes even browning. Arranging cookies at least 3 inches apart gives them ample room to spread without merging.
- Temperature Drop Trick: The instruction to start baking at 375°F and immediately reduce to 325°F is a classic bakery trick. The initial high heat helps the edges set quickly, while the lower temperature allows the cookies to bake through slowly, resulting in a perfectly soft, chewy center and a slightly crisp edge, without over-browning.
Having baked countless batches of these, and even comparing them side-by-side with other popular recipes like the famous pan-banging Giant Crinkled Chocolate Chip Cookies, my Big Flat Chocolate Chunk Cookies consistently emerge as the favorite. Their unique balance of chewiness, rich chocolate flavor, and satisfying size is simply unmatched.
Recipe for Big Flat Chocolate Chunk Cookies

Big Flat Chocolate Chunk Cookies
Anna
Pin Recipe
Ingredients
- 1 stick unsalted butter, melted and cooled (114 grams)
- ⅔ cup light brown sugar or mix together light and dark (140 grams)
- ½ cup granulated sugar, scant (90 grams)
- 1 large egg (50 grams)
- 2 tablespoons lightly beaten egg (20 grams total, to make 70g egg)
- 1 ½ teaspoon vanilla extract
- 1 ½ cups cake flour or 180 grams of all-purpose or pastry flour (180 grams is critical for texture)
- ¾ teaspoon baking soda
- ¾ teaspoon salt
- 1 ⅓ cups bittersweet chocolate chips or 4-6 oz chopped dark chocolate
- Optional mix-ins: macadamia nuts, caramel chips, chopped milk chocolate
Instructions
-
In a large bowl, using an electric mixer, beat the cooled melted butter and both the brown and granulated sugars for 1 minute until well combined and slightly lightened. Add the combined egg (1 large + 2 tbsp beaten egg, or 70g total) and beat again for 30 seconds. Allow the mixture to rest for 5 minutes, then beat for another minute. Finally, beat in the vanilla extract until fully incorporated.
-
In a separate medium bowl, whisk together the measured flour, baking soda, and salt. Gradually add this dry flour mixture to the wet ingredients, mixing on low speed until just combined and a soft, cohesive dough forms. Be careful not to overmix. Once the dough is formed, stir in your chocolate chips or chopped chocolate until evenly distributed. The dough will feel quite soft at this stage.
-
Cover the dough and chill it in the refrigerator for about 10-15 minutes, or just until it firms up enough to be easily scooped. Using a ¼ cup measuring scoop, portion out the dough into 8-10 equal balls onto foil-lined plates or a small baking tray. Cover these scooped dough balls loosely with plastic wrap and chill them for a minimum of two hours. For the best flavor and texture development, an overnight chill (12-24 hours) is highly recommended. Once firm, lightly shape the chilled dough balls into neater rounds and gently press them down slightly to create thick discs. This helps achieve that perfectly flat shape.
-
When ready to bake, preheat your oven to 375°F (190°C). Line a large baking sheet with parchment paper. Arrange the chilled cookie discs about 3 inches apart on the prepared baking sheet to allow for adequate spreading.
-
Carefully place the baking sheet with cookies into the preheated 375°F oven. Immediately close the oven door and reduce the oven temperature to 325°F (160°C). This temperature drop trick is key for the ideal flat and chewy texture.
-
Bake the cookies for approximately 15 to 18 minutes. Start checking at 10 minutes; the edges should be set and lightly golden, but the centers should still appear very soft and slightly underbaked. Rotate the pan halfway through baking for even cooking.
-
If you’re using milk chocolate pieces (instead of chips), or if you want extra melty pockets, pull the cookies from the oven when they are still hot and slightly puffy. Immediately press additional milk chocolate pieces into the surface of the hot cookies. They will melt beautifully.
-
Allow the cookies to cool on the baking sheet for about 5 minutes to firm up slightly. This prevents them from breaking when transferred. Then, carefully transfer them to a wire rack to cool completely. The cookies will continue to set as they cool, achieving their ultimate chewy texture.
Notes
There you have it – a comprehensive guide to baking your new favorite big, flat, and chewy chocolate chunk cookies. This recipe is more than just a list of ingredients; it’s a journey into the nuances of cookie baking, where small details make a world of difference. From the precise measurement of flour to the strategic chilling of the dough, each step is designed to deliver a cookie that not only satisfies your cravings but also impresses with its bakery-quality perfection. Whether you’re making them for a special occasion or simply to treat yourself, these cookies are sure to become a cherished addition to your recipe collection. Happy baking!
