The Ultimate Guide to Baking Fluffy Yeast Banana Bread: A Versatile Loaf for Every Meal
Forget everything you thought you knew about banana bread! While most people associate banana bread with quick breads leavened by baking soda or powder, this recipe introduces you to the delightful world of Yeast Banana Bread. Imagine a loaf that’s not just moist and flavorful, but also incredibly light, airy, and boasting a tender, chewy crumb. That’s exactly what this yeast-risen version delivers. I initially created this recipe with the simple goal of elevating my morning peanut butter toast, adding a subtle banana essence. To complement the banana and infuse a gentle sweetness, I incorporated a touch of honey – enough to balance the flavors without making it overtly sweet, achieving a profile similar to a wholesome honey whole wheat bread.

Why Yeast Banana Bread? A Cut Above the Rest
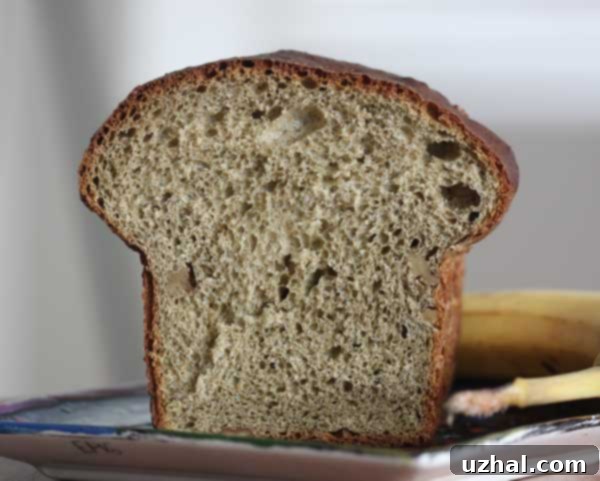
What truly sets yeast banana bread apart from its quick bread relatives? The secret lies in the yeast itself. Unlike quick breads, which often have a denser, more cake-like consistency, yeast facilitates a gradual, delicate rise that results in an exceptionally light, fluffy, and slightly chewy crumb. This makes the bread incredibly versatile – equally perfect for slicing thinly for morning toast or cutting thicker for a substantial sandwich. The banana flavor, deliberately kept subtle and enhanced by a hint of honey, creates a balanced and sophisticated taste profile that beautifully complements a wide array of toppings and fillings. This is a bread that consistently delivers on all fronts: an impressive rise, an incredibly satisfying texture, and a subtly sweet, well-rounded flavor that will have you reaching for another slice.
Achieving Perfect Texture and Flavor in Your Homemade Loaf
This particular loaf truly hits all the right notes! It rises beautifully high, creating an impressive appearance, and the interior texture is wonderfully light, soft, and fluffy. During my first attempt, I used an 8 ½ by 4 ½ inch loaf pan, which I quickly realized was a little too small, causing the dough to spill over the sides slightly as it rose. For anyone planning to bake this, I strongly recommend using a standard 9×5 inch loaf pan or one that’s slightly larger. This will provide ample space for the dough to achieve its full potential without overflowing. Even with my slightly undersized pan, the loaf still presented itself beautifully and tasted absolutely fantastic, a testament to the recipe’s inherent deliciousness.
One of the great joys of baking at home is the freedom to customize your creations. I had some hemp protein powder on hand, so I decided to experiment by substituting ½ cup of the whole wheat flour with ½ cup of the hemp powder. This addition worked remarkably well, lending a subtle earthy note and an extra nutritional boost to the bread. While this substitution is entirely optional, and you can certainly use the full amount of whole wheat flour as specified, if you happen to have hemp protein powder, it’s definitely worth trying. It integrates seamlessly into the dough, enhancing the overall profile.
Now, let’s talk more about the bananas – the star of this bread. As much as I adore the delicate banana flavor in this loaf and eagerly anticipate making exquisite French Toast with it, my culinary imagination is already exploring other possibilities. I believe that replacing the mashed bananas with ½ cup of mashed sweet potatoes or even cooked, pureed lentils could yield equally delightful results. These variations would introduce distinct flavor profiles and additional nutritional benefits, showcasing just how adaptable and versatile this yeast bread base truly is. Imagine a savory lentil bread or a subtly sweet sweet potato loaf – the potential is endless!
The Role of Each Ingredient for Perfect Yeast Banana Bread
Understanding the purpose behind each ingredient is key to baking success. Here’s a breakdown of how each component contributes to this exceptional Yeast Banana Bread:
- Bread Flour: This is crucial for developing a strong gluten network, which is essential for trapping the carbon dioxide produced by the yeast. It gives the bread its characteristic chewy texture and allows for a robust rise.
- Whole Wheat Flour: Adds a delightful nutty flavor, increased fiber, and a more wholesome character to the loaf. It balances the bread flour, preventing the bread from becoming too light and giving it a satisfying substance.
- Salt: While often overlooked, salt plays a vital role in regulating yeast activity and enhancing the overall flavor of the bread. It strengthens the gluten structure and prevents the bread from tasting bland.
- Platinum Quick Rising Yeast: This specific type of yeast is formulated for faster activation and rising times, making the bread-making process more efficient. It’s the engine behind the bread’s airy, voluminous texture.
- Mashed Ripe Bananas: The primary flavor component. Using very ripe bananas (with plenty of brown spots) is crucial, as they are naturally sweeter and more aromatic, contributing maximum flavor and moisture to the dough.
- Honey: Beyond providing a gentle, natural sweetness, honey acts as a food source for the yeast, encouraging vigorous activity and a healthy rise. It also contributes to the bread’s golden-brown crust and a subtle depth of flavor.
- Large Eggs (at room temperature): Eggs add richness, moisture, and help bind the dough. Using them at room temperature is important as they emulsify more easily with other ingredients, leading to a smoother, more uniform dough.
- Melted Coconut Oil: This provides a lovely richness and helps keep the bread incredibly moist and tender. It also imparts a very subtle, pleasant tropical hint. Unsalted butter can be used as a substitute if preferred.
- Hot Water: The ideal temperature for activating the yeast. It needs to be warm enough (typically between 105-115°F or 40-46°C) to wake up the yeast, but not so hot that it kills the live cultures.
- Chopped Toasted Walnuts: An optional but highly recommended addition. Toasted walnuts provide a wonderful textural contrast and a complementary nutty flavor that elevates the banana and honey notes. Other nuts like pecans or even chocolate chips could also be fantastic.
Essential Tools: Why a Stand Mixer is Your Best Friend
When embarking on this Yeast Banana Bread adventure, there’s one piece of kitchen equipment that I cannot stress enough: you really need a stand mixer for this recipe. The dough for this bread is designed to be exceptionally soft and quite sticky. This high hydration is precisely what contributes to its signature light and fluffy texture, but it also makes hand-kneading an almost impossible task. Trying to work such a soft, sticky dough by hand would be incredibly messy and frustrating, making it difficult to achieve the proper gluten development.
A stand mixer, equipped with a dough hook, transforms this challenge into an effortless process. The hook efficiently kneads the dough, developing the necessary gluten structure for a perfect rise without you having to battle with stickiness. You’ll be able to scrape down the sides of the bowl easily once or twice during the kneading process to ensure everything is incorporated evenly. While a bread machine could potentially handle the kneading cycle, the stand mixer offers superior control, allowing you to monitor the dough’s consistency and elasticity closely. This precise control is key to achieving that smooth, elastic dough that will yield a beautifully risen and tender loaf every time.
Versatile Serving Suggestions for Your Homemade Loaf
One of the most appealing aspects of this Yeast Banana Bread is its incredible versatility. The banana flavor is present but not overpowering, meaning it can transition seamlessly from sweet to savory applications. It’s truly not “so banana-y” that it limits your culinary creativity. Here are some fantastic ways to enjoy your freshly baked loaf:
- For Breakfast & Brunch Enthusiasts:
- Classic Toast Perfection: Slice it thick or thin, then toast to a golden crisp. It’s an ideal canvas for classic toppings like creamy peanut butter, rich almond butter, a dollop of cream cheese, or a simple spread of butter and your favorite fruit jam.
- Cinnamon Sugar Delight: Brush slices with melted butter, sprinkle generously with cinnamon sugar, and briefly broil until bubbly and caramelized for a comforting treat reminiscent of childhood.
- Elevated French Toast: The slightly chewy yet tender texture of this yeast bread makes it an outstanding choice for French Toast. It absorbs the custardy batter beautifully, resulting in a rich, golden, and incredibly satisfying dish.
- Unexpected Savory Pairings:
- Gourmet Sandwiches: Don’t be afraid to venture into savory territory! The subtle sweetness of the banana bread can provide a unique and surprisingly delicious contrast. Try it with a classic ham and cheese, a slice of roasted turkey with avocado, or even a crispy bacon, lettuce, and tomato (BLT). You’ll taste the banana, but it often adds an intriguing layer of flavor rather than clashing.
- Soup’s Best Friend: Lightly toast a slice, perhaps with a touch of herb-infused butter, and serve alongside a creamy soup like butternut squash, sweet potato, or even a hearty lentil soup for an unexpected delightful pairing.
- Simple Snacking & Dessert:
- Simply Delicious: Enjoy a slice as is, allowing the subtle flavors and tender texture to shine through. It’s perfect with a cup of tea, coffee, or milk.
- Warm Dessert Treat: For a quick dessert, lightly grill a slice until warm, then top with a scoop of vanilla bean ice cream and a drizzle of warm caramel or chocolate sauce. The slight warmth and sweetness are irresistible.
Related Baking Adventures and Tips
- Five Layer Bars
- Half Batch Hazelnut Chocolate Chip Cookies
- How to Toast Hazelnuts
- Chocolate Yeast Bread
- Quick Soft Breadsticks
Recipe: How to Bake Yeast Banana Bread

Yeast Banana Bread
Anna
Pin Recipe
Ingredients
- 1 ¾ cups bread flour 8.5 oz
- 1 ¼ cups whole wheat flour**
- 1 teaspoon salt
- 1 packet Platinum quick rising yeast
- ½ cup 4 oz mashed ripe bananas
- 3 tablespoons honey
- 2 large eggs at room temperature
- 2 tablespoons melted coconut oil
- 3 to 5 tablespoons hot water
- ⅓ cup chopped toasted walnuts
Instructions
-
In the bowl of a stand mixer, combine flours, salt, and yeast. Stir well to ensure even distribution.
-
Add the mashed bananas, honey, eggs, and coconut oil to the dry ingredients and stir until just blended.
-
Gradually add hot water, 1 tablespoon at a time, until you achieve a very soft, sticky dough. It should be noticeably sticky and not dry, making it quite challenging to knead by hand.
-
Attach the dough hook to your stand mixer and knead the dough for approximately 8 minutes. Remember to scrape the sides of the bowl once or twice during this process to ensure all ingredients are thoroughly incorporated. The dough should become smooth and elastic. It will remain sticky and likely won’t completely clear the sides of the bowl, but it should have a noticeable snap and elasticity when you pull it away.
-
Cover the mixing bowl with plastic wrap or a clean kitchen towel and allow the dough to rise in a warm, draft-free place for 45 minutes to an hour, or until it has visibly doubled in bulk.
-
Once the dough has risen, add the chopped toasted walnuts and stir them into the dough, gently punching it down as you mix to redistribute the air.
-
Scrape the sticky dough into a well-greased (or foil-lined and greased) 9×5 inch loaf pan and gently press it down to form an even layer. Let the dough rise for a second time, for another 45 minutes, or until a beautiful dome has formed over the top of the loaf pan. This second rise is crucial for the final light texture. The bread will rise even more during baking.
-
Preheat your oven to 350°F (175°C). Bake the loaf for about 45 minutes. To prevent over-browning, you may want to shield the top of the loaf with foil after the first 35 minutes. The bread is done when it sounds hollow when tapped on the bottom, and an instant-read thermometer inserted into the center registers an internal temperature of 205°F (96°C). Once baked, remove from the oven and let it cool completely on a wire rack before slicing.
Notes
Essential Tips for Success with Your Yeast Banana Bread
Baking with yeast, especially for a unique loaf like this Yeast Banana Bread, can be incredibly rewarding. To ensure your success and help you achieve the perfect loaf every time, here are some crucial tips to keep in mind:
- Always Use Very Ripe Bananas: The riper your bananas are (think brown spots and a soft texture), the sweeter and more intensely flavorful your bread will be. Under-ripe bananas will result in a less sweet and less aromatic loaf.
- Monitor Water Temperature Carefully: The “hot water” for activating the yeast is critical. It should feel warm to the touch, like a comfortable bath. Aim for a temperature between 105-115°F (40-46°C). Water that’s too cold won’t activate the yeast, and water that’s too hot will kill it, preventing your bread from rising.
- Don’t Skimp on Kneading Time: The full 8 minutes of kneading in a stand mixer are absolutely essential. This process develops the gluten strands in the flour, which are responsible for creating the bread’s airy, elastic, and chewy texture. A well-kneaded dough translates to a superior crumb.
- Embrace the Stickiness of the Dough: This dough is intentionally very soft and quite sticky. Resist the natural urge to add more flour than specified, as this will lead to a dry, dense, and less enjoyable loaf. The stickiness is a sign of a properly hydrated dough that will result in a wonderfully light bread.
- Patience is a Virtue During Rising: Yeast needs sufficient time and a warm, draft-free environment to do its work. If your kitchen is on the cooler side, you can create a warm spot by turning your oven on for a minute or two, then turning it off and placing the covered dough bowl inside. Avoid excessively hot environments, which can cause the yeast to over-proof quickly, leading to a collapse later.
- Check for Doneness Accurately: While tapping the bottom of the loaf to hear if it sounds hollow is a good indicator, the most reliable method is to use an instant-read thermometer. Insert it into the center of the loaf; it should register an internal temperature of 205°F (96°C) for a perfectly baked loaf.
- Allow for Complete Cooling: It’s tempting to slice into a warm loaf, but for the best texture, allow the bread to cool completely on a wire rack before cutting. This allows the internal structure of the bread to set fully, preventing a gummy texture and ensuring clean slices.
If you try the Yeast Banana Bread, let me know!
I’m genuinely excited for you to experience baking and tasting this unique and incredibly delicious Yeast Banana Bread. Did you stick to the classic recipe, or did you explore adventurous variations like incorporating sweet potato puree or hemp protein? I would love to hear all about your baking journey, your thoughts on the texture and flavor, and any creative twists you decided to try. Please share your experiences, tips, or questions in the comments section below! Your feedback is invaluable and helps enrich this recipe for our entire baking community.
I am always experimenting, so I’ll be sure to post any updates or new variations to the recipe as they emerge. Happy baking, and enjoy your delightful homemade loaf!
